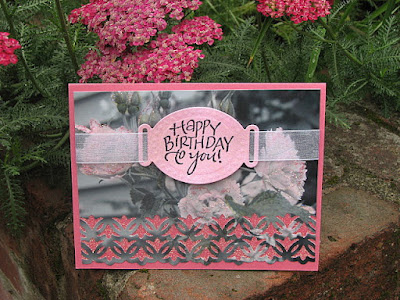
Our challenge for this month with Sparkle N Sprinkle, was to create a card using at least one glittery product and a greeting. I had done a Scrapbooking Convention with Margaret, about a month ago, and we demonstrated on how to add "bling" to photos. So I decided to go that route for my glittery card.
I took a photo out in my yard and sent it down to Costco, but had it developed in black and white, instead of color. I took four Copic markers: two pink, RV02 Sugar Almond Pink and RV42 Salmon Pink, 0 the Colorless Blender and G99 Olive and put color back into the photo.
Next I punched the bottom of the photo with the Tulip punch from EK Success.


Sparkle N Sprinkle has started to carry this great 2 1/2" tear-ific tape (SAT11). It is wonderful for making all kinds of backgrounds - just apply it to card stock and remove the protective backing and apply glitter, flocking, tinsel, even beads - it is very sticky and everything sticks to it! I took this tape and stuck it behind the punched area of the photo. I then applied Cyclamen Glitter (G1090) which stuck to the open areas of the punch.
Cut the photo down to 4" x 5 1/4" at this point, so it will fit nicely on to your finished card. Then using the Quickie Glue Pen draw around the petals and leaves of the roses and add different glitters (one at a time). For my card, I used Cyclamen (G1090), Bubblegum (G1088) and my all-time favorite SNS Glitter Sparkling Snow (G1003). When you want some bling, but don't need color - then he's your man! Put the photo aside at this point to dry (although it only takes five minutes). Meanwhile make the label for the card.
 Take a piece of pink card and stamp your sentiment in Staz-On ink. I used the saying Happy Birthday to You from the new Happy Birthday Set 416 from Sparkle N Sprinkle. A very versatile set, full of great sayings for every birthday occasion!
 Cut and emboss the saying with Spellbinder's Ribbon Tag Trio Two. Then take a Versamark pad and cover the entire label with the ink. Heat emboss with the "one and only" Sparkle Embossing Powder. It gives a lovely sparkly, intensified color to the label.
 Thread a piece of white organdy ribbon through the label as shown and using dimensionals attach it to the front of the card.
 Tape the ribbon down on the back of the photo with Tear-ific tape and then remove the protective backing of the 2 1/2" tape then you can go ahead and stick it down to your card front.
Here is the finished card:
I hope you have enjoyed making this card with me. I also hope that you will see the endless possibilities you have with your very own black and white photos. Have fun!


