Showing posts with label Using Dies as sticker. Show all posts

Wednesday, June 24, 2015

CIRCULAR BIRTHDAY WISHES!

Hi there,

Today I'd like to share with you a fun new way to use the Sparkle N Sprinkle Super Adhesive Sheets, some micro-fine glitters and a die!

h

This was seriously a lot of fun! Start by applying a 4" x 5 1/4" piece of Super Adhesive Sheet to a piece of white cardstock. Next take your choice of dies (I used Memory Box Large Ringlets) and run it through your machine cutting into the adhesive sheet.


Using an exacto knife, remove the "outline" of the rings:


... and apply Black Suede Velvet Glitter.
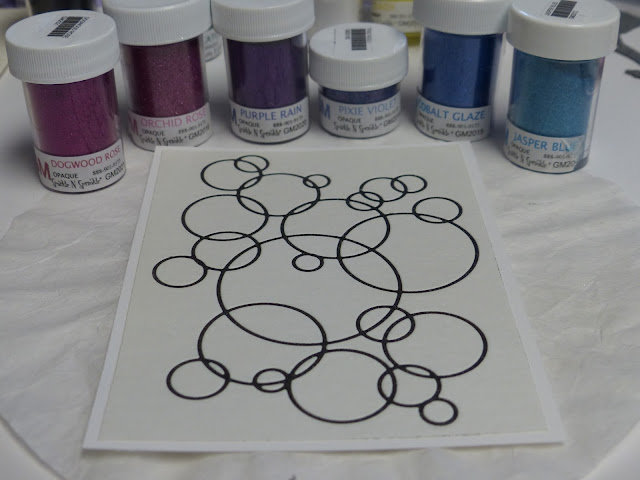

Next remove little sections of the rings, applying an odd number (sporadically) of the following Velvet Glitters:

Jasper Blue (GM2012)
Dogwood Rose (GM2021)
Cobalt Glaze (GM2015)
Orchid Rose (GM2016)
Pixie Violet (GM2018)
Purple Rain (GM2020)


After all the rings are "colored" in, then remove the protective backing for the entire background piece and apply Cloud Nine to the remaining sticky surface.


... the result:


Make a frame from black cardstock using the two largest dies of Spellbinders A2 Matting Basics A. Versamark is then applied to the frame and heat embossed with Clear Detail. The framed piece was then layered to a 5 1/2" x 4 1/4" piece of black cardstock.


The Ellentina "Happy Birthday" die was cut from black cardstock and heat embossed with Silver Lightning. The little banner was cut from a piece of scrap Super Adhesive Sheet (scraps of which I keep in an envelope) applied to a piece of white cardstock. The protective backing was removed and the die cut "Happy Birthday" was stuck down onto the sticky surface. Cloud Nine Velvet Glitter was then applied to the remaining sticky surface of the banner. This was attached to the card front with Dimensional Foam to finish the card.


Hope you've enjoyed my share today! Thanks so much for stopping by.

Shona

Friday, June 19, 2015

GLITTERED POPPY THANK YOU

Hi there,

Today I'd like to share a card using the glittered stencil technique. This time I used the Dreamweaver Fern and Flower stencil. My focal image is made using a Memory Box die, Perky Poppy, some Tear-ific Tape and Velvet Glitters. Hope you enjoy:


To make the background, I started with rubbing Hawaian soap to the stencil before placing a piece of sticker paper  to the stencil (the soap allows the stencil to separate easily from the sticker paper). I then started to "color" in the flowers (with Tiger Orange and Gypsy Red) and the ferns (with Lator Gator):


After the flowers and ferns were colored, I separated the sticker paper from the stencil and covered the entire piece with Daisy, which I'm sorry, I neglected to photograph.


For the focal image I used the Memory Box Perky Poppy Die. I stuck a piece of 2 1/2" Tear-ific Tape to a piece of white cardstock.


By running the prepared cardstock through the embossing machine with the die face down onto the protected adhesive, it results in a "sticker":


Use an Exacto knife to remove the outline first. I used the same colors of Velvet Glitters as in the background piece. So I began with Gypsy Red for the flowers and Lator Gator for the stems:


The petals were colored with Tiger Orange and Daisy:


Now you remove the protective backing from the rest of the Tape, and apply your preferred color - I chose to use Cloud Nine:


Burnish the Glitter in well with your finger.


To finish off my card, I decided to cut the Poppy out with Spellbinders Mega Ovals Large. I cut a strip off the fern and flower background and layered it to black cardstock. A white card base was too stark and so I edged the card base with 1/4" Tear-ific Tape and centered the black layer, applying Daisy glitter to the sticky edges.


The Sentiment (from Thanks a bunch Stamp Set) was stamped in Versamark on black cardstock and then heat embossed with Belgian Cream. I cut and embossed with the smaller of the dies from the same die set used for the poppy image. It was tucked behind the focal image, which was then attached to the card front with Dimensional Dots.


Hope you've enjoyed my share today and that I've inspired you to try this new "make your own stickers with dies" technique!

Let me leave you with a sneak preview of the other card I did today using the Memory Box Large Ringlets Die:


Have a great day!