Showing posts with label Card-making. Show all posts

Thursday, February 9, 2017

Teacup Pansies

Hi there,

Today, I'd like to share another card with you from the fabulous February Reveal. Today I chose to use the New Pansies in Teacup Set 833.
I decided to take a shot at watercoloring with the Distress Crayons on Kraft cardstock. As I would be working with water with the crayons, I began with stamping the image on the Kraft cardstock with StazOn Jet Black ink.
I used a Waterbrush to "paint" the crayon onto the image.
The handle of the Teacup and the little line was applied with glue, using the Nuvo Fine Tip Pen, this was left to dry till tacky and then I applied Nuvo Radiant Gold Gilding Flakes. OK, now what? Let's antique that teacup, shall we? Using a spatula, I put a nice thick layer of the crackled Texture Paste over the whole cup - yes I even covered up the Gold Flakes! Though I did leave the handle as it was.
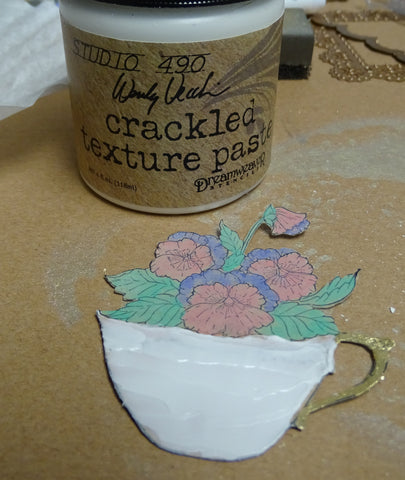
Now to bring those dull flowers back to life! I applied Brushable Glue to the leaves, Dimensional Glue to the flowers and Nuvo Sea Breeze Jewel Drops to the darker parts of the petals. Here is everything before it was left to dry overnight! A big messy blob!
Eight hours later: E voila!
Some Memento Desert Sand was sponged over the cracks of the cup before the cup was applied with Versamark, which was then applied with a coating of Clear Detail and heat set. But the magic happens after another application of Versamark and the Thick Clear Enamel! Ta Da!
OK, I think I'm happy with my focal image now! How about a background? In-keeping with the old and crackled look I decided to make a background using the Crackle Background Stamp Set 609, which was stamped onto Kraft cardstock in Versamark and heat embossed with Clear Detail
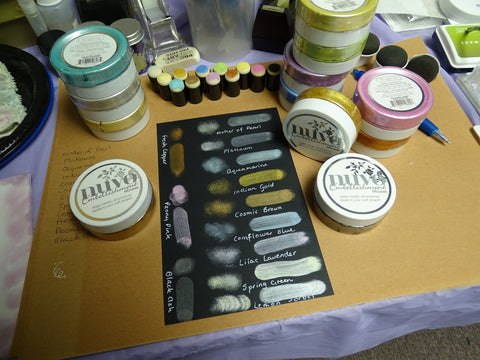
I then took a piece of black cardstock and die cut the Spellbinders Nestabilities Decorative Curved Square. But it needed some antiquing too! So I daubed on some Nuvo Mother of Pearl Embellishment Mousse - a recipe that you will see being repeated!!!
Loving my home-made wrought iron! Here is a look at what the other Embellishment Mousses do on black cardstock:
I found that dabbing the sponge on rather than rubbing it on, gave a nice mottled appearance which I liked. Now I have a whole new cardstock wardrobe!! A little of the mousse goes a long way too!
OK, so I digressed, but I really wanted to share my little metallic discovery! So let's put this card together, shall we?
So the crackle background was layered to the black card base with the wrought iron square taped down on top of that. A strip of cream pearled lace was placed underneath the wrought iron square, and simply snipped at the edges. The sentiment from the same Teacup Pansies Set was stamped in Versamark and heat embossed with Clear Detail. I just fussy cut that it - wanted the focus to be on the teacup. The sentiment was then popped up with mounting foam. It gave everything a pretty vintage look, I thought.
... and that finishes my card for today!
I'd like to enter this card in the following challenges:
Scrapy Land challenge # 59: Using a die that Scrapy Land carries
HeARTful Stamping: Feb 5th to 12th: For a Special Someone and a stamped image
Hope you've enjoyed my share with you today? Let me know in the comment section down below!
Big Hugs,
Shona

Wednesday, March 2, 2016

HAPPY MOTHER'S DAY!

No, I'm not away ahead of my stamping schedule!! It's already Mother's Day this Sunday in the UK, as it is based on when the 4th Sunday of Lent falls, traditionally called Mothering Sunday!

I had fun with this card, using a Dylusions Floral Flourish ( DYZ45830) set that had never been used, and some Sparkle N Sprinkle Glitters to come up with a relatively easy (if you like fussy cutting!) card.


To start, lay out all the pieces of flowers and butterflies on to an acrylic block and stamp on to glossy white cardstock in Versamark and then heat with White Detail


Then using Memento Inks with daubers, color in the flowers to your liking and then wipe of excess ink from the top of the embossing with a tissue. I used Cantaloupe, Pear Tart, Lulu Lavender, Lilac Posies, Bamboo Leaves, Rhubarb Stalk, Dandelion and Love Letter.


Once colored, fussy cut all the images. then using a Sakura Glue Pen add semi-transparent glitters to the pieces. I used Bubble Gum for the pink, Lavender Iris for the purple shades, Green Iris for the leaves and stems and Sparkling Snow on anything else and the butterflies.

Cut out Happy Birthday (we will the only use the Happy bit) from black cardstock using the Ellentina Cutting Die. Cut also the Mother's Day (Die-Versions) from black cardstock, I cut this from the inside of the black die cut frame of Labels Twenty-Five. Then add a piece of 2 1/2" Tear-ific Tape to white cardstock and run it through the embossing machine with the die cut one step smaller. Remove the protective backing and adhere the "die cut sentiment".  Apply Cloud Nine Velvet Glitter to the remaining sticky surface. I taped the black "frame" down on to a 5" x 7" glossy card base and used Dimensional Foam for the glittered sentiment.


Then it is just a case of positioning and layering the flowers, stems, leaves and butterflies as you like with tape or Dimensional Foam. You can also curl the leaves, petals or wings as you wish. Cut off any pieces that are hanging over the edge of the card.

Makes for an easy, but dimensional card:


Hope you've enjoyed my share today? Today I'd like to enter my card in the following challenges:

Dragonfly Journeys Challenge 46: Flower Power
Addicted to Stamps Challenge 121: Glitter/Bling
Our Crafty Corner #6: Anything Goes

Thanks for stopping by, please leave a comment to let me know you did. 

Till next time,

Shona


Monday, February 29, 2016

SPARKLE N SPRINKLE MARCH 1ST REVEAL

Hi there and welcome to the Sparkle N Sprinkle March Reveal. For my card today I chose to work with the new Lucky Charm Set 776 to create the easel wedding card below. I used chipboard sheets to make my own frame, horse shoes and dancing couple chipboard embellishments. I made a little Faux Fresco panel for the base of the card using the same Copic colors as in the image. Some Mon Ami Gabby Pull Ribbon was incorporated into the card also:


We have Three new stamp sets to share with you today.  These new sets are 20% off until March 3.  So once you finish the blog hop, head on over to the store and start shopping.  All of the new sets are available on cling mounted rubber or as a digital image.  

The sets are:

Honey Bees 775 (digi version DIGI775)
Lucky Charm 776  (digi version DIGI776)
 Donna's Stylin' Sayings 777  (digi version DIGI777)

On March 3rd, ONE GRAND PRIZE WINNER will be selected from the comments left on the Designers' blogs listed below. Please leave a comment with each Designer in order to be eligible for the Grand Prize.  You never know who the Mystery Designer will be that has the winning comment.

The Grand Prize Winner, which will be announced on the SNS Facebook page and on the SNS Blog, will receive ALL of the new stamp sets released this month (or the digi versions, if preferred).

The Blog Hop order this month is:


(*Tip: if you have difficulty with a particular link, try clicking on the Designer's blog title to send you to their Home page.)

We hope you enjoy the New Reveal Blog Hop as much as we do.  Thanks for joining us and remember to comment on each of the Designers' blogs to be eligible for the Grand Prize.  
 Wonder who the Mystery Host will be this month????

The Sparkle N Sprinkle Creative Challenge also begins today.  There are lots of prizes and recognition badges.  Come check out how you can become a SNS Featured Artist as well.  The theme is always Anything Goes using Loose Glitter, Embossing Powder, and/or Flock.


Have you checked out the SNS YouTube Channel featuring Demo Donna?  If not, then you are in for a real treat.  Subscribe today to get all the latest Demo Donna tips and techniques!


So now back to my card. I began with stamping t he horseshoe image in Versamark and heat embossing with Silver Detail. This gave a lovely detailed impression to then color in with my Copics.


I had thought that I would make this an easel card so I prepared a piece of card for the base panel using the same copics that I used for the image. I decided to do a Faux Fresco to give it a more muted look. First I embossed a piece of white cardstock with the Cuttlebug Musical Flourish embossing folder. This was then colored with several of the Copics on the raised part of the cardstock. To be honest it looked a little scary - but don't worry, the best is yet to come!


I then took some Acrylic White Paint and spread it over the entire piece with a palette knife.


Where did the Copic coloring go? Believe me it is still there! So set this aside to dry - I left it over night, while I continued with the rest of the card parts.

Next day, I sanded the piece. The paint on the raised parts will sand off and reveal some of  the base color. Which it did! Now cover the entire piece with Versamark and heat emboss with Sparkle.


Set the panel aside, while we work on the Chipboard pieces. After working with the Want 2 Scrap Chipboard embellishments, using cardstock with my dies just wasn't cutting it (see what I did there?)! So I thought ... what if? So I had a pack of unopened Recollections 40 point Chipboard sheets  - not too thick, but a lot more substantial than cardstock. It says on the dies that it can be used with thin Chipboard, so I tried it and it did:


The frame cut perfectly well and easily using the Spellbinders Label Ten die cut. The Lucky Horseshoes (Poppystamps) and the Sweet Petites - Dancers  (Die-Versions) had to go through two or three times. What I found was that if you turned the sandwich upside down as well as moving the position within the sandwich that it helped. The cuts came out very clean. I would not recommend trying to use a delicate, intricate die with the chipboard. Having said that, I am going to try more dies - just to see how intricate I can go! But this is all we need for this card, so I'll leave well enough alone at this point. 

The couple were applied with Versamark before being heat embossed with Silver Detail. Oh, and by the way, one really good thing about making your own chipboard embellishments - they don't leave burn marks on your Versamark pads! I gave them another coat of Versamark and applied Super Thick Silver to give them this nice shiny look.


The frame and the horseshoes were done the same way - with a coat of silver Detail first. If you do this, then the Super Thick Enamels tend to melt in rather than fly off when being heated from the top. I added some Verdigris to parts of the frame and three of the horseshoes were done in Verdigris, three in Super Thick Silver.


Now for the assembly! Make a base for the easel - 11" x 4 1/4". Folded at the 5 1/2" mark and then at the 2 3/4" mark.  Run the front panel fold through the embossing machine with the Label Ten die - put a piece of card across the fold so that it doesn't cut through past the fold. Then die cut the horseshoe image. Tape the image to the folded flap and then attach the frame to the image - I used 1/4" Tear-ific Tape.


To make the horseshoe ribbon bouquets, I took a length of the Mon Ami Gabby Pull Ribbon R08 and threaded the three big horseshoes to the base. For the three smaller horseshoes I used a smaller ribbon - R01.


Cut the Faux Freco panel down to the appropriate size for the base, to leave room for writing your message inside. Punch a hole in this panel where you want the horseshoe ribbon bouquet to go, thread the end threads through the hole and tape down, before attaching the panel to the base. For the little bouquet, I eased the frame up from the cardstock with an exacto knife and threaded the ends of the little bouquet through, so that the tape, between the image and the frame would hold the bouquet in place.


The couple were adhered with Dimensional Foam, The sentiment, from the same set, was stamped in Versamark and heat embossed with Silver Detail. This was cut and embossed using one of the smaller Labels Ten  dies and I edged it with the Coral colored Copic. This was also popped up on the base with Dimensional Foam. 


Hope you've enjoyed my share today, along with the rest of the design team's creations. 

I'd like to enter this card in the 
Stamping Sensations Challenge - Anything goes
.. and Our Crafty Corner Challenge 6.

Remember to leave a little love in the form of a comment on each of the blogs to be eligible to win these three fabulous sets. I'll be back soon to share what I've done with the other two sets - lots of fun projects this month! Here's a little sneak peak at one of them using the same dancing couple die.


Your next and last stop on the blog is Marie!

Till next time,

Shona

Monday, February 15, 2016

STENCILS, BLACK EMBOSSING PASTE AND NEON GLITTERS!

Today, I've got a new technique to share with you using a stencil, some Dreamweaver's Black Embossing Paste, the new Sparkle N Sprinkle Neon Glitters and some Want 2 Scrap Chipboard!


First I attached the TSC Designs Wild Lilies Stencil to a 11 1/2" x 11 1/2" piece of bright green cardstock.


Notice that I didn't tape it done all the way round - I found that this added a more funky, artsy look which went well with the glitters - in other words it was OK for the paste to go under the stencil a little! Apply the Dreamweaver black embossing paste over the stencil. Remove stencil and set aside to dry. I left mine overnight. Clean the stencil with soapy water.  When dry, replace the stencil, tape down again and using a paint brush go over each section with Brushable Glue that you want to "paint" with each color. I began with the flower petals that I was going to "color" with pink.


Remove the stencil carefully, and put it in soapy water, while you apply the first of the glitters - Exulted Pink! Shake off the excess glitter and put back into your jar, then leave to dry - it takes 10 minutes at the most. Clean off the stencil while you're waiting on it to dry.


On to Energized Orange! Replace the stencil and apply more glue where you want the orange glitter to go:


.... continue with Electrified Yellow for the stems and then finally with Exhilarated Green for the leaves. 


Now we get to play with the Want 2 Scrap Chipboard Pieces! Sparkle N Sprinkle now carries a wide variety of words and embellishments and bling from Want 2 Scrap. They are great for scrapbook pages!


Apply the Chipboard piece with Versamark and then heat emboss with Silver Detail. Then reapply the Versamark and this time heat from underneath with the Super Thick Silver (this will stop the bigger particles from flying off the word).


Now how to adhere them to the page? I've done it both with tape (the 1/8" Tear-ific Tape) and with Dimensional Glue, but what I've found as the easiest way is to give them a background to stick to. In this case I chose to use Spellbinders Classic Scalloped Hearts. I applied a piece of Super Adhesive Sheet to a piece of hot pink cardstock and ran it through my embossing machine. The smaller hearts were able to fit on the 2 1/2" Tear-ific Tape.


Remove the protective backing of the tape and stick the word (or words) down before applying the pink glitter to the remaining sticky surface.


The hearts with their words were attached with Dimensional Foam So now how are we looking?


1/4" Tear-ific Tape was attached around the edges of a 11 3/4" square of the hot pink cardstock and then the page was centered on top before being applied with the Neon pink around the sticky surface. This was then attached to a 12" x 12" black Scrapbook page.


I didn't want to cover up, or clash with the colors of the fun flowers, but really needed to make it into a "Scrapbook" page, so I had a black and white wallet size photo made of a photo a couple of years back of David and me. I made a little frame the same way as the hearts using Spellbinders Classic Rectangles Small.


There was an annoying little black piece in the photo in the top corner, so I covered it up with another little scalloped heart. I used the inside of the little frame to die cut it from.


.... and that finished off my page. I was going to do 25th (for a Silver Wedding), but I really loved the look of the flowers and wanted to leave it open as much as possible. 

I'd like to enter the Challenge at Our Crafty Corner with my scrapbook page.


Here's a sneak peak at my next project. Using a Dreamweaver stencil this time and painting on top of the paste with a paint brush instead of through a stencil. This worked better for a card size project as it was more detailed.


Hope you've enjoyed my share today! See you again, later in the week!

Hugs,

Shona