Tuesday, May 31, 2016

SPARKLE N SPRINKLE'S JUNE 1ST REVEAL

Hi there, and welcome to the Sparkle N Sprinkle June 1st Reveal! Today we have three lovely flower sets to share with you. I chose to work with the Wild Rose Set 785 for my reveal card this month, making things a little more feminine than usual!


These new sets are 20% off until June 3.  So once you finish the blog hop, head on over to the store and start shopping.  All of the new sets are available on cling mounted rubber or as a digital image.  

The sets are:


 Roses 784 (digi version DIGI784)
  Wild Rose 785 (digi version DIGI785)
   Country Flowers 786 (digi version DIGI786)


On June 3rd, ONE GRAND PRIZE WINNER will be selected from the comments left on the Designers' blogs listed below. Please leave a comment with each Designer in order to be eligible for the Grand Prize.  You never know who the Mystery Designer will be that has the winning comment.

The Grand Prize Winner, which will be announced on the SNS Facebook page and on the SNS Blog, will receive ALL of the new stamp sets released this month (or the digi versions, if preferred).

The Blog Hop order this month is:

(*Tip: if you have difficulty with a particular link, try clicking on the Designer's blog title to send you to their Home page.)


We hope you enjoy the New Reveal Blog Hop as much as we do.  Thanks for joining us and remember to comment on each of the Designers' blogs to be eligible for the Grand Prize.  
 Wonder who the Mystery Host will be this month????


The Sparkle N Sprinkle Creative Challenge also begins today.  There are lots of prizes and recognition badges.  Come check out how you can become a SNS Featured Artist as well.  The theme is always Anything Goes using Loose Glitter, Embossing Powder, and/or Flock.


Have you checked out the SNS YouTube Channel featuring Demo Donna?  If not, then you are in for a real treat.  Subscribe today to get all the latest Demo Donna tips and techniques!


For my card today I began with stamping the wild rose image on vellum in Versamark ink and heat embossed with White Detail. I turned over the vellum and used four Copics (V12, YG11, YG03, R21) to color on the back of the embossed image. 


Then I went on to the frame, I took a piece of white cardstock and die cut with the Die'sire: Aurora die. The center circle was a perfect size for the image. Then I took some Memento Angel Pink, and Lulu Lavender inks and rubbed both pads directly on to the cardstock. 


After I thought it had enough color, I decided to apply Versamark to the entire piece and heat emboss with Clear Detail, which resulted in a nice shiny look.


The image was cut with Spellbinders Standard Circle which happened to be just slightly larger than the cut out in the frame. I attached it to the back with a little tear-ific tape to hold it in place, before placing the entire frame down on a piece of 5 3/4" x 5 3/4" Super Adhesive Sheet. The new Hyacinth glitter was then burnished in to the sticky spaces.


The sentiment from the same set was stamped in Versamark on white glossy cardstock and was heat embossed with one of my favorite Tuscany embossing powders, the fine detailed Concord. It was then die cut using the Spellbinders Ornamental Tags One. A little Lulu Lavender ink was daubed over the die before removal, which gave the little tag some purple highlights. 


Some Crushed Grape Nuvo Crystal Drops were added to the tag for extra bling!


Creative Expressions (Sue Wilson) Olive branches were die cut from glossy white cardstock and were decorated with Nuvo Glitter Drops: Purple Rain, for a little more bling!


So then I started the put the card together. I tied a lace ribbon around the left side. I placed the three little flowers by the edge of the frame, using white brads on top of which I added White Blizzard and Purple Rain Nuvo Glitter Drops. The olive branches were tucked in behind the flowers as shown.


The sentiment was added with Foam Squares for dimension. This was all layered to a 6" x 6" piece of glossy white cardstock.


I found the image to be "washed out" with not enough pop for the rest of the card, so decided to add some sparkle to the image. Using Mountain Mint, Lavender Iris and Orchid glitters, which I applied with the Sakura Glue Pen, it turned out like this:

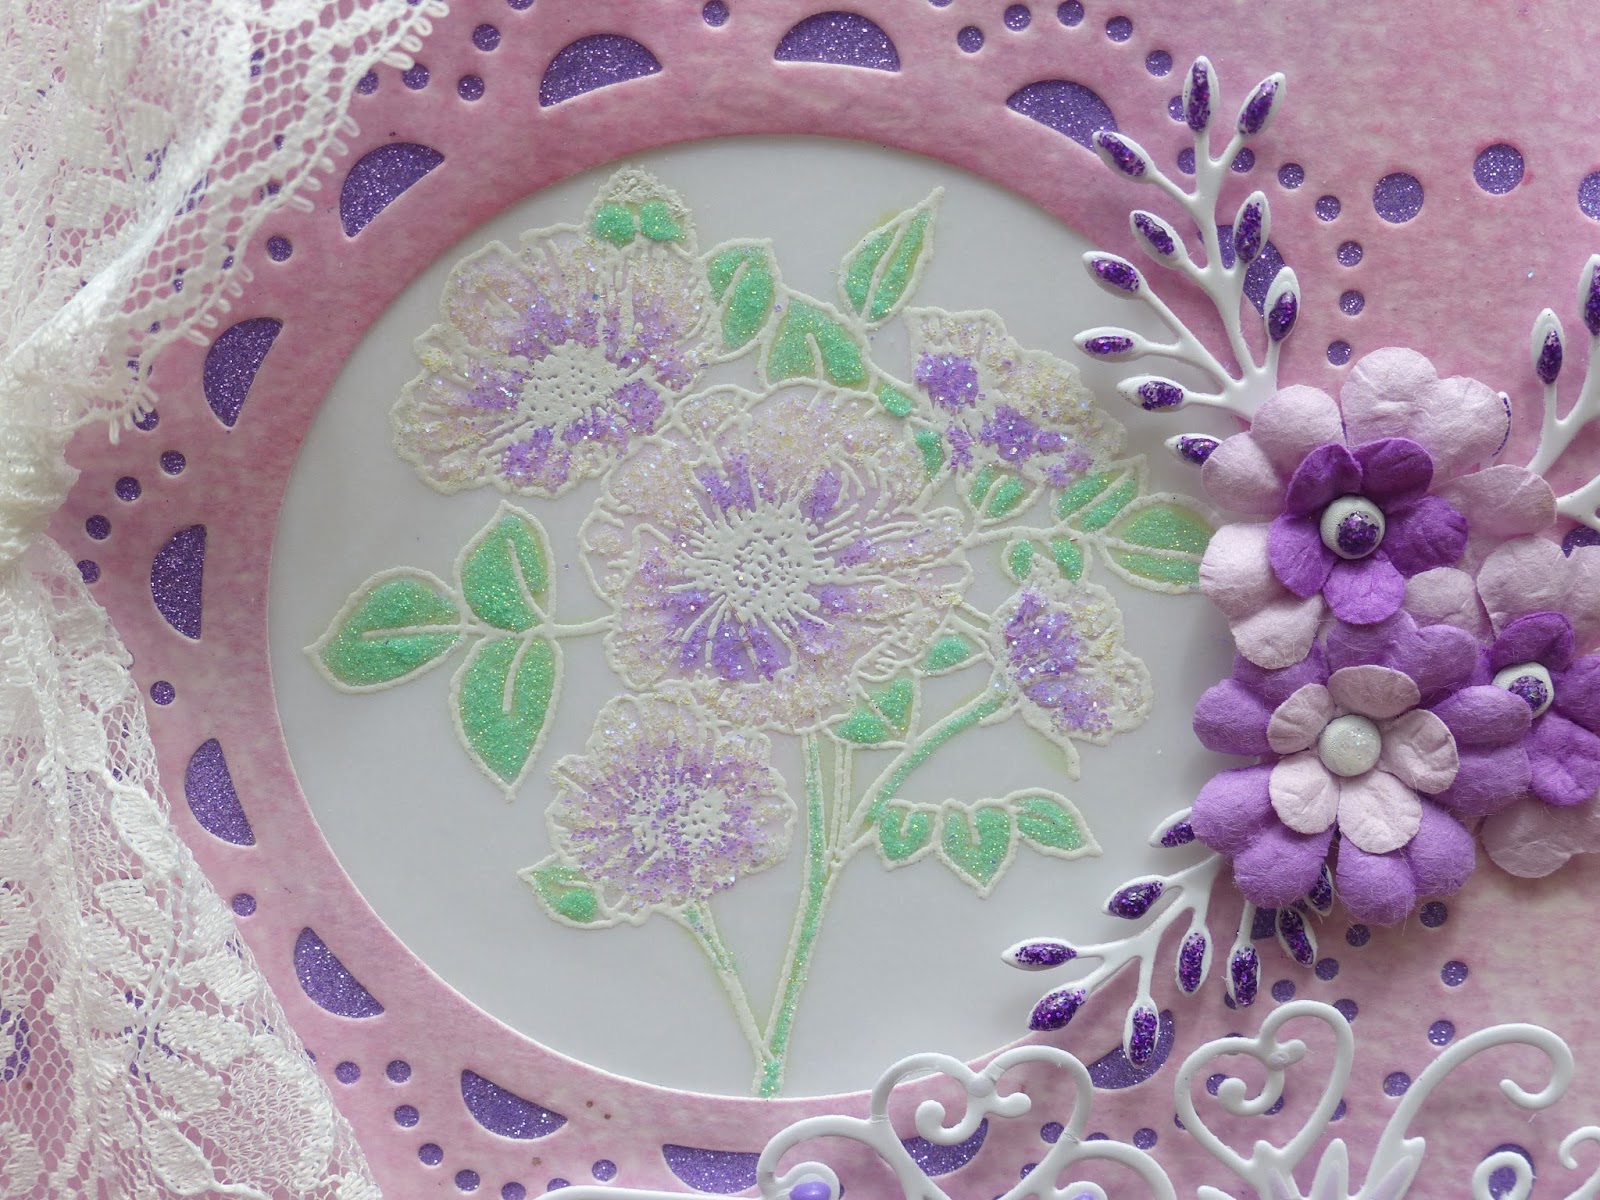
Much better! Don't you agree? So that finishes off my card for the Reveal. 

I'd like to join in the following challenges:
Die Cuttin' Divas Challenge # 268: Anything goes with die-cuts
Simon Says Stamp: Monday Challenge: Monochrome
Scrapy Land Challenge #43: Anything goes using dies that Scrapy Land carries - Die'sire: Aurora, Creative Expressions (Sue Wilson) Olive branches, Spellbinders Ornamental Tags One, Spellbinders Standard Circle


Your next stop will be Marie. She has a beautiful creation using the Country Flowers Set 786. Remember to leave a comment on all the blogs to be eligible to win all three of these pretty floral sets! Good luck!

See you soon,

Shona

Thursday, May 26, 2016

NASTURTIUM SYMPATHY

Hi there,

Today I'm sharing a sympathy card made with the May reveal Nasturtium #2 Set 783.

Nasturtium Sympathy

To begin with, I stamped the nasturtium panel in Versamark on black cardstock and heat embossed with Gold Detail.

Nasturtium Sympathy

I put some bleach into my Waterbrush and colored in the leaves. I let the bleach do it's magic! If you go over areas a couple of times, it will give varied results in the colors. Because the embossed lines are raised, the bleach tends to stay within the lines more easily than if were just stamped.

Nasturtium Sympathy

I made a second panel exactly the same way and then for the third panel, I colored in the flowers instead of the leaves! After trimming the three panels, I taped them together (turning the flower-colored one the other way) and attached them to a piece of Gold Mirror Cardstock.

Nasturtium Sympathy

I made a little sheer gold bow (with my Craft-Dee BowZ tool - this makes these awesome little bows so easy to do!) and attached it to the corner of the base of the card. Then a big gold brad was attached to the center of the bow, through the panel. It was then layered to a black card base.

Nasturtium Sympathy

The sentiment, from Sympathy Set 579, was stamped in Versamark and also heat embossed with the Gold Detail. I cut out the saying using the Spellbinders Media Mixage Die (MD2-001). Then I took the Versamarker and edged the die cut with Gold Detail. This gave a bit of a distressed look to the sentiment. This was then tucked under the bow and attached with a Foam square to give it a little dimension.

I'd like to join in on the following challenges:
Aurora Wings Challenge #29: Clean and Simple
Craft-Dee Bowz: May Challenge: Use a handmade bow
Our Crafty Corner: Challenge #9: Anything goes


Nasturtium Sympathy


Hope you liked my share today.

Till next time,

Shona

Monday, May 23, 2016

NASTURTIUM BIRTHDAY WISHES!

Hi there,

I needed a quick birthday card this morning, so I went up to my stamping room to see what I could rustle up!


I found another copy of the printed color version of the border stamp from the Nasturtium # 2 Digi Set 783, which I cut down to 3 1/4" x  4 1/2". I layered that to a piece of yellow cardstock (3 1/2" x 4 3/4"). The two layers were sent through the embossing machine with the Crafts-Too Tropical Flowers embossing folder. I sanded the raised pattern, before applying Versamark to them and then Clear Detail was applied and heat embossed. This gave a lovely shiny, textured finish:


This was then layered to red cardstock, and I tied a sheer red ribbon in a knot on the left side. This was then layered to yellow before the white card base. The sentiment from the Silhouette Set 493 was stamped on to glossy white cardstock in Versamark and was heat embossed with Red Apple. It was die cut using a Spellbinders Media Mixage die. Before removing the die, I sponged the sentiment with a little Memento Dandelion ink.


That finished my quick card for the day, which is already on it's way to the recipient!

Be back soon,

Shona

Thursday, May 12, 2016

ALL OF YOUR HEART

Hi there, 

Today I am sharing another card using the beautiful Nasturtium Set 783 #2 from the May reveal.

All of Your Heart

I used the colored digi version of the Nasturtium border stamp again, enlarging the size quite a bit. I then ran the piece through Crafts-Too Tropical Flowers embossing folder and sanded the color off the raised flowers.

All of Your Heart

The piece was then covered with Versamark and heat embossed with Clear Detail. Next I went on to the Want 2 Scrap Round Flourish Chipboard frame. This was also applied with Versamark and then heat embossed first with Black DetailVersamark was reapplied and then Dalmatian embossing powder was heated from the underneath, as this is one of the Ultrathick enamels. This gave the frame a lovely speckled effect.

All of Your Heart

The flower panel was cut to fit into the inner circle of the frame, I used 1/8" Tear-ific Tape to hold the edges down. I then took a piece of 5 1/2" square black cardstock and centered a piece of 5" square Super Adhesive Sheet on top. I laid the framed flowers on the square at an angle and stuck it on to the very sticky surface of the adhesive.

All of Your Heart

Black Suede Velvet Glitter was then burnished in to all the nooks and crannies of the remaining sticky adhesive. This gave the cardfront a soft and sparkly surface.

All of Your Heart

The sentiment was stamped in Versamark on to white cardstock and was heat embossed with Black Detail. It was die cut with a Spellbinders Grommet Tag and before removing the die I sponged on some Memento Lady Bug and Morocco inks.

All of Your Heart

Mon Ami Red Pull Ribbon was threaded through the tag and was attached behind the black card front. The sentiment and ribbon were attached with Dimensional Foam. the card was then layered on red and then a white card base to finish.

I'd like to play in the following challenges:
Crafting for all Seasons #126: Add some embossing
The Sisterhood of Crafters: No Design Paper

Hope you've enjoyed my share with you today.

Till next time,
Shona

Wednesday, May 4, 2016

BLACK AND WHITE WITH DIGIS

Hi there,

Today, I want to share another recent attempt with the digi sets from the Sparkle N Sprinkle May reveal. Digi's have always been a challenge for me - as I don't do them often enough to remember how to work with them. Anyway, I persevered and managed to make a couple of masculine cards with the two fishing sets this month: Gone Fishin' Set 778 and Just Go Fishing Set 779.


I thought that the sentiment from the Just Go Fishing Set was perfect for a Father's Day card, so that is what I did with this one!

I printed out the silhouette image on white cardstock. The sentiment was printed on Vellum. I cut the sentiment to a 4 1/4" square and attached it on top of the silhouette image with four tiny black brads. I then trimmed the image down so that it had a 1/4" edge beyond the vellum.

The black and white dotted designer paper was layered to a 5 1/2" x 5 1/2" black card base. The image and sentiment was attached with Dimensional Foam. The Happy Dad's Day sentiment from the Fishin' with Dad Set 501 was stamped in Versamark and then heat embossed with White Detail. It was also attached to the card base with Dimensional Foam. A little black and white baker's twine was added to the left side of the card to finish off the card.


My second card today was pretty much done in the same manner.  I printed out the image from the Gone Fishin' Digi Set 778 on to white cardstock. As soon as it came out of the printer I applied Black Detail embossing powder to the wet ink and then heat set it. This makes the black more vivid behind the vellum.


The image panel was cut down to 4 7/8" x 3 7/8". The vellum panel was cut to 5 3/8" x 4 1/8" - once the vellum was attached to the image panel by the little square brads, the panel was attached to an A2 sized black card base with Dimensional Foam.


Hope you've enjoyed my adventure with fishing and digis today!

I'd like to enter my first card in the following challenges:
Cardz 4 Guys: Challenge 118 - Monochrome
Fantasy Stampers: Challenge 61 - Monochrome

Till next time,

Shona