Thursday, May 23, 2019

Let's Shellabrate!

Hi there,
As many of you may already know, Sparkle N Sprinkle is closing her doors. This will be my final post for Margaret and the Company. Today is a sad post for me as I have been a designer with the company for many years. I have had such a wonderful time, highlighting all their gorgeous stamp sets and the products that they brought on board throughout the years. I really want to thank SNS for making me think out the box, to try new techniques and even coming up with new techniques. I've loved every minute. Many things had to change as technology grew and I had to keep up with the times - I had to become a blogger and a facebook user and I will continue to do this as I have found many special friends in both areas. My rubber stamping days started at a Stampin' Up party I hosted one night a mere 23 years ago. I was immediately hooked after which I had cards published in magazines and it was then when I had used one of very first SNS golf sets that Margaret asked in her newsletter if anyone knew me! I've been with the company ever since. I have so enjoyed working with Margaret and the company, not only as a designer, but working some conventions too. 
Anyway, enough about me - on to the card for today, where we are using the beautiful Nature of the Beach Set 929 and a left over piece of netting (which I got from a neighbor to make a special shaker for my bees!)

When I was using it for what I needed for the bees,  I immediately thought of fishing netting and how it would work with the shell set. I partially heat set it in to super thick embossing powder, Blue Bird (EP471).


These ultra thicks should be heated from the bottom to prevent them from flying off the cardstock. Laying the netting on the top of the white cardstock, adding the embossing powder and gently heating it from the bottom.  Once it starts melting you can apply a little heat to the top which will melt the netting and make it look distressed. I then applied Frosted Lawn (EP475) to add in some green. 


The shells were then stamped with Versafine Clair Acorn using the stamping platform. 


The shells and turtle were colored with Copics and then applied with Versamark and then heat embossed with Sparkle (EP107).


Nuvo Jewel Drops Rose Water  and Crystal Drops Sugar Almond were then applied.


The Cheery Lynne die was cut from black cardstock and then the sentiment from the set was stamped in Versamark (after the piece was wiped with the anti-static bag). This was then heat set with White Detail (EP198).


Everything was then assembled. The white card front was attached to a black card base. The shells, turtle and sentiment were attached with mounting foam for dimension and then the Nuvo Drops Apple Green and Dazzling Blue were applied randomly around the card front.


Below is a list of the products that I used today. There is a closing down sale going on right now that you may wish to take advantage of. Many of these products may still be available.
Nuvo Crystal Drops: Sugared Almond, Apple Green 
Copics
Cheery Lynne Horizon Fishtail Banners Die
Mounting Tape
Fish net
I thank each and everyone of you that have been on this Sparkle N Sprinkle journey with me. I hope to keep creating and blogging and keeping up with all of you too!

I'd like to play along in the following challenges with this card:
Craft Stamper: Make It Take It May Challenge: ATG
World Wide Open Design Team Challenge #05: ATG
Classic DT Open Challenge #4 May: ATG
2 Crafty Critter Crazies Challenge #26: Use a critter (Turtle)
MIUCB #25: Anything goes + mixed media
JFF May 2019 Challenge: Celebrate Women + 3 Layers
Cardz 4 Guys: Challenge 220: Beside the Sea
Till next time,
Shona

Thursday, May 16, 2019

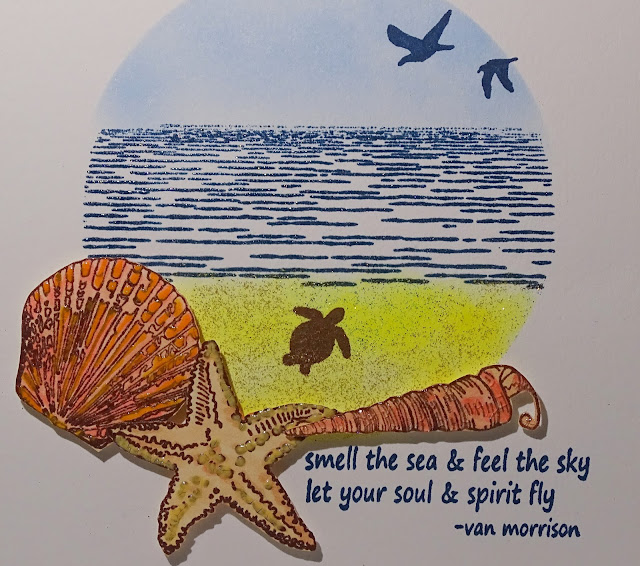
Smell the Sea

Hi there,
Thanks so much for stopping by today. I'd like to share a Sparkle N Sprinkle card with you using two of our May release sets, Sand Dune Silhouettes 940 and Nature of the Beach 929 along with an older set Wetlands 1 790 

I started with making a mask, by die cutting a circle (Lifestyle Nested Circles) and using the frame part, taping it lightly to my white cardstock square. 

I positioned the "water" in the stamping platform so that it would stamp in the middle of the circle. I stamped with Versafine Clair Twilight and heat embossed with Sparkle. 

Memento Sky Blue was sponged on for the sky. 

After inking the bottom third with Versafine Claire Cheerful I sprinkled on some Celestial Glitter which attached to the Versafine like an embossing powder. This gave a shimmery, sandy look. 

The mask was then removed and the birds and the sentiment were then placed on the stamping platform and stamped in Versafine Clair Twilight, I then heat embossed the sentiment with Sparkle. 

1/4" tear-ific Tape edged a 5 3/4" square piece of card and after attaching the scene to the middle, Autumn Frost was burnished in to the sticky edges. The little turtle was stamped on the beach with Versafine Clair Acorn ink. I inked and stamped a couple of times to give it good coverage on the textured sand.
 
The shells were stamped in Versafine Acorn and were colored with Copics. Nuvo Crystal Drops Ripened Pumpkin, Sugared Almond and Jewel Drops Rose Water were then added to the shells for some dimension. Once dry they were mounted to the bottom of the scene using foam tape. 

That finished off my card for today. 

Below you will find all the products that I used in my card and those with a link can be found over at the Sparkle N Sprinkle website. You can use my code ShonaDT10 for a further 10% of your purchase.
Memento Summer Sky
Lifestyle Nested Circles Dies
Copics
Hope you'll come back to visit again soon. Thanks again for stopping by!

Shona

Thursday, May 9, 2019

Take Time to Relax!

Hi there,
I'm so glad you stopped by today. My card today features three Sparkle N Sprinkle Stamp Sets, two from the May Reveal: Cruisin' Digi 949Sand Dune Silhouettes 940 and one older Set 404, Ocean Treasures. This card shows not only how to work with more than one stamp set at a time, but also how digis and rubber can work together.


To begin with I printed out the version of the Cruisin' digi. After fussy cutting the car I applied Versamark and heat set with Clear Detail. I repeated this step and then after applying Versamark a third time, I heat set with Super Thick Clear. You need to heat from beneath to stop the thicker granules of embossing powder from flying off the project. This gave our car a lovely shine. 


I stamped my sand dune scene, starting with the sand dune stamp and then the grasses in the bottom left, then the little grass from the Ocean Treasures Set in the bottom right. All of these stamps were stamped in Versafine Clair Acorn. I then cut a line along the horizon of the scene.


Memento inks were applied directly to paper to color the sand.


When the inks were dry I took a brush and applied Brushable Glue on top of the sand and applied Sparkling Sands Flocking to give the sand some texture and sparkle.


The sentiment and birds were arranged on the stamp platform and were stamped with the Versafine Clair Acorn Brown again directly to the blue cardstock that I was going to use as the background.


The blue panel was attached to a Kraft card base then the sand dune scene was taped down with 1/4" Tear-ific Tape. The car was added with mounting foam to finish off my card for the day.


Listed below are the Sparkle N Sprinkle products used on my project that you will find on the website. You can use my personal code ShonaDT10 at checkout for a further 10% off these products and anything else that catches your eye!.

Ocean Treasures Set 404
Memento Inks: Desert Sand and Toffee Crunch
Mounting Tape

I'd like to join along in the following challenges:
Thanks again for stopping by. I do hope I've inspired you to try mixing stamp sets and using both the digis and stamps. I think this will make a fun Father's Day card!

Shona

Wednesday, May 8, 2019

Decorate Your Holidays

Hi there,

Welcome to my first May post! My May header is not from my backyard, but from a visit to the Cream Ridge Tulip Farm, New Jersey. I am here today to share my May Christmas card for the Christmas at Sweet Stampin' Design Team. Please stop over to see what the rest of the Design Team has created and join in the challenge where there is an optional twist of snowflakes for May. 

I have lots of snowflake paraphernalia, so ended up using Hero Arts baubles (with snowflakes) stamps, a Darice snowflake embossing folder, a Tutti Design Arched Fir branch (with snowflakes) and a Martha Stewart snowflake punch!


I began by die cutting the branch from Kraft cardstock, sponging with Versamark and heat embossing with Sparkle.


Next I stamped the baubles using Versafine Clair Golden Meadow, using my Stamp Platform, and then heat embossed them with Gold Detail. These were then fussy cut.


I embossed the white cardstock with the Darice embossing folder and then stamped the sentiment at the bottom of the cardstock with Versafine Claire Golden Meadow and heat embossed with the Gold Detail. The edges of the cardstock were then applied with Versamark and heat embossed with Gold Detail.


The Martha Stewart punched border was covered in Versafine Claire and heat set with Gold Detail and was wrapped around the back of the gold-edged panel.


The panel was attached to a white 5" x 7" card base and then I attached the fir branch with bits of 1/8" Tear-ific Tape. The baubles were attached with mounting tape.

That finished my card for today. Hope you've enjoyed my project.


Below is a list of the products I used:

Hero Arts Decorate Your Holidays
Versamark
Versafine Clair Golden Meadow
Gold Detail (EP168)
Sparkle (EP107)
⅛” Tear-ific Tape
Tutti Designs Arched Fir Branch
Martha Stewart Snowflake Punch
Darice Snowflake Background embossing folder
Mounting Foam

I'd like to play along in the following challenges:
The Holly and the Ivy Challenge #49: Anything Goes
World Wide Open Design Team Challenge #4: Anything Goes
Christmas Cards All Year Round: May - Ornaments


Thanks for stopping by today, I'd love to hear what you think of my card.

Till next time,


Shona