Wednesday, January 25, 2017

Don't be afraid to stick your neck out!

Hi there, 
I'm here today to share with you a card I made using one of the January Reveal Sets 817: Milton the Friendly Giraffe.
I started with the background. I ran a piece of Kraft cardstock through my embossing machine with the Cuttlebug Animal Print embossing folder. Once it was embossed I took the Memento Rich Cocoa ink pad and ran that directly over the raised pattern.
So on to Milton (our Friendly Giraffe!). I took a piece of 2 1/2" Tear-ific Tape and attached it to a piece of white cardstock. After removing the protective backing, I covered the sticky surface with Buff Flocking. Milton was then stamped directly on top of the flocking with the Memento Rich Cocoa ink. I "colored" Milton using Copics (YR02, C7, YR00, E35). When coloring on top of the flocking, you gently dab the image with the side of the marker instead of using the point of the marker. Once he was colored in, he was taped down to the embossed background.
  
I wrapped a piece of sheer gold ribbon around the right side of the background and added a strip of 1/2" Tear-ific Tape down the center of the ribbon and once the protective backing was removed I applied Golden Wheat Velvet Glitter.
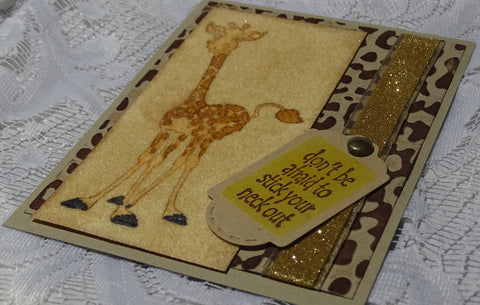
The sentiment was stamped on Kraft cardstock with Versamark and was heat embossed with Teddy Brown. This was die cut using the Spellbinders Framed Tags One. I sponged some Memento Dandelion Yellow ink before removing the die. This was then attached to the ribbon strip with a brass Brad. The card front was then layered to a Kraft card base.
 
That finishes my card for today. Hope you've enjoyed your visit today. 
I'd like to enter my card in the following challenges:

Thursday, January 19, 2017

"Clearly" With Love!

Hi there,

Today, I'd like to share something a little different. I was cleaning up in my stamping room/and everything else room (luckily I have a split wall and I'm behind it) The rest is a complete utter mess right now! February's project maybe???? As I was putting things in their correct places I came across this product that I didn't even know I had "Clearly For Art: Modeling Film". So I decided to give it a go! After you stamp, you can color with alcohol inks and then heat set it, and actually mold it into whatever shape you like!


So I started off with the flowers and leaves from the Sparkle N Sprinkle Build-a-Flower Set 811. You need to use Archival Jet Black Ink for this technique.


I actually rubbed off the veins (using the alcohol blending solution) from the leaves before using them, as I thought it would have competed with the veins in the flowers. I stamped the flowers and leaves from Set 811 and then used Adirondack Inks: Meadow, Lettuce for the leaves and Cranberry and Purple Twilight for the flowers. Just daubed them on with a little blending solution.


I wanted the flowers and leaves to have center stage and so looked for something to display them on. I found the Poppy Large Circle Burst Die. Punching holes in the three leaves first and combining it with the big flower and threading it through the front of the Circle Burst, then the two other smaller flowers were positioned on either side:


The sentiment from Blossom Sets 429 was stamped in Versamark and then heat set with Belgian Cream on the black card front. All the corners were cut off at this point with the corner rounder.

A sheer green ribbon was threaded through on the opposite side of the flowers.


I then decided that it should become an easel card at this point.


Nuvo Jewel Drops: Pale Periwinkle and Key Lime were added to the corners of the card front. The sheer Lime Green Ribbon was just mounted on top of Mounting Tape to give the Easel it's "stop". "With Love" from Wetlands 2 Set 791 was stamped above the "stop".


That completes my project for today!

Hope you've enjoyed your stay today, please let me know in the comment section.

I'd like to share my project over at the following challenges:

Craft Rocket Challenge #31: Add a Bow
Fab and Funky Challenge #334: Must use a Bow
Craft-Dee-Bowz January 2017 Challenge: Use a hand-made bow
World Wide Open Design Team Challenge January 15th: Anything Goes

Big hugs,

Shona

Friday, January 13, 2017

Musical Happy Birthday!

Hi there,

An extra post from me this week. We had a special little lady turn 21 last Monday. She has brought us so much joy over the years - it has truly been a wonder to watch her grow from baby to the beautiful lady that she has become. Her passion is music: handbells and singing, for which she is undergoing a five-year program at Westminster Choir College, NJ. We look forward to seeing what the road ahead has in store for this exceptional young woman!


I wanted to have a music theme for her card, so I started with a burgundy background - purple is Gillian's favorite color! Next I found a lovely piece of music DP, which happened to have some color at the edges, which worked in well with the base card. Found this old Hero Arts Bird Collage stamp which I stamped in Ranger's Archival Ink onto white cardstock. Then I went to town with the Art Anthology Paints (Vegas Gold, Pumpkin Spice, Coral and Leaf) and colored in the bird and the flowers and leaves with those and set it aside to dry.


After it was dry (maybe half an hour at most) I die cut the image with Spellbinders Floral Ovals, and left the die in place while I sprayed the Art Anthology Sprays (Timeless, Wild Orchid and Rustic) over the top. The sprays dry very quickly and then I took the Nuvo Fine Tip Glue Pen and added some Sparkling Snow Glitter to the flowers and leaves on the image. I wanted to add some flowers to the card and I happened to have some that had musical notes on them (though I'm not sure where I got them from!). Anyway, I sprayed them with the same three colors. When they were dry I used a paint brush and applied some Brushable Glue to some of the petals and added Cloud Nine.


I tried to find something with music, but couldn't find anything for the card front, so did this on the inside with Versamark, Black Detail embossing powder and the same three sprays carried over from the front. The row of birds and sentiment is from the Bird Song Set 496 from Sparkle N Sprinkle.


The sentiment on the front was a challenge! I wanted to use the Happy Birthday die, but I wanted to have different layers on the card front, so knew it wouldn't be good to just glue it down. So I took the smaller die from the SB Floral Ovals and sprayed the inside before removing the die, then I used the little oval from the Spellbinders Classic Ovals Large and cut out a scrap of Super Adhesive Sheet. This was then attached to the center of the sprayed floral oval. I die cut the Happy Birthday (from the burgundy cardstock) from Sizzix Thinlits Celebrate and positioned it on top of the adhesive and then applied Cloud Nine Velvet Glitter to the remaining sticky surface.


Then everything was put together. The image was put on first to the music DP, with foam squares. Then the flowers were attached with brass brads. The little ivy stems (Creative Expressions Craft Dies) were cut from white cardstock and sprayed with the same three sprays. Those were tucked under the flowers as shown and then the sentiment was added at the base with foam squares.


I had fun creating this for my special little girl! How can she be 21 already? Sing On and Ring On, looking forward to the ride, Gillian!

I'd like to join the following challenges:

Scrapy Land: Anything goes #57 (Using dies that Scrapy Land sells)
World Wide Open Design Team Challenge #18: Anything Goes
Seize the Birthday: Anything Goes