Sunday, December 23, 2012

On Cloud Nine Again!

Hi everyone,

I just got a couple of cards published in this month's e.mail version of Vamp Stamp News.  It was for the Watercolor markers challenge.  I brought out some old markers and using a technique from one of my Design Team members at Sparkle N Sprinkle, using outline stickers and Cloud Nine Velvet Glitter, here is what I came up with for one of my cards:


Hope you have the time to check out what the rest of the artists came up with for this challenge!

Merry Christmas to everyone!


Friday, December 7, 2012

Playful Pandas

Hi there,

Just a quick post this morning, with another Asian card.  I decided to use the cute Panda stamp from Sparkle N Sprinkle, to make a masculine birthday card for an "older" Gentleman!  I recently picked up the Darice Bamboo embossing folder, which I love.  So that is what I used for my background.

I also used Sparkle N Sprinkle's Cloud Nine (Velvet Glitter) for the panda's white fur.  Unfortunately you can't feel it through the computer, but it is glitter with a fuzzy feel.  It's so versatile - check out the Tips and Techniques Section of Sparkle N Sprinkle, scroll down to Glitter - Velvet, to see some of the ways the designers have used it!

Here's the card, and the link to my gallery, if you need full directions:


Hope you're having a good day.  I'm off to hopefully put a dent in my Christmas cards!

Monday, November 26, 2012

ASIAN GOOD LUCK

Hi there,

Back from visiting David's Mom, in Virginia.  It was a nice, relaxing visit, didn't do much (well, apart from eat!).  Since I couldn't haul my stamping loot with me, I leafed through magazines to get ideas for my Christmas cards. I usually stamp 15 to 20 of each design, using 10 different designs.  Haven't done the count yet, this year, but last was 162.  Half of them go overseas, so I really should get moving on it!

Also have quite a few birthdays in December and January, so I need to get them done too.  So while I'm waiting on my stamping room to heat up a bit, let me share with you, an Asian Good Luck card that I did last week:


I stamped the Gingko leaves in Versamark and heat embossed in Detail White. I used a Deckled Rectangle die from Spellbinders to create the window, putting a piece of cardstock over the leaves so that the die wouldn't cut the entire rectangle, then cut around the leaves. I ran the two top layers through the Darice Scroll Background embossing folder and distressed the top layer with distress inks.

The Leaf Robe was stamped in Versamark on brown cardstock, heat embossed in white.  I bleached out her face and then colored over some of the white embossing with colored pencils. I cut her out and then applied Versamark to entire piece and heat embossed with Clear Detail. Repeat with Versamark and Super Thick Clear embossing powder.

Full instructions for the card, if you need them, can be found in the Sparkle N Sprinkle Gallery. OK, I'm off to see what I can get done upstairs.

Wednesday, November 14, 2012

SPARKLE N SPRINKLE WINTER WONDERLAND BLOG HOP

Hi there, and welcome to the Sparkle N Sprinkle Winter Wonderland Blog Hop.  We have lots of ideas to share with you this time round.  In fact, so many that we are having this hop run for four days, instead of our usual two.  Sparkle N Sprinkle has picked out a few new designers for our team and so they are all joining us on this hop.  So without further ado let's get going!

The Hop will work the same way as usual, all you have to do is leave a comment on each designer's blog in order to be eligible for one of the 6 fabulous prizes. You should have hopped here from one of my new team mates, Debi's blog.  If you did, then you are on the right track, if not, you should go back to the beginning at the SNS blog page, to be eligible for all the prizes.

Have you heard about Sparkle N Sprinkle's latest product?  Velvet Glitters!  Yep, they are lovely and sparkly and they feel like velvet to the touch, hence their name!  I've been spending most of my stamping  time this month, playing with them, and one in particular - Cloud Nine! The reason for this is, not only can you stamp on it - you can color on it too!

For my first card today, I used three of the new glitters: Luau Green, Gypsy Red and my favorite - Cloud Nine.  Can't you just see the velvety texture of the glitter?  That is one thing that I would like to point out about these new glitters - the coverage is phenomenal! The cardstock behind the glitters is white, the Velvet Glitter is so fine that no white shows through!  


To do the image part of the card, I applied a piece of the Super Adhesive Sheet to white cardstock and then removed the protective backing.  Apply Cloud Nine glitter, burnish in with your finger, and you're ready to stamp and color!  Now, the only thing you need to remember is this:

If you are going to color with Alcohol markers (such as Copics), you need to stamp with Memento ink (just as you would on cardstock).  If you are going to use watercolor pencils or crayons (which I did in this card) you will need to use Staz-On ink! 

So, for my little froggy, Raising Cane, I stamped him in Staz-On and then colored over the top of the glitter using my waterbrush and watercolor crayons. If you go outside the lines by mistake, just take a clean waterbrush and remove the color.  Full directions for this card are right here.  

Once, I got started with this I couldn't stop - here is another card - done with the same technique:


Full directions for the above card are here.  

Now, just to let you see the difference, in the glitters, I colored the above image with watercolor crayons and the waterbrush, on  top of the Cloud Nine Velvet glitter.  In the next card, I colored the paper first with the crayons and brush and then covered the colored panel with the Super Adhesive Sheet and applied Sparkling Snow Glitter on top of the image.  Here is how that looks:


It's all just a matter of taste and what look you prefer. Now I have to show you how the Cloud Nine looks with Memento and Copics:


Isn't he just adorable?  This is Woofie our Christmas pup!  I stamped the image in Memento black ink and colored with Copics.  Oh and for the little label? - I stamped directly on the glitter with green Staz-On ink - but that's a whole other possibility!!  Full details can be found in the art gallery.  Also, come back after the hop and check out all the great ideas in our Tips and Techniques Section under  Glitter - Velvet.  

Well, I hope I've whetted your appetite to try some of these new glitters out. However,
BEWARE:  It is highly addictive! 

That's all from me today, hope you've enjoyed what I've shared. Don't forget to leave a comment for me before you pop over and see what another one of our new designers, Dawn, has up her sleeve!  Have a great day!


Wednesday, November 7, 2012

Staz-On and Velvet Glitter

Hi there,

Well, still no power, but we do have internet, so I'm typing with cut-off gloves!  The bedroom was 47 degrees this morning!

I'm going to quickly try to put up a tutorial that I did this weekend using Staz-On with Sparkle N Sprinkle's new Velvet Glitters.

So let's get started:

Take a piece of 2 1/2" Tear-ific Tape and apply it to white cardstock.


Remove the protective backing and apply Cloud Nine Velvet Glitter, burnishing it in well with your finger.


Ink up your image (I found that bold images work best with this technique) with the Staz-On color of your choice and stamp on top of the glittered piece. On this card I am using the Poinsettia Ornament image and some of the sayings from Set 418: Nesties Ornaments.


Sparkle N Sprinkle also carries the Spellbinders 2010 Heirloom Ornaments dies.  They can also be bought together as a combo.  This is what I used to cut and emboss my ornaments with.  One thing I did find - if your plates are cut up like mine, it helps to put a piece of wax paper between the stamped image and the top plate, it keeps the image nice and clean.


So I was thinking of how my ornaments were going to be staged?  I figured I needed to do some kind of background using the same three colors, but I couldn't emboss anything - as I'm without electricity?  I tried inking up the embossing folder with the three colors and running a piece of white cardstock through:


Well that looked pretty uninteresting!!  So, I went to clean the folder with Staz-On Cleaner and the colors got all wet and blended a little, so I thought rather than wiping all this color away, I'll try putting another piece of card through, I didn't have anything to lose (well - just a piece of cardstock!) I wrapped everything up in paper towel first, as I was scared that the wet ink might ooze out on to my plates, machine etc! 


Oooooh! So pretty!  That was a stage for my baubles!


So after I got the piece of card dry (normally I would have used my heat gun - but I had to dry it by the fire place for a half hour!), I cut the lines off.  I inked up the edges of the card front with the same colors of ink and edged the piece with 1/2" Tear-ific Tape.


Once edged, remove the protective backing and center the calendar and apply Cloud Nine Velvet Glitter to the exposed edges.


I then attached my baubles with dimensionals:


Here is my finished project!  You can find complete details in the Sparkle N Sprinkle Art Gallery.


Hope you've enjoyed what I've shared with you today, 'till next time - keep warm!


Trash Can Hooligans?

I went out this morning to throw out the trash, I feel so bad!  (Sorry, I can't get that picture to rotate to the way it was taken!)


Some poor little racoon (or something) was trying to get in to the can the hard way!  In fact I don't know what it would have been - because the weight of a racoon would probably have made the empty trash can fall over?!

The unfortunate thing was - that there was a full can right next to this one!  Maybe it was one of the not-so-smart bunch!


It's amazing what happens to a brain, when it's cold!  

Still waiting for power!


Saturday, November 3, 2012

Greetings from Cold New Jersey


Huddled around the fire!  Still no power, but at least we have Internet and some phone service.  I just want to thank Donna so much for posting on my blog for me while I was MIA!  Will post some photos later!

Stay warm!

Friday, November 2, 2012

Shona and Super Storm Sandy Update


My name is Donna and I'm a friend of Shona's. Because I'm down in Florida, I have not been affected by the recent storm. Shona has asked me to write on her blog so her friends with internet service can now she is ok.

Shona, David and kids are doing great, though it is cold with the weather change.

Their telephone service is no longer predictable. Shona said the forwarding service from the house phone to her cell phone has stopped working. The substation may have become flooded, lost its battery-back-up power, or is being reserved for emergency-contact numbers only. 

She is also having periodic trouble with cell service, but it is working more than the house phone. For some reason, Shona is able to get in touch with me in the mornings, but cannot reach most of her other contacts. That is why she has not phoned many of her friends and family.

She can retrieve voice mail messages late at night, but calling out is "hit or miss".

Be assured that they are all fine. The generator is still keeping the food cold. The fire place is providing warmth for that room, and she can cook on her gas stove top. They also have hot water because the hot water heater is gas.

Shona said it appears that they will not have power for another week. We are hopeful that it will be restored more quickly. More than anything, it sounded to me like Shona is bored. She is so used to being busy 24-7 that it's probably difficult to snuggle in a blanket and read. She misses her stamping room because it's a bit cold up there.

David went to work yesterday hoping to recharge their cell phones and laptops, however the office is closed. Shona does not have internet service. David has spent his 2nd day hoping to find an open gas station with power. They can only obtain 10 gallons at a time. While they have full tanks in their vehicles, they need to refill the containers for the generator. Lines are long. 

In the meantime, Shona is stamping, of course, trying out new techniques which do not require power. She advised me she has run out of Super Adhesive Sheets, Brenda LOL

Please be assured that they are safe. The Erlenborn home is not damaged. Just a mess to clean up when time permits. In the meantime, I'll try to keep everyone posted via the blog until their power, phone, and internet is up and working again. If you have any questions, please leave them in the COMMENTS section, and I'll try to get back to you.

Very sincerely,

Donna


Monday, October 29, 2012

Happy Birthday Tea Bag Holder

Well, what's a girl to do when there is a storm brewing?  This one went up to her stamping room and stamped her girlfriend a little gift!!

Another dear friend recently forwarded a tutorial on making this cute little Tea Bag Holder, so I decided to give it a go!  So I used the tutorial for the pattern and then for the front panel, I used another tutorial from Sparkle N Sprinkle's Tips and Techniques Section - Watercoloring on Velvet Glitter!  Sparkle N Sprinkle has recently added a new product to their already extensive line of glitters.  We now have Velvet Glitters!  These glitters actually feel like velvet, they are super soft and it is so much fun to stamp on top of them and now, it's been proven, that we can use several mediums to color on top of them too!

For this particular project, I used Watercolor Crayons.  I covered a piece of cream cardstock with  a piece of SNS's Super Adhesive Sheets.  I cut and embossed with Spellbinder's Labels One die and then removed the protective backing and applied Cloud Nine Velvet Glitter to the entire piece.  I then stamped the Magnolia image and saying in black Staz-On and colored in the Magnolia with a waterbrush and watercolor crayons.

I attached a little row of pearls to the bottom to finish it off!  I know my friend Sharon, is going to love this!  I put a tea bag in one pocket and a Starbuck's card in the other.

Here's the finished product:


Now, I need to go and make her a batch of shortbread to go along with it!  'Till next time.

Monday, October 22, 2012

Sparkle N Sprinkle has got some new sets!

Good morning!  We've got a beautiful fall morning here in New Jersey!  Just the right inspiration needed for some fall-themed stamping.  This morning, I'd like to share a couple of cards with you that I made from Sparkle N Sprinkle's new Fall Harvest set. Also, if you scroll down under the set, you will see many samples by some of the other Design Team Members.

I know I will be using this set over and over again!

The background for this first card is actually a photo of my backyard from last fall, and I printed it on to cream cardstock before running it through the Autumn Words embossing folder  I then sanded it to highlight the words.


I dipped three Versamarked gold brads in three different autumnal embossing powders to bring out the yellow, red and green tones of the watercolored apples.  Here are the full instructions for the card.

Still in autumn mode, I used the pumpkin image from the set for my second card:


For this background I used the edge of the watercolor crayons and applied yellow, pale orange, orange and red scribbled across watercolor paper, then I used a water color brush to blend the colors together. After die cutting the circle and dry embossing it (with brown dye ink applied to the inside of the folder), I covered the entire piece with Versamark and heat embossed with clear, to give it a shine.

The pumpkin image is colored with watercolor crayons applied with a waterbrush.  Full instructions for this card can be found right here.

Hope you've enjoyed your visit today.  I'll be back soon, to show you what I did with the new Christmas Set!  'Till then - Happy Fall!


Friday, October 12, 2012

The Best Lie

Good Morning,

Well here is the third of my Golf Cards, that I was working on last week. Scroll down to see the first two, if you haven't seen them already. Again trying for a humorous, masculine card, I used images from Sparkle N Sprinkle's Golf Set 189 - Green Pastures and Mustang Sally from Set 283 - Cars - Clyde.

Here is what I came up with:


I edged the card with our new "Velvet" Microfine glitter - Lator Gator,  just to give our Glitzy Golfer a little masculine bling!  These glitters are the latest product that Sparkle N Sprinkle has come out with.  They are gorgeously velvety, and they are available in 11 different colors, for now.

So this is the last of my Golfing Trio!

I'm off to play some more with those Velvet Glitters.  Lator Gator!!

Tuesday, October 9, 2012

It's a Hole in One!!

So here is the second, of my three Golf cards.  If you scroll down, you'll see the first one!  Still on a roll with the humorous masculine cards using one of the fun Golf Sets from Sparkle N Sprinkle.  I used Embossable Acetate for the window and did a masculine looking background for the wallpaper!


I put a droplet of black Staz-On reinker to replicate a cracked window and used a toothpick to make the cracks.  When it was dry I punched a hole in the center.

Full details are right here.


Monday, October 8, 2012

Fun After Fifty

I was playing around last week with some of the Golf images from Sparkle N Sprinkle.  I took a saying from another set 246 - Free Spirited Hat Ladies and came up with the first of my three golf cards!

Here it is:


You know after fifty, your eyes just aren't the same as they used to be!  So I decided to give McDuff a bigger ball to hit!

Complete directions are here, if you need them!

Sunday, September 30, 2012

AUTUMN'S IN THE AIR

Happy Autumn,

In my last post I was saying how the trees in the yard were beginning to change color - now they are beginning to lie on the ground!!  Fall is officially here in New Jersey!  Still using the Water Stamping Technique used in my last blog post, let me share a little of my backyard with you!


I sponged yellow, orange, red and green Distress inks onto glossy white paper and stamped the background leaves using the Water Stamping technique.  I then ran the piece through the tree embossing folder and used a sanding block to rub away the color from the branches and trunk. I sponged another piece of white glossy and stamped the leaves from the Fall Leaves Stampette set, which I heat embossed with Teddy Brown.  I then ran the leaves through the Sissix "Cracked" embossing folder, to give them some texture.  

Click here if you need more detailed directions.

Thanks for stopping by.


Wednesday, September 19, 2012

GHOST AND GOBLINS FALL FROLIC


Welcome to the Sparkle N Sprinkle Fall Frolic!  Today we have a fun array of projects from the Design Team to get you inspired for some Halloween fun and also some ideas for fall.  To be eligible for all the prizes that are up for grabs (a set of your choice and a couple of bonus prizes) you need to leave a comment at each of the posts.  If you got here by the way of the talented Brenda Smalle, then you are in the right place - if not, then you should go back to the Sparkle N Sprinkle blog page to start from the beginning.  Good luck!

For my two projects today, I used the Water Stamping technique. This technique is a really fun and easy way to make backgrounds for your cards.  I hope you'll be inspired to give it a go!


For this first card, I used purple and orange distress inks, and using the water stamping technique, with the little web stamp from the "Fill the Jar" set, I made the background cardstock for my card. The little witch was my first try at making a card with a digi stamp.  Sparkle N Sprinkle now carries a whole line of digital images by Michelle Perkett.  For those of you (I should say us - as this was my first try!) who prefer the "old-fashioned" method, many of the images are or will be produced in rubber also.  So do take a look - I have to say there are many lovely images in her line.  You can find complete instructions for the first card here.

For my next card, I used the same "Fly Away Witch" digi stamp and used the Water Stamping technique to make the wallpaper background:


You'll find complete instructions for the second card, here.

Hope you've enjoyed your visit. Make sure you leave a comment here, before heading off to see what trick or treat, my teammate Julie, has in store for you.

Saturday, September 1, 2012

SEPTEMBER SKETCH CHALLENGE AT SPARKLE N SPRINKLE

Well, there's another month gone and Fall is just around the corner.  The leaves are already beginning to fall in our neck of the woods and it sure is nice getting a little cool air at night.  Time to open the windows and let in the fresh air?

To celebrate with the season, I decided to go with a fall theme for this sketch, using Set 228 - Harvest - Pumpkins.  I have been playing around with Water Stamping this month (it just seems to go really well with the fall colors).  You can check it out in the Tips and Techniques Section.

For the ribbon, I embossed a piece of green card and ran it through a soda tab, colored with Copper embossing powder!

Here is my card that I made for the September Sketch Challenge.  You'll find all the rules and a few designs that some of the other designers have come up with right here.  I hope you'll find the time to take a shot at our September Challenge. Good luck!


If you need full directions for the card above, you'll find them right here.

Happy Fall ......

Tuesday, August 28, 2012

AN AUTUMN BIRTHDAY

Well, Fall is definitely here in New Jersey!  Although we still have hot weather, some of the trees are starting to lose their leaves.  It's always a sad time for me, as I hate to admit that summer is over and the kids will be going back to school, or in my eldest's case "away to school" and it means back to early rises and routine!  However on the bright side, I just love the autumn colors and New Jersey has so many trees that even the back yard looks different every day! The colors are what inspired my card today:

September and October are the busiest birthday months for me and so I thought I'd better get a few under my belt before I left for Scotland on Sunday.  I'll be back on the 11th but don't know if I'll be able to get right back in to stamping - it's more likely to be laundry and cleaning!!

I've been playing a lot with the Water Stamping Technique, and I found the colors I gravitated towards were "fally", and so I made bunches of leaves, and used the left over ones on my birthday cards.  Here is the last one that I put together with some "scraps" that were lying about on my table from previous projects.


The woodgrain background was made by painting a piece of cream cardstock with a Copper Acrylic Paint Dabber. I ran it through the embossing folder and then lightly sanded the piece, to bring out the texture. I layered that on to a piece of cream edged with Tear-ific Tape and applied Autumn Medley Glitter to the exposed edges. The leaves were made by sponging dye inks (I used orange, green and red) onto cream cardstock and then stamped the leaves with Versamark, then heat embossed with Teddy Brown embossing powder (EP187).  I ran the leaves through the Sissix "Cracked" embossing folder and added a little more of the inks to highlight.  The tag is from Spellbinders Ribbon Tag Trio Two, stamped with Happy Birthday to You from Set 416. I distressed the edges of the finished card with the green dye ink.

Thanks for stopping by!

Sunday, August 19, 2012

Thank You, Thank You, Thank You .......

Gosh, this summer has been a complete whirlwind, hasn't it?  I love being able to "sleep-in" (past 5.30am) when the kids aren't needing to be pulled out of bed for school, but only two more weeks of that and we're back to the grind (after I get back from a week in Scotland, getting the eldest off to University).

Ten weeks, seemed like a lot of time, but we have had the busiest summer ever, which made it just fly by!  Among all the things going on, were several "big" birthdays, graduations, and anniversaries. All good, but I felt like my "relaxing" stamping time, was turned into a "sweat shop".  Struan's 18th birthday was on the 5th of August and he's just writing them now as I'm writing this!

Anyway, bottom line is, they had to be quick and easy, but I hate making something that looks like it took a minute to make! Already went that route with his Graduation Thank-You's.  that really did only take a minute!   So this time - I took 5!!!  I used a stamp from the Asian Set 304, and then a Thank You from Set 415.  I bought a few Dylusion paints lately, along with a stencil, thanks to some "stamping tool enablers", but I haven't used them yet, and thought I should at least put the stencil to use, until I have time to play!

Here is the end result using two dye-based inks sponged onto glossy cardstock with the stamped image embossed in black detail powder.  I used a dauber, with the same two inks, to color in the stenciled circles and then just stamped the saying into the bottom circle:


Thanks so much for stopping by!


Saturday, August 11, 2012

Thanks for being my Friend

Hi there,

The Blog Hop over at Sparkle N Sprinkle was last week, and I had made two cards for it, but decided since I had a little tutorial on masking and stamping on flocking, that it was maybe too long to add the second card, so I decided to hold this little doggie one back 'till now!

I'm loving playing with all the different width tapes and Adhesive sheets with the Flockings and Sparkle N Softs. Did you know you can stamp directly over the top of them with Staz-On or Memento black ink and you have a fuzzy colored-in image?  This of course works great on the animal stamps, which by the way are still on sale this month, so if you've had your eye on any of them, now's the time to pounce!

I had used a cat image for the Blog Hop, so I decided to go with a dog for this one.  My brother used to be a game-keeper in Scotland, and had a black lab at the time.  Mack was such a loyal lad!  I had him in mind when I made this card:


For the background, I used the Bird Call embossing folder and embossed with Clear embossing powder before coloring with a dye ink wash.  Here are the full directions for the card.

Such a cute, fuzzy pup - don't you think?

Thanks for stopping by.


Wednesday, August 1, 2012

IT'S THE SNS FURRY FRIEND BLOG HOP

Hi and welcome to the latest Blog Hop by the SNS girls!  We've got a lot of cute and cuddly projects to share with you, to celebrate our little furry friends. If you are here by way of  Marie's fantastic blog then you are in the right place and you are eligible to win one of five different prizes.  All you have to do is a leave a comment at the end of each blog - it's that easy!

If you've been following my blog lately, you will see that I have been working with our Tear-ific tapes quite a lot.  Although not furry (just very sticky) - he's my new best friend!!  The tapes are super easy to work with and come in various widths, from an 1/8" through 2 1/2"  ...and if that's not wide enough, all you need to do is step on up to the Super Adhesive Sheets.

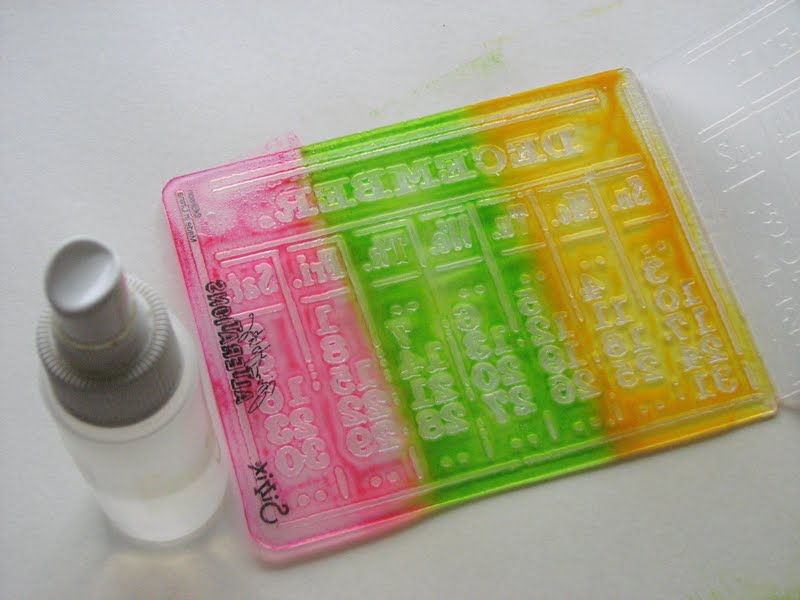
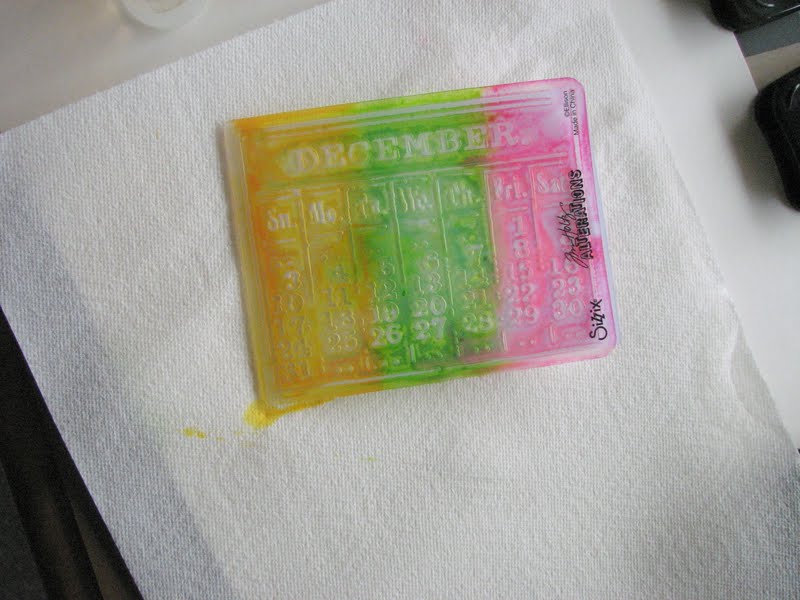
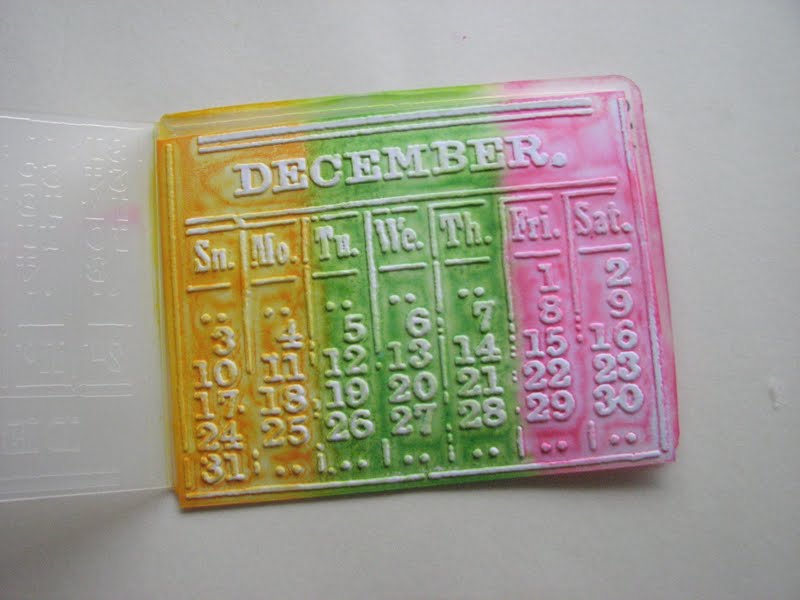
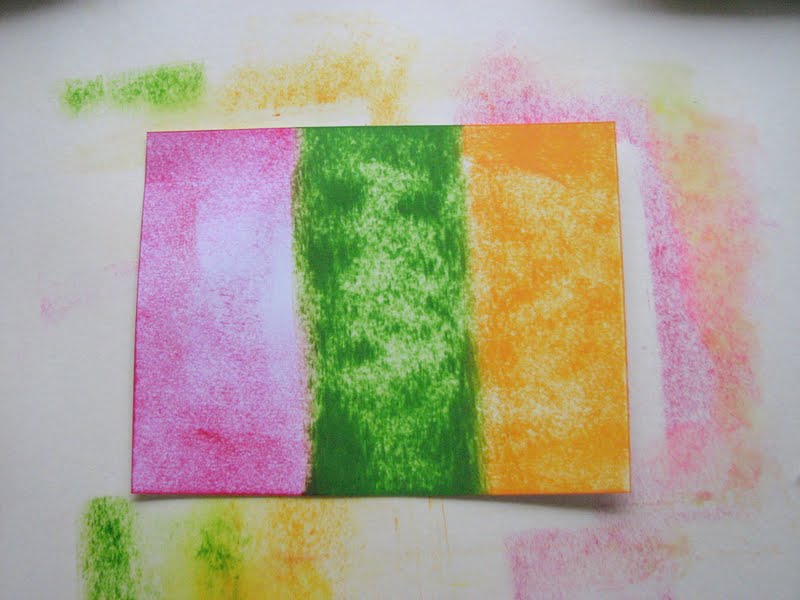
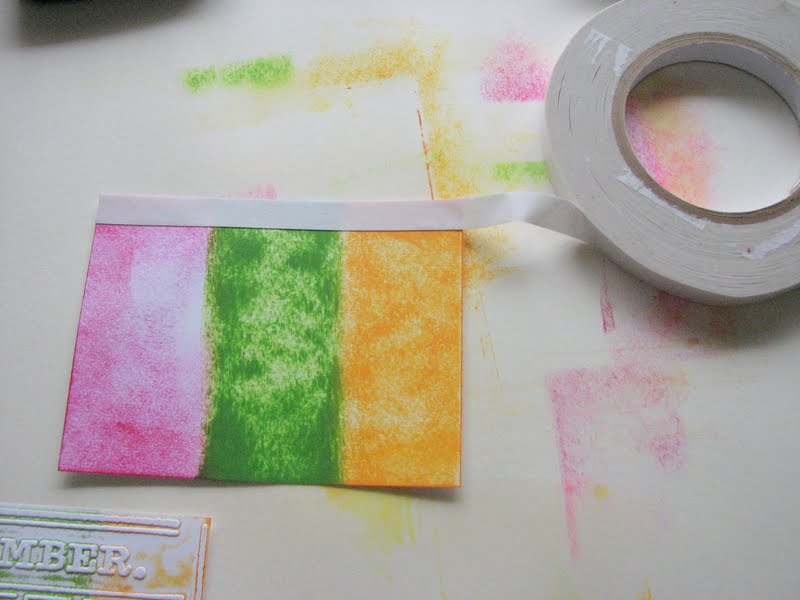
My obsession with the tapes really got worse in June when I was demoing at a Scrapbook Convention in Somerset, New Jersey with Margaret. We were showing customers the many uses of the tapes, and one of the un-advertised uses is to use the left over backing as a mask!  I now keep a bag of the leftovers - some of them are from border punches, some of them are from big pieces of sheets that I've used, or the 2/12" tape. I'd like to show you how I do this masking with a little tutorial today.

When I got my Kitty Trio Set, I immediately thought about how cool it would be to have these little guys colored, but be fuzzy too!  I had recently stamped on top of flocking, and knew that it worked, so I took the idea one step further - here is what I came up with:

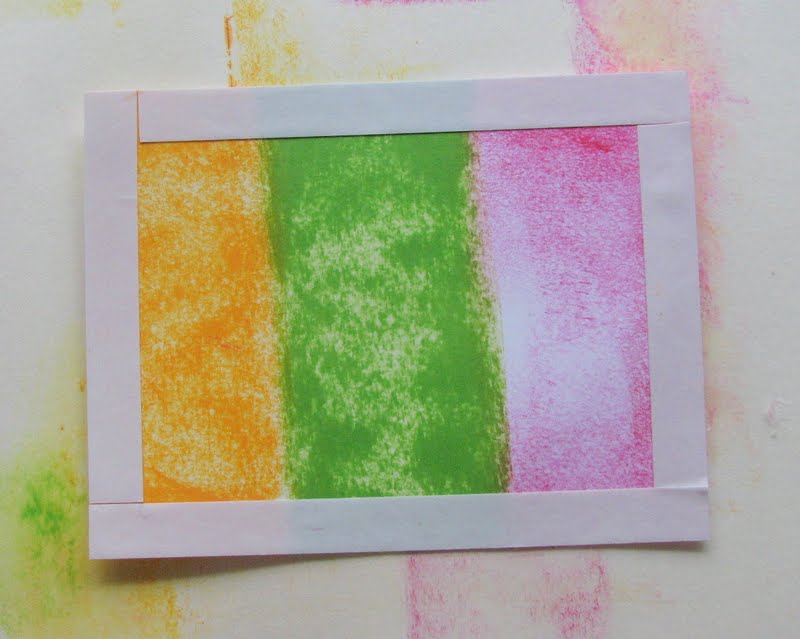
Cut a piece of the Super Adhesive Sheet (the tape was not wide enough for this image) and stick it down to a piece of white cardstock.  Stamp the image directly on to the protective backing of the tape. Remove same backing and cut around the outline of the cat on the left.  Place that back down on to the exposed tape - this is your mask:


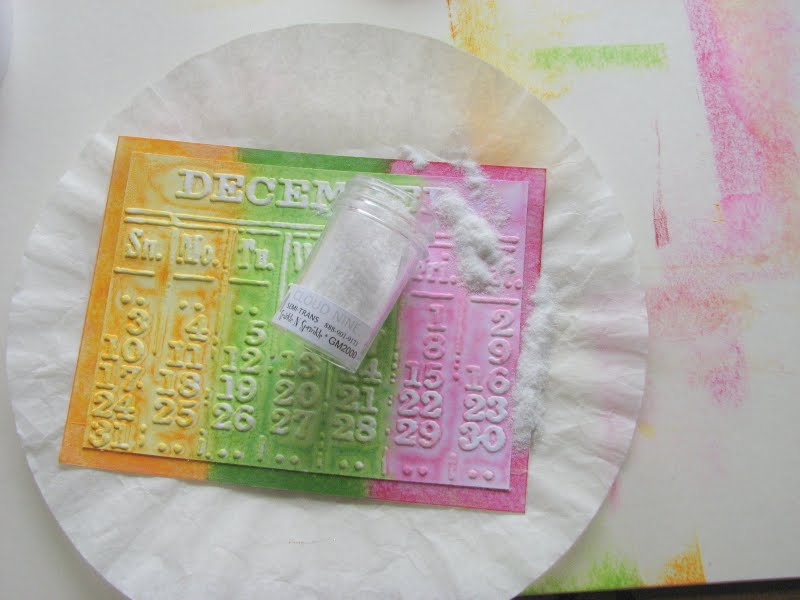
Now, using the Elephant Gray flocking and a pair of tweezers, dab little patches of the flocking on to the exposed side of tape.


When done, turn piece upside down to remove excess and return to jar.  Then take the Snow White flocking and dump that on top of the gray patches and burnish in with your finger.


After returning excess white flocking to jar, remove the mask.


Repeat with Amber Wheat flocking (as the patches)


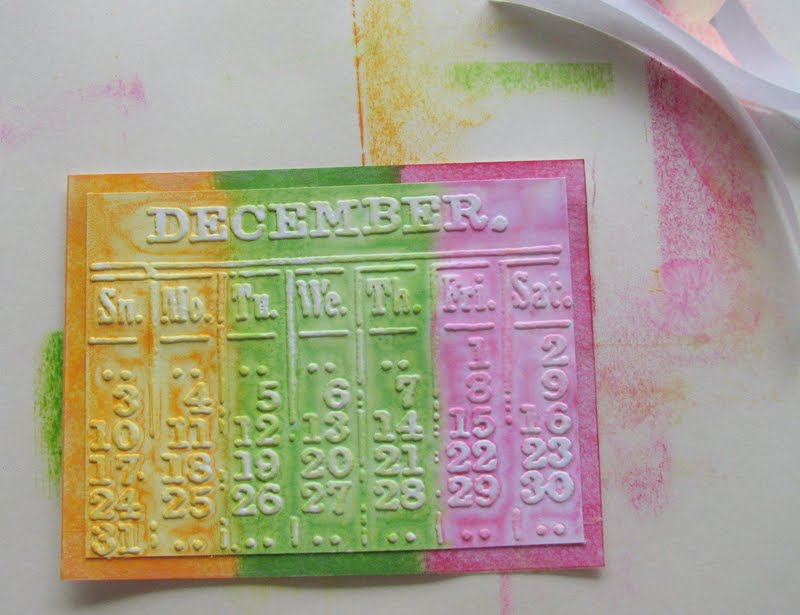
.... and Buff flocking.  The finished piece should look something like this!


Now stamp the kitties on to a stamp positioner and place on top of the flocked piece in the correct position.


Remove the acrylic block and stamp on top of the flocked piece with Black Memento ink.


How cool is that!!!???


Cut around the outline of the two cats.


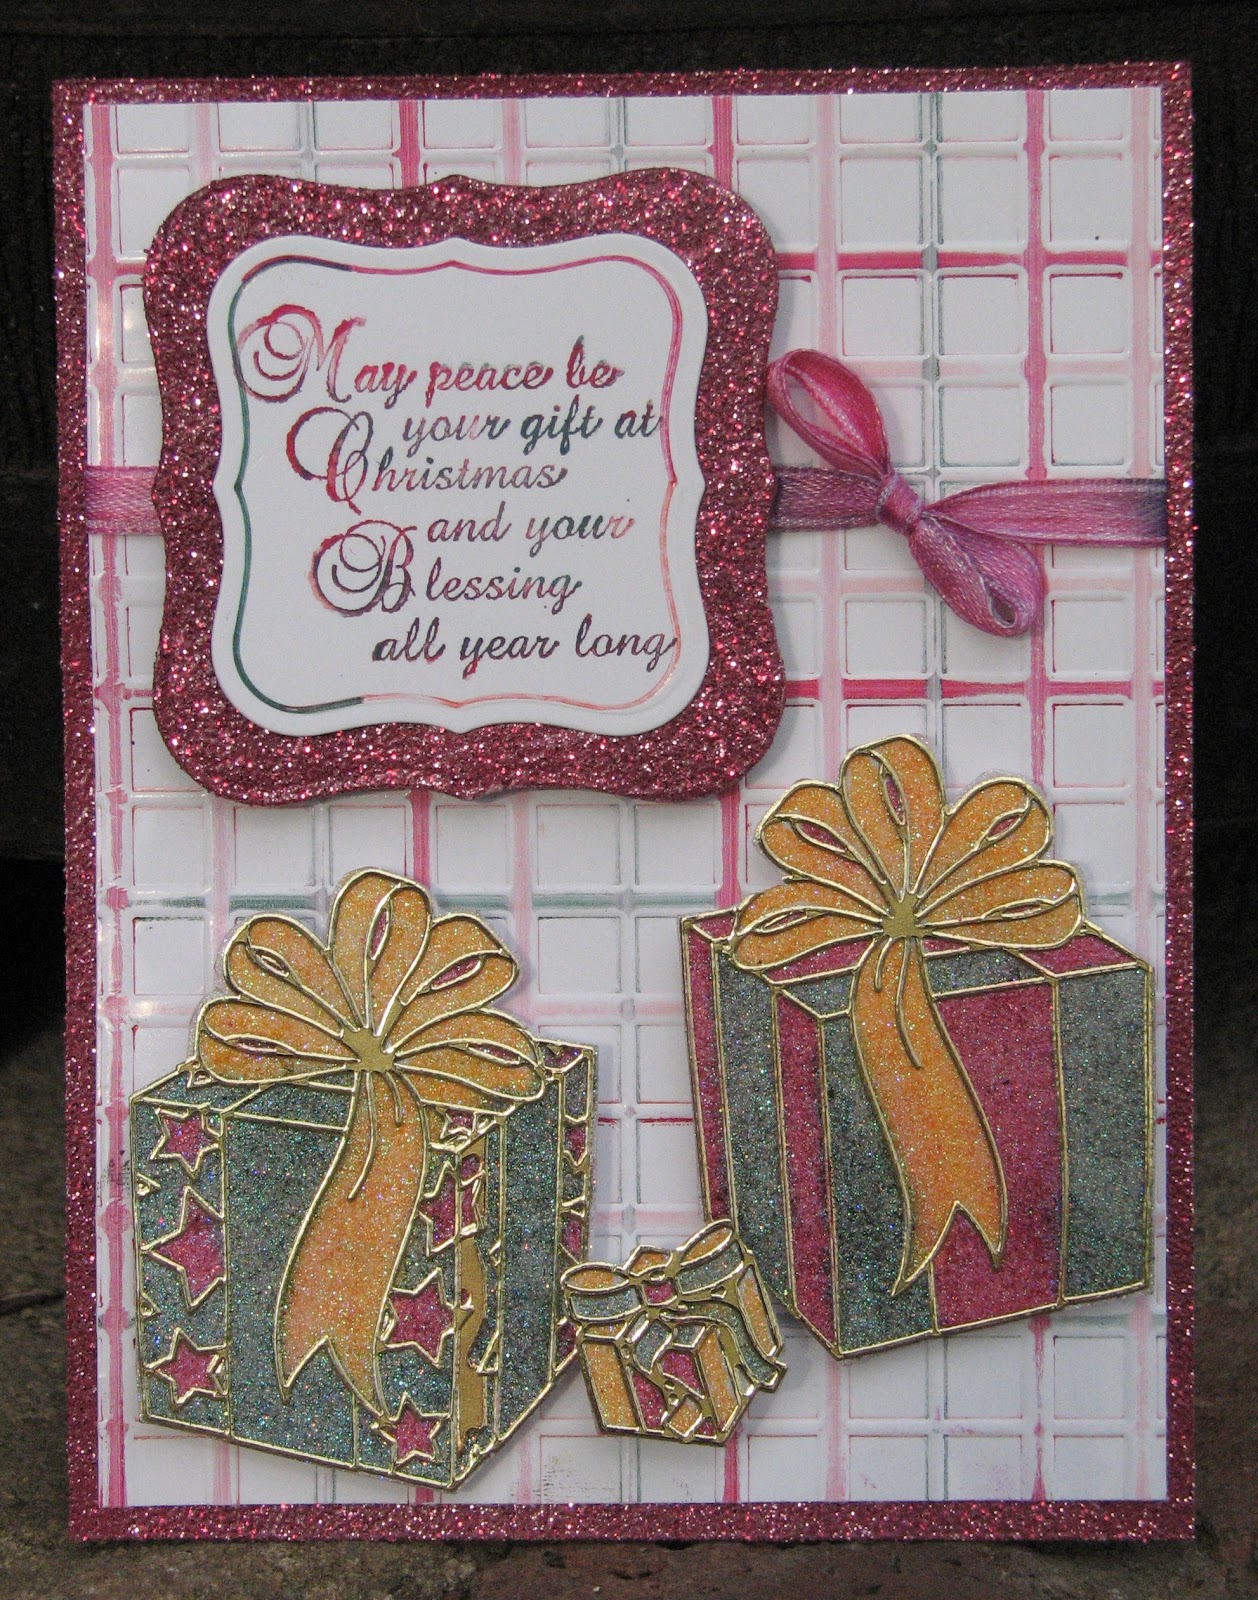
... and there they are!  Aren't they so darned cute - and fuzzy to boot?!  Wish you could feel them, well you can - just make your own!! Here is how I used them in a card:


Here's a close-up, so you can see the fuzzy goodness! ...... and here is the recipe! ?


I hope you've enjoyed your visit with me today.  Now after leaving me a comment, you should continue on to the talented Karalee's blog .  Enjoy the rest of the hop.  I'm off to see what else needs flocking!!