Tuesday, June 30, 2015

SPARKLE N SPRINKLE'S JULY 1ST REVEAL

Hi there and welcome to the July 1st Sparkle N Sprinkle Reveal,

Hope everyone is enjoying the beginning of summer. I'm just loving not having to get up at 5.45 for the start of the school day!

So already July - really?? For the reveal this month, I decided to go with the 3 Wise Men Set 720 and paper-piecing with a twist!:


We have FOUR new stamp sets to share with you today.  These new sets are 20% off until July 3.  So once you finish the blog hop, head on over to the store and start shopping.  All of the new sets are available on cling mounted rubber or as a digital image.  
The sets are:


3 Wisemen 720   (digi version DIGI720M)
Christmas Goose 721   (digi version DIGI721B)
Reindeer 722   (digi version DIGI722J)
Tree Scene 723   (digi version DIGI723J)

On July 3, one GRAND PRIZE WINNER will be selected from the comments left on the Designers' blogs.  Please leave a comment with each Designer in order to be eligible for the Grand Prize.  You never know who the Mystery Designer will be that has the winning comment.  

The Grand Prize Winner, which will be announced on July 3 on the SNS Facebook page and here on the SNS Blog, will receive ALL of the new stamp sets released this month (or the digi versions, if preferred).

In addition to our regular Designers, we are happy to introduce you to two new Guest Designers this month.  Ani and Chris will be our Guest Designers for the months of July, August, and September.  We'd also like to say Thank You to our first set of Guest Designers, Diane and Ashley, for a job well done!

The Blog Hop order this month is:


(*Tip: if you have difficulty with a particular link, try clicking on the Designer's blog title to send you to their Home page.)

We hope you enjoy the New Reveal Blog Hop as much as we have enjoyed creating new projects for it.  We also hope that we have inspired you as well.  Thanks for joining us and remember to comment on each of the Designers' blogs to be eligible for the Grand Prize.  (We love reading them too since your comments also inspire us.)  Last month the winning comment came from Eret's blog.  Who will be the Mystery Designer this month?? 


The Sparkle N Sprinkle Creative Challenge also begins today with lots of prizes and recognition badges.  Find out how you can become a SNS Featured Artist with special recognition on the SNS Facebook page as well as the Creative Challenge Winner's post.  From time to time, we also have special prizes just for Featured Artists.  The theme is always Anything Goes using Loose Glitter, Embossing Powder, and/or Flock.

To begin with I stamped the Wise Men on to a piece of white cardstock in Memento Tuxedo Black ink, then colored the faces and hands with Copics. I started paper piecing my Wise Men from the left. For the first one, I stamped on top of a piece of designer paper which had been backed with a scrap of Super Adhesive Sheet.


I cut out the body and layered it to the first Wise Man (keeping the cuffs separate). The second Wise Man was stamped and cut out of the scrap of Super Adhesive Sheet (again cutting out the cuffs separately) and applying the cut out adhesive to the image, I then applied Sparkling Sands Sparkle N Soft directly to the Robe and Sparkling Coffee to the cuffs.


The first Wise Man's cuffs' protective backing was removed and applied with Pink Spirit Sparkle N Soft. The third Wise Man's "robe" was backed with Super Adhesive Sheet and then stamped on the front and fussy cut, the cuffs and applique were applied with the Sakura Glue Pen and covered with the new Blue Haze Velvet Glitter for detail.


Celestial Glitter was also applied with the glue pen to the center Wise Man's head piece.


Then came the Dimensional Glue, which was added first to the beards (along with Buff and Elephant Gray Flocking) and then to the Copic colored containers and to the crown, to give them a shiny appearance, when it dried. The men were then fussy cut.

The background was made from brayering Kaleidacolor stamp pad Creole Spice on Glossy White cardstock. This was layered on to a piece of navy cardstock and was then run through an embossing machine, with Spellbinders A2 Matting Basics A, to create the opening for the saying.


The sentiment was stamped in Versamark on white glossy cardstock and heat embossed with Cerulean (one of the detailed Tuscany powders). The brad stars were attached (the big one having first been heat embossed with Firefly) before the card front was layered to the glossy white card base. The fussy cut Wise Men were added to the card front with Dimensional Dots to finish the card.


This completes my project for this month's reveal. Now you should hop on over to Eret's blog. She has a fantastic project to share with you this month!

Have a wonderful day and thanks for stopping by,

Shona

Wednesday, June 24, 2015

CIRCULAR BIRTHDAY WISHES!

Hi there,

Today I'd like to share with you a fun new way to use the Sparkle N Sprinkle Super Adhesive Sheets, some micro-fine glitters and a die!

h

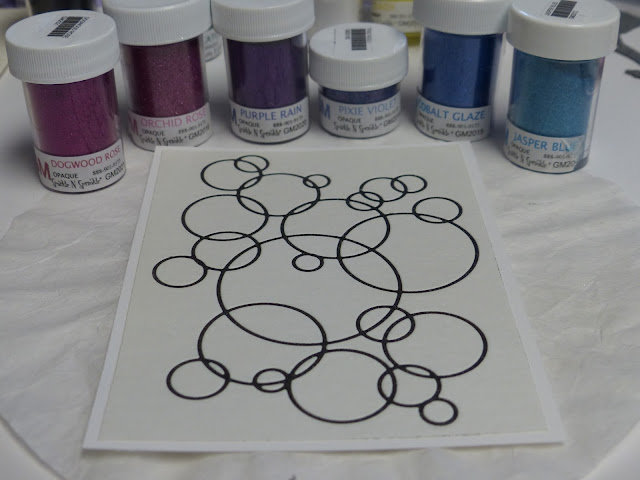
This was seriously a lot of fun! Start by applying a 4" x 5 1/4" piece of Super Adhesive Sheet to a piece of white cardstock. Next take your choice of dies (I used Memory Box Large Ringlets) and run it through your machine cutting into the adhesive sheet.


Using an exacto knife, remove the "outline" of the rings:


... and apply Black Suede Velvet Glitter.


Next remove little sections of the rings, applying an odd number (sporadically) of the following Velvet Glitters:

Jasper Blue (GM2012)
Dogwood Rose (GM2021)
Cobalt Glaze (GM2015)
Orchid Rose (GM2016)
Pixie Violet (GM2018)
Purple Rain (GM2020)


After all the rings are "colored" in, then remove the protective backing for the entire background piece and apply Cloud Nine to the remaining sticky surface.


... the result:


Make a frame from black cardstock using the two largest dies of Spellbinders A2 Matting Basics A. Versamark is then applied to the frame and heat embossed with Clear Detail. The framed piece was then layered to a 5 1/2" x 4 1/4" piece of black cardstock.


The Ellentina "Happy Birthday" die was cut from black cardstock and heat embossed with Silver LightningThe little banner was cut from a piece of scrap Super Adhesive Sheet (scraps of which I keep in an envelope) applied to a piece of white cardstock. The protective backing was removed and the die cut "Happy Birthday" was stuck down onto the sticky surface. Cloud Nine Velvet Glitter was then applied to the remaining sticky surface of the banner. This was attached to the card front with Dimensional Foam to finish the card.


Hope you've enjoyed my share today! Thanks so much for stopping by.

Shona

Friday, June 19, 2015

GLITTERED POPPY THANK YOU

Hi there,

Today I'd like to share a card using the glittered stencil technique. This time I used the Dreamweaver Fern and Flower stencil. My focal image is made using a Memory Box die, Perky Poppy, some Tear-ific Tape and Velvet Glitters. Hope you enjoy:


To make the background, I started with rubbing Hawaian soap to the stencil before placing a piece of sticker paper  to the stencil (the soap allows the stencil to separate easily from the sticker paper). I then started to "color" in the flowers (with Tiger Orange and Gypsy Red) and the ferns (with Lator Gator):


After the flowers and ferns were colored, I separated the sticker paper from the stencil and covered the entire piece with Daisy, which I'm sorry, I neglected to photograph.


For the focal image I used the Memory Box Perky Poppy Die. I stuck a piece of 2 1/2" Tear-ific Tape to a piece of white cardstock.


By running the prepared cardstock through the embossing machine with the die face down onto the protected adhesive, it results in a "sticker":


Use an Exacto knife to remove the outline first. I used the same colors of Velvet Glitters as in the background piece. So I began with Gypsy Red for the flowers and Lator Gator for the stems:


The petals were colored with Tiger Orange and Daisy:


Now you remove the protective backing from the rest of the Tape, and apply your preferred color - I chose to use Cloud Nine:


Burnish the Glitter in well with your finger.


To finish off my card, I decided to cut the Poppy out with Spellbinders Mega Ovals Large. I cut a strip off the fern and flower background and layered it to black cardstock. A white card base was too stark and so I edged the card base with 1/4" Tear-ific Tape and centered the black layer, applying Daisy glitter to the sticky edges.


The Sentiment (from Thanks a bunch Stamp Set) was stamped in Versamark on black cardstock and then heat embossed with Belgian Cream. I cut and embossed with the smaller of the dies from the same die set used for the poppy image. It was tucked behind the focal image, which was then attached to the card front with Dimensional Dots.


Hope you've enjoyed my share today and that I've inspired you to try this new "make your own stickers with dies" technique!

Let me leave you with a sneak preview of the other card I did today using the Memory Box Large Ringlets Die:


Have a great day!

Sunday, June 14, 2015

DOGGIE GET WELL WISHES

Hi there,

A close friend has just undergone a rather big surgery, and thankfully is well on the road to recovery. She was the inspiration for this card and loves her dogs. Although she doesn't have a Doberman, I thought the little Chihuahua looked like he could cheer even these two up!! Hope you're better soon Maribeth!

This card uses two of the June releases and one from a couple of months back: Heart Like Dogs Set 711, Life is better Set 712 and Old Well Set 703.


Beginning with the background for my card, I stamped the Wishing Well image on Kraft cardstock in Versamark Ink and heat embossed with Belgian Cream. I then took my Memento Toffee Crunch ink pad and rubbed it over the entire piece. Then I rubbed  a tissue over the image, to remove any ink that was sitting on top of the embossing. The embossing powder resists the wet ink and makes the white really pop. I then took an aqua pen filled with bleach and bleached out inside the lines of the image, I guess, because of the brown ink, this made the image green, which was perfect for all of the greenery!! I took a Sakura Glue pen and added Green Iris glitter to the foliage.


The dogs were all stamped on cream cardstock in Memento Tuxedo Black, fussy cut and were colored with three Copics: E11, N2, and N4. I took a sponge, applied it with Blending Solution and dabbed it over the dogs to give the mottled appearance.


The sentiment (from the Old Well Set 703) was stamped on Kraft cardstock in Versamark and heat embossed with the new Coffee powder. I took a dauber that had brown ink on it to distress the piece after cutting it to the shape of a banner.


Dimensional Glue was added to the bucket and the dogs' noses. and a rhinestone brad and two little rhinestones were added for the little dog's collar. The background was layered to a Kraft card base, with Toffee Crunch distressed edges. Then the dogs and sentiment were added with Dimensional Dots.


Hope you've enjoyed my share with you today!

Shona

Thursday, June 4, 2015

BRUSHO'S BLOOM!

Hi there,

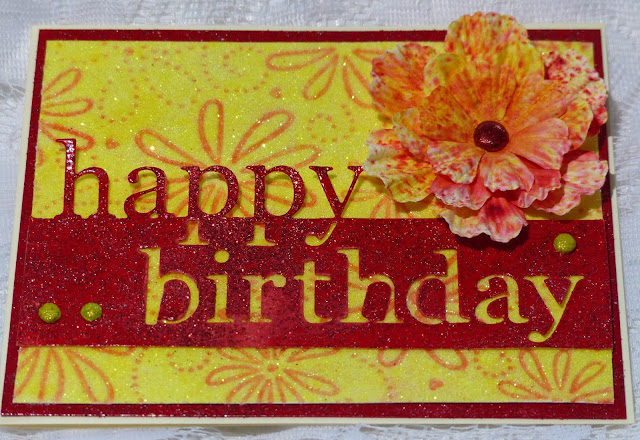
Things have been a little hectic around here for the last month, so I've barely been able to keep up with my stamping "duties". The end of the school year always does that to me and this year although I've not got proms or graduations for any of my kids, there is plenty volunteering activities to take care of. Today's card was put together for my Sister-in-Law using the Memory Box Grand Happy Birthday die, a couple of  Brushos, two embossing powders and a Sparkle N Soft from Sparkle N Sprinkle.


I cut a 4" x 5 1/4" piece of Super Adhesive Sheet. I removed the protective backing and covered the entire piece with Sun Dazzle Sparkle N Soft. Next I ran it through the Darice Daisy and Swirl embossing folder, which had been inked on the inside with Memento Lady Bug ink. There is a detailed tutorial on how to make these flocked backgrounds here.


Next I cut out the Happy Birthday die from white cardstock, covered it in Versamark ink and heat embossed the entire piece with Firecracker Red.

Dandy Dandelion and Firecracker Red embossing powders were used to bling up the silver brads. 


The flower was three Prima flowers layered on top of each other, after I had spritzed them with water and shaken the Brusho Crystals on them. Another spray of water and then they were dried with the heat tool, to compliment the colors of the card.


The card front was put together using the brads to hold everything in place. It was then layered to a piece of white cardstock edged with Versamark and heat embossed with the Firecracker Red. It was this was then layered to a cream card base. 


I'd like to enter this card in the Scrapy Land: Challenge 19 - Use a die cut that Scrapy Land carries.

Hope you've enjoyed my quick share with you today. 

Till next time,

Shona