Wednesday, December 31, 2014

SPARKLE N SPRINKLE'S JANUARY 1ST REVEAL

Happy New Year!! Can you believe it? I know I can't! Anyway, it is what it is and so ......

Welcome to Sparkle N Sprinkle's 
January 1, 2015 Reveal.


This month FOUR new stamp sets are being introduced.   These sets are 20% off their regular price, until Jan. 3rd.  All the new reveal sets are available on Cling Mounted Rubber and as a digital image.  The Collector #682 is the stamp set featured in  This Month's Technique Video.

The sets are:


Big Wet Kisses #678   (digi version DIGI678)
Ellie Retail Therapy #679   (digi version DIGI679)
Itty Bitty Robots #681  (digi version DIGI681)
The Collector #682   (digi version DIGI682)


On Jan 3rd,  one Grand Prize Winner will be selected from the comments left on the designers' blogs listed below.  The Grand Prize Winner will receive
all FOUR of the new rubber stamp sets (or digi sets, if you prefer)


The new SNS Creative Challenges also begins today, with lots of prizes and recognition badges. 

The winner of the blog hop will be announced on Jan 3 on Facebook, the SNS blog, and on our blogs.  This month's Blog Hop order is:


Marie Berquist
Belinda Shupe
Anita Scroggins
April Williams
Shona Erlenborn
Eret Pank
Anne Temple

(Tip: if you have a problem with a particular link, try clicking on the person's blog title to send you to their Home page.)

Don't forget to leave a comment with each Designer to be eligible for the Grand Prize.  We love reading your comments and hope we have inspired you as well.  If you absolutely can not leave a comment for some reason, please email icinganne@yahoo.com with your comment and the name of the blog or Designer you are commenting about.
We hope you enjoy the New Reveals as much as we do!
Last month the winner came from Marie's blog.  Wonder which Designer contains the Grand Prize winner this month?


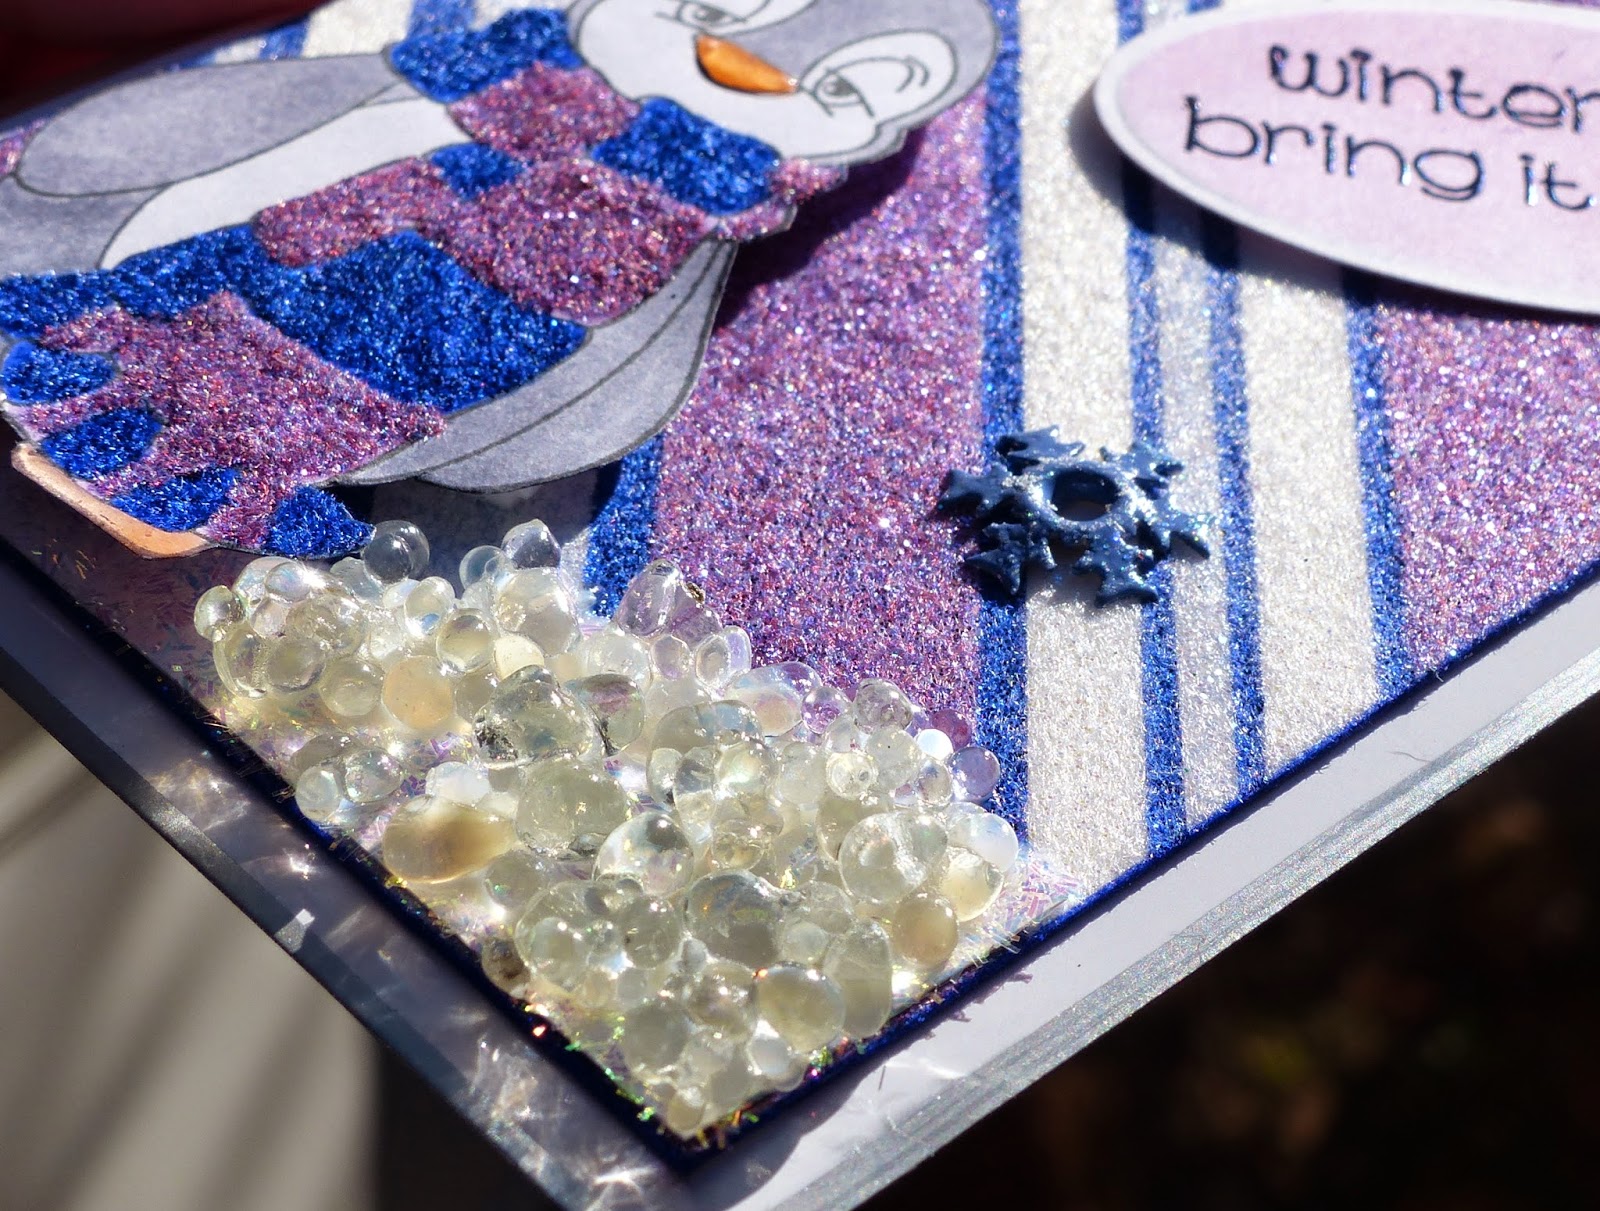
As you can see, I decided to go with the new Big Wet Kisses set and also incorporate the Under the Mistletoe Set 556.  Still in Christmas mode I used the Die-Versions Mistletoe die cut to make my seaweed and mistletoe branch. I applied 2 1/2" Tear-ific Tape to white cardstock before die cutting the Mistletoe four times. Then I removed the protective backing and applied the three new opaque Frozen glitters to different stems of the Mistletoe. 


Princess Elsa Frozen (G1122)
Princess Anna Royal  (G1124)
Princess Anna Fuchsia (G1120)

I applied a piece of Super Adhesive Sheet to a piece of blue cardstock and removed the protective backing. The "seaweed" was then attached along the bottom at different heights. The excess was then cut off. Another Frozen Glitter along with three other (semi-transparent) glitters were sprinkled over the exposed tape. The background was done in this order:

Olaf White  (G1121)


Waterscape (G1108)

Waterfall (G1071)

Surf (G1117)


The sentiment was stamped twice in Versamark and heat embossed with Mulberry  - to allow for each letter being punched out with the little heart punch. 

After attaching another piece of 2 1/2" Tear-ific Tape to white cardstock, I removed the backing and applied Cloud Nine Velvet glitter before stamping the fish image in Memento Tuxedo black. I then colored the image directly on top of with the following Copics:

V09, B69, B04

The fish were cut out and set amidst the seaweed under the mistletoe with dimensional dots. A few clear rhinestones were added to the tips of the mistletoe for the white berries. Not quite sure why, but a lot of the photos looked likes eyes! A couple of wiggly eyes were added to the fish and then the base was layered to a piece of white cardstock, distressed with Mulberry Star.

Hope you've enjoyed our fist Blog Hop of 2015!  May you all have a wonderful, happy and healthy New Year!

Sunday, December 28, 2014

HYDRANGEA BIRTHDAY

Hi there, 

I wanted to share a quick birthday card that was due in the midst of the Christmas bustle. I always feel badly for the people in my life that have birthdays around Christmas.  I am usually always scrambling to get my Christmas cards done in time and as a result often forget about the birthdays.  

My Mum had a birthday on the 4th of December and David's Mom's birthday is the 30th of December. Here's the card I did for my Mum.


I used two Sparkle N Sprinkle Sets for my card: Silhouettes Set 493 for the sentiment and Spring Floral Set 490 for the hydrangea. I stamped the Hydrangea in the bottom right of the white cardstock. The petals were colored using a baby wipe wrapped around the tip of my finger with a couple of drops of pink and blue dye ink, and then the leaves with a baby wipe and a couple of green inks. You can see how I wasn't able to keep completely inside the lines, but I don't mind it - I think it gives a nice "homemade" look!


The Hydrangea was cut out using the out of the box Nesties technique along with Spellbinder's Labels Nine. I layered purple cardstock to a pink card base. The white card front was then placed on top of the base temporarily to ensure that the window and the base lined up. Spellbinder's Basic Lattice was cut from white cardstock and taped behind white card front before layering to card base.


I added Sparkling Snow Glitter to the petals with a Sakura Glue PenThe sentiment was stamped in Versamark and heat embossed with Black Detail embossing powder. It was then cut and embossed with a small Labels Nine die and added to the card front with dimensional foam.

A piece of sparkly white ribbon was added to the left side and three self adhesive pearls were added to the top right to finish the card.


Hope you managed to keep up with all your card-making during the festive season. I'm off to get my Mother-in Law's done now!!

See you in the New Year!

Shona


Thursday, December 11, 2014

SPARKLING MERRY CHRISTMAS

Hi there! Have you got all your Christmas cards made? If not, you're not alone. Let me help you - here's a quick and simple card, using red and green mirror cardstock, some Glistening Emeralds Sparkle N Soft and a piece of Super Adhesive Sheet!


Cut a piece of the Super Adhesive sheet to 4" x 5 1/4" and layer to A2 white card base, which has been edged with a red shimmer Krylon pen. Cut out Die-Versions Merry Christmas Script die from the red mirror cardstock. Remove the protective backing from the adhesive sheet and lay the die cut on top.


The surface around the sentiment is very sticky and now you are going to "dump" on the Glistening Emeralds and burnish it in well with your finger.

Die cut the little sprigs of holly (Cottage Cutz Winterland Holly) from green mirrored cardstock and attach to the top left and bottom right corners, using a little Tear-ific Tape and Dimensional Dots.


Add three red self-adhesive rhinestones on top of the holly sprigs and you are done! Full directions can be found in the SNS Gallery here.


Quick and simple - with lots of sparkle! I'm off to make a few more - still got 80 cards to go! 

Enjoy the holiday season,

Shona

Sunday, November 30, 2014

SPARKLE N SPRINKLE'S DECEMBER 1ST REVEAL

Hi there and welcome to Sparkle N Sprinkle's December Reveal.  I hope you all had a wonderful Thanksgiving.


This month FOUR new stamp sets are being introduced.   These sets are 20% off their regular price, until Dec. 3rd.  All the new reveal sets are available on Cling Mounted Rubber and as a digital image.  Sweetheart Frog, set #677 is the stamp set featured in  This Month's Technique Video.

The sets are:


Toyland Bear #674   (digi version DIGI674)
Gymnast #675   (digi version DIGI675)
Love and Kisses #676  (digi version DIGI676)
Sweetheart Frog #677   (digi version DIGI677)

On Dec 3rd,  one Grand Prize Winner will be selected from the comments left on the designers' blogs listed below.  The Grand Prize Winner will receive

all FOUR of the new rubber stamp sets (or digi sets, if you prefer)

The new SNS Creative Challenges also begins today, with lots of prizes and recognition badges. 

The winner of the blog hop will be announced on Dec 3 on Facebook, the SNS blog, and on our blogs.  This month's Blog Hop order is: 


Eret Pank
Anne Temple
Marie Berquist
Belinda Shupe
April Williams
Shona Erlenborn (you are here)

(Tip: if you have a problem with a particular link, try clicking on the person's blog title to send you to their Home page.)

We hope you enjoy the New Reveals as much as we do. Our winner last month came from April's blog. Don't forget to leave a comment with each Designer to be eligible for the Grand Prize.  We love reading your comments and hope we have inspired you as well. If you absolutely cannot leave a comment for some reason, please email icinganne@yahoo.com with your comments and the name of the blog or Designer you are commenting about.

I chose the Gymnast set to work with this month and wanted to also incorporate the brand new "Frozen" glitters. I was thinking along the lines of the Olympics and thus the different colored rings (circles) came about. 


I decided to go with a Center Step card this month. I stamped the Gymnast on white cardstock with Memento Tuxedo Black. She was then colored with Copics and cut and embossed with the biggest circle die cut. I sponged Memento Lulu Lavender around the image before removing the die. I added a strip of the Princess Anna Fuchsia glitter to the side of the outfit with the Sakura Glue Pen. I then edged the circle with Versamark and heat embossed with Mulberry Star. I cut another circle the same size that will be used as a backing to this circle.

Next I applied a piece of 2 1/2" Tear-ific Tape to white cardstock and cut out the four smaller circles. After removing the protective backing, I applied Olaf White to the largest of the four circles, and then continued with the smaller circles with Princess Anna Royal, Princess Elsa Frozen and then Princess Anna Fuchsia to the smallest circle.


I cut out one more taped circle using the second smallest die and applied Cloud Nine Velvet Glitter to that one. I stamped the sentiment directly on top of the glittered circle with Memento Tuxedo Black.

I followed the tutorial to make the base for the Center Step card. 3/4" Tear-ific Tape was applied to the base step and sides, with a 1/8" strip added to each side of the 3/4" tape (which adds up to the inch width of the sides and base). Remove the protective backing from the 3/4" piece on the base and center a piece of 1/4" tape, before applying Princess Anna Royal glitter. Remove the two 1/8" and the 1/4" from the base and apply Olaf White.


Repeat the same step with the sides, applying Princess Elsa Frost to the 3/4" piece, before removing the 1/8" and 1/4" strips and applying Princess Elsa Frozen. Also put a 3/4" strip of Princess Elsa Frozen at the top of the base.

Assemble the card by sandwiching the Princess Elsa Frozen and Princess Anna Royal circles between the image and the extra cut circle. Add the Olaf White circle to the top of the base and then add the image with dimensional dots. The little Princess Anna Fuchsia and the sentiment circle are then added with Dimensional Dots to complete the card.
   

I hope I've inspired you to check out the new "Frozen" Glitters. I see this Christmas, "Frozen" is all over the stores. Now it can also be all over your cards! If you came via the talented April's blog, then you have successfully completed the blog. You can pop over to the Sparkle N Sprinkle blog now and leave any other comments that you wish.

Hugs, till next time,

Shona

Friday, November 28, 2014

SANTA'S COMING TO TOWN!

Hi there, and I hope that if you celebrated Thanksgiving day - it was a wonderful one! It is scary how quickly the holidays came this year, isn't it. Before we know it, the big guy in the red suit is on his way! Oh look - Here he comes now!


Sparkle N Sprinkle is now carrying Die-Versions dies. There are many awesome designs and they have just introduced some fabulous Pop-Ups and Cut-Outs too. Today, I'm sharing a card with you using the Sleigh Ride die cut.

Apply a 4" x 5 1/4" piece of Super Adhesive Sheet to white cardstock and die cut "Sleigh Ride". Cut an oval using Spellbinders Classic Ovals Large from the center of the scene and set aside. The town and Santa portion of the scene will be used for another project.


I die cut the scene again, this time just from plain white cardstock. I applied Versamark to the die cut and heat embossed with Black Detail embossing powder. There is no need to emboss the entire oval, just the edges past where the where oval will go. (This will also ensure better adhesion for the Dimensional Dots.)

Remove protective backing from the framed piece and apply Gypsy Red Velvet Glitter. Remove protective backing from another piece of the Super Adhesive Sheet and place behind the window. Insert the embossed scene into the space and add Cloud Nine to the remaining exposed tape.


Remove backing from the white oval and apply Cloud Nine glitter. Stamp sentiment in Memento Love Letter ink directly on top of the glitter. This is a great way to get a sparkly greeting. Not only can you stamp on top of Cloud Nine, but you can color too! Check out the full tutorial here

... and the belt? It is a piece of 1/2" Tear-ific tape sandwiched between Black Suede Velvet Glitter. Check out our "glittered ribbon" tutorial for that technique! 


Layer the card front to a white glossy card base. Weave the glittered ribbon through the belt buckle and tape it down to the front of the card as shown.

Hope this has inspired you to try out some of our Velvet Glitters. Let me leave you with a sneak preview of another version of the same die cut, being used in a different way with some more of the Velvet Glitters: 


Will share this one with you shortly!

Till then, 

Shona

Friday, November 21, 2014

CHRISTMAS WOOFIE GONE BIRTHDAY!

Hi there,

I've been upstairs in my stamping room this morning and they are already starting to introduce those Christmas tunes into the radio playlist!  Yikes!  It's still too early for me and in an effort to slow the inevitable down a bit, I decided to repurpose a Christmas image to a birthday one - just because!

I got the idea from a Blog Challenge last week, and wanting to use one of the new Die-Version dies which SNS is now carrying, I decided to give Woofie a seasonal change. 


He comes like this in the Set:


... and I made him into this:


The inside is as much fun as the outside:


Sparkle N Sprinkle now offers many of the Die-Version dies. There are also these PopUp dies and CutOuts that are just so much fun. You can check them out here.

For my Woofie Birthday I stamped the Christmas image on to white cardstock and then colored the packages in birthday colored Copics (incorporating some of the colors from the printed cardstock). I then fussy cut and added dimensional glue to the packages to make them nice and bright.


Woofie was given a "coat" of Brushable Glue and was adorned then with Buff Flocking, to make him soft and fuzzy! The hat and balloons were stamped from another new stamp Set 673: Birthday Friends. They were stamped onto scraps of the patterned paper, fussy cut and then Versamark was applied to them before being heat embossed with Clear Detail.


I added a piece of the patterned paper to the card front and ran natural cardstock through the Cuttlebug Happy Birthday embossing folder. The embossed piece was torn and then inked directly with Memento Desert Sand. It went well with the Buff flocking.

I added a little sparkle with strips of 1/8" Tear-ific Tape applied with one of the Velvet Glitters: Peruvian Lily. This background was then layered to the card base. I cut and embossed the circle, from natural cardstock, using Spellbinders Classic Circles Large die and sponged the piece with Desert Sand, before removing the die.

The sentiment was stamped in Versamark and heat embossed with one of the Tuscany embossing powders, Sienna. I love using these embossing powders for sentiments, as they are very fine powders and are therefore great for detailed images as well as words.


I then hand cut the banner and sponged again with a little Desert Sand. The card was then put together with tape and some dimensional dots. 


I hope I have inspired you today to take another look at your Christmas stamps and see how else they can be put to use.

Since I missed the deadline for repurposing your stamps, I'd like to enter this card in the following challenge:

Love to Scrap Challenge Blog #42 - Say it in Color

Till next time,

Warm Hugs,

Shona

Tuesday, November 11, 2014

WINTER??? PUT ON A WARM AND WOOLLY SCARF!!

Hi there and thanks so much for stopping by. 

Today I'd like to share a card which features another of the Sparkle N Sprinkle November Reveal sets: Finn's scarf. I decided to make the entire card warm, fuzzy and sparkly, starting with a cozy scarf!


I stamped the image with Memento Tuxedo black and colored with Copics, I then went over the colors of the scarf with Brushable Glue and some Sapphire and Silk, then repeated with Purple Dazzle. I added Dimensional Glue to his beak and feet and set him aside to dry, while I made the background.

I took a piece of Super Adhesive Sheet and applied it to a piece of white cardstock. I removed the protective backing of the sheet and then began adding different widths of Tear-ific Tape, leaving a little 1/8" space between each tape. It will look something like this when done.


I then cut the piece to 4" x 5 1/4":


Then I applied Sapphire and Silk Sparkle N Soft to the exposed tape areas:


Then I continued with Purple Dazzle for the 3/4" width and Blissful Blue for the 1/2" and 1/8" and finally Twinkling Clouds for the 1/4" width.


The sentiment was stamped in Versamark and heat embossed with Dark Night. It was cut and embossed with a Spellbinders Back to Basics Tag and some Lulu Lavender Memento ink was sponged to the tag, before the die was removed.

The blue snowflake eyelets were heat embossed with Sparkle and attached to the striped background, one of them attaching the sentiment. 


A piece of 2 1/2" Tear-ific Tape was attached to white cardstock and then torn diagonally. I removed the protective backing and applied Moonrise Glitter Tinsel, this "snowdrift" was stuck to the base of the background as shown. I edged the background with Copic B69 before attaching to white glossy card base, which had been edged with a Krylon Silver Pen.


Mudd Puddles - Ice Sea Glass was spread over the snowdrift at either side of Finn, after he was mounted to the card base with Dimensional Dots.

Full directions for the card can be found here, if needed.

Now he's ready to go out and get in a snowball fight. Bring it On!!


Hope I've inspired you to try some new backgrounds with the flocking and Sparkle N Soft that Sparkle N Sprinkle has to offer. They can certainly add warmth and fuzziness to your projects!

I'd like to enter this card in the following card challenges:

Clear it Out - Use 3 of the Same Thing! (I used 3 snowflake eyelets)
Scrap-Creations - Make it Sparkle! 

Till next time, warm hugs,

Shona

Friday, October 31, 2014

SPARKLE N SPRINKLE'S NOVEMBER 1ST REVEAL

Hi, and welcome to Sparkle N Sprinkle's November 1st Reveal! Toot, toot, toot! ......


This month FIVE new stamp sets are being introduced.   These sets are 20% off their regular price, until November 3rd.  All the new reveal sets are available on Cling Mounted Rubber and as a digital image.  Finn's Scarf, set #671 is the stamp set featured in  This Month's Technique Video.

The sets are:

Christmas Doves #649   (digi version DIGI649)
Brighten the Holidays #663   (digi version DIGI663)
Finn's Scarf #671  (digi version DIGI671)
Woofie Under the Christmas Tree #672   (digi version DIGI672)
Birthday Friends #673   (digi version DIGI673)

On Nov 3rd,  one Grand Prize Winner will be selected from the comments left on the designers' blogs listed below.  The Grand Prize Winner will receive

all FIVE of the new rubber stamp sets (or digi sets, if you prefer)

The new SNS Creative Challenges also begins today, with lots of prizes and recognition badges.

The winner of the blog hop will be announced on Nov 3 on Facebook, the SNS blog, and on our blogs.  This month's Blog Hop order is:

(Tip: if you have a problem with a particular link, try clicking on the person's blog title to send you to their Home page.)

So without further ado .... Here are two of my best girlfriends, who know how to party!


I wanted to incorporate a fancy fold this month - and I found this interesting one, the Concertina fold, over at Splitcoast Stampers. Rather than using design paper, I decided to use sticker paper with some glitters to decorate the panels.


After printing the digi and the sentiment, I colored them with Copics and added a little Sparkling Snow with a Sakura Glue Pen to glitz up their birthday celebration.

This is a photo of the card laying "flat" so you can see the gradation from pink to blue glitters used.
The glitter panels were done by cutting strips of 2" sticker paper cut at a slant at the top, so there is an 1/8" edge around each of the panels. Keeping it in the red hat and purple haired club for the sake of these two, first panel is decked out in Pretty Princess, then comes Flirt, followed by Eggplant and finally Blue Jewel. The glitter panels were attached with 1/4" tear-ific tape.

The Concertina card doesn't really have a place for you to stamp a sentiment, so I thought I'd tuck a little tag in a pocket on the back of the front right side panel, and attach some balloons to it for a festive touch!


The balloons were created from pink, purple and blue cardstock covered with a piece of 2 1/2" Tear-ific Tape. Remove the protective backing and apply Pretty Princess to the pink cardstock, Eggplant to purple and Blue Jewel to the blue. A little piece of silver thread was attached to the base of each of them and then they were attached to the front of the tag with the printed sentiment with Dimensional Dots, so that when it goes down in the pocket the balloons sits over the top of the front right side panel.


Too much fun - right?!!

So just to add a little more bling to the sparkle - I added pink Mon Ami Gabby Diamond Mesh to the top of each of the left hand side panels and the two back right hand side panels the bling tape is quite sticky, so I added some Sparkling Snow to counteract that! Full directions can be found in the SNS Gallery, right here, if needed.

That's my show and tell for today! Hope I've inspired you to get out some bling!
I'm first up this month, next is the very talented April, but don't forget to leave a comment with all of the Designers to be eligible for the Grand Prize.  We love reading your comments and hope we have inspired you as well.  If you absolutely can not leave a comment for some reason, please email icinganne@yahoo.com with your comment and the name of the blog or Designer you are commenting about.

Thanks for stopping by,

Hugs,

Shona

Thursday, October 23, 2014

HAPPY AUTUMNAL BIRTHDAY

Hi there, today I have a card to share, made with the new Welcome Autumn set for a dear friend, who hopefully will have received it by now, so it won't ruin the surprise! There is a lot of detail in this pretty image, which means a lot of potential coloring! I decided to use the spotlight technique and just focus on the friendship of the little animals in the image.


I stamped the image in Versamark on mustard cardstock and heat embossed with Teddy Brown. I took an Aqua Pen and filled it with bleach and colored the leaves of the image. I cut and embossed the card front with Spellbinders Fanciful Lattice. The image was then stamped again on white cardstock and I colored just the animal areas using the following Copics: E33, R20, YR21 and YR24.


The big cat area was cut out of the embossed image and the same part of the image was cut and embossed from the white image, using Spellbinders Standard Circles Large. The white image was placed in the "window" and was taped down from the back.

I then edged another piece of mustard cardstock with 3/4" Tear-ific Tape, after removing the protective backing, the latticed card front was centered on the edged piece and Goldenrod velvet glitter was applied to the exposed sticky edges.


I continued cutting and embossing the other little animals and they were attached in their places with Dimensional Dots. 

The happy birthday was die cut and then heat embossed with Teddy Brown. I attached the sentiment with Dimensional Glue. Friend was cut and embossed and then I ran Memento Cantaloupe ink over the top, before heat embossing with some Clear Detail to give it a bit of a shine, like the happy birthday. This was also attached with Dimensional Dots.


The card front was layered on a mustard card base and a strip of Diamond Mesh was attached to the left hand side for some autumnal bling and to complete the card.


I enjoyed putting this card together for Donna! Happy Birthday dear Friend! 

I'd like to enter this card in the following two challenges:
Stamping Sensations - October Challenge - Warm Autumnal Colors
and Jellypark Challenges - Autumn/Fall

Thanks for stopping by today,

Shona