Thursday, February 21, 2019

You Make Me Happy!

Hi there,
Today I'm sharing a card which features the Black Ice Technique, using the gorgeous digi 920 May Showers along with a sentiment from Set 555 April Showers.
I printed out the colored version of the boots and sponged some Memento Summer Sky around the base of the boots.
Next, I pulled the Hybrid ink pad Metro Grey (I thought using black ink would be too dark) down the entire panel and then turned the piece around so that I pulled the ink down again (from the boot end up). It should have faint vertical lines going through the entire piece with more ink at the top and bottom where you start the process.
Now repeat the same process with Versamark and then heat emboss with Clear Detail.
The sentiment from April Showers set 555 was originally stamped directly on the image panel, however I decided to use a die cut tag so stamped the sentiment in Versamark and heat embossed with Black Detail. This was then cut out with the Spellbinders Grommet Tag and before removing the die I sponged on a little Memento blue Summer Sky. 
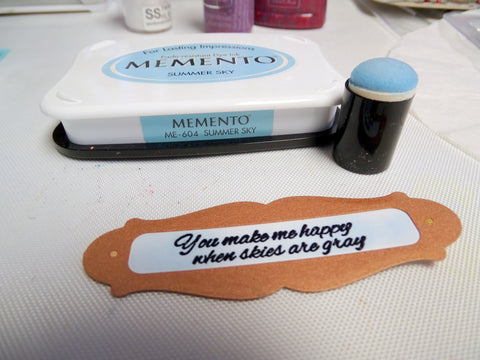
The tag was attached to the image panel with two yellow brads. This was then attached to a light blue card base to finish.


Here is another card I did with the same Black Ice technique on silver cardstock, using the Vintage Country Home Stamp Set 911.

Below are the products used in today's card. The linked items can be found over on the Sparkle N Sprinkle website. You can also use code ShonaDT10 at the checkout for a further 10% off your entire order. 
Digi 920 May Showers
April Showers Set 555
Vintage Country Home Set 911
Memento Summer Sky
Hybrid Ink Metro Grey
Versamark
Black Detail (EP171)
Clear Detail (EP280)
Spellbinders Grommet Tags
2 yellow brads
I hope you have enjoyed my quick share today. 

I'd like to join in the following challenges:
World Wide Open Design Team Challenge #2: Anything Goes
Cardz 4 Gals Challenge #90: Weather: Any condition

Thanks for stopping by!
Shona

Wednesday, February 13, 2019

Timeless Beauty!

February Challenge at Christmas at Sweet Stampin'

Hi there, 

I'm delighted to be a newbie on the Design Team over at Christmas at Sweet Stampin'. Here is the card I made using the Sparkle N Sprinkle stamp set 935: Winter Deer.


With kraft cardstock in my stamp positioner, I began with stamping the image in Hybrid Acorn Brown ink, I then colored the image with Nuvo Alcohol Markers.
 
The image was then returned to the same position on the stamp platform and the stamp was inked up with Versamark and then heat embossed with Clear Detail. This made the image lines pop again.
Using the Nuvo Precision Glue I applied Twinkling Clouds Flocking to the snowy boughs.
I used the Spellbinders Superellipse die inside the Creative Expressions Seville die to frame the deer. I then ran kraft cardstock through the larger Seville frame  die which was then distressed with Memento Ladybug ink using a dauber. 
After stamping the sentiment on kraft cardstock in Versamark ink and heat embossing with Red Apple, I went to use the little Seville die, but it was too big for the sentiment, so I cut halfway through the die on my machine then moved the die over, so that it made the sentiment shorter and narrower.
I die cut a piece of the red cardstock from the same die as a backing for the sentiment. I die cut three of the Tutti Designs die Arched Fir Branch and then they were applied with Versamark and heat embossed with Sparkle. The kraft distressed frame was layered to a red card base and then I arranged the sparkly fir branches around the edges of the frame. The deer with the red frame was then positioned in the center with mounting tape.
The sentiment was then attached also with mounting tape. Ruby Slippers Glitter Drops were applied to some of the berries and left to dry. I then added some more berries with Glitter Accents Winter Cranberry. You have to wait until the drops dry between applications otherwise it will become one giant blob instead of individual berries. 
 
I also applied three of the Ruby Slippers to the sentiment. Below you can see the dimension of the puffy snow and the berries.
So that finished off my card for today.
I hope you've enjoyed my share today. Below please find the list of products I used on my project today. The linked items can be found over on the Sparkle N Sprinkle website and if you use my ShonaDT10 code at the checkout and you will receive an extra 10% off your purchase.
Memento Lady Bug
Tutti Designs die Arched Fir Branch
Spellbinders Die Superellipse
Creative Expressions Die: Seville

We would love to see you join in the Challenge over at Christmas at Sweet Stampin'. You can show us anything Christmas! Hope to see you join in the fun! You n also join in the Sparkle N Sprinkle Challenge, where all you need to do is use embossing powder or loose glitter!

I'd like to enter my card in the following challenges:
Classic Design Team Open Challenge #2: Anything Goes
Scrapy Land Challenge #107: Use a die that Scrapy Land carries
The Holly and Ivy Christmas Challenge #44: Anything Goes
Thanks so much for stopping by today,
Shona


Thursday, February 7, 2019

Thanks a Bunch - "Of Tulips"!

Hi there,

So is Spring here? We have had two lovely days of warm sunshine and that makes me feel rather happy! Apart from going outside and getting some much needed exercise - warmer weather always gets me in the mood for flowers. It was quite appropriate Monday that my Candy Cane Amaryllis started to bloom! That's what's my header for the month of February!

So still thinking about Spring we have the Sparkle N Sprinkle Showers of Tulips Digi Set 923, yes I know it came as tulips in an umbrella, but technically challenged me just couldn't get the entire digi to print!! So therefore - it became a bunch of tulips!!


As I said, I couldn't get the digi to print the entire thing (total operator error) but then I thought I'll just fussy cut what I have into a bunch of flowers and pair it with the awesome "A Big Thanks" Set 928, which includes this awesome stamp "Thanks a Bunch", designed by dear friend, Donna Ellis!


After I had fussy cut it, I covered it in Versamark and heat embossed with Clear Detail, then applied Versamark a second time and heat embossed Super Thick Clear, from underneath. I've been having a lot of fun with these Super Thick embossing powders lately. SNS has an entire new line of pastel colors (which are perfect for Spring). I did a quick card yesterday using all eight of the new colors and the new dreamy Smokey black. You can see the card here.


The Thanks a Bunch sentiment was randomly stamped on a piece of white cardstock with Memento London Fog and also across the die cut (Sizzix Framelits Dotted Ovals).


I positioned the foam mounted oval directly over one of the Thanks a Bunches. This was then layered to black cardstock before the white card base. The tulip bouquet was then mounted with foam on top. Grey Mist Nuvo Jewel Drops were applied here and there to finish off my card. 


I hope you've enjoyed my share today. Listed below are the products used in my card. Most of the items can be found on the Sparkle N Sprinkle website. Also, if you enter my code ShonaDT10 at checkout, you will receive an extra 10% off your order.

Memento London Fog
Sizzix Framelits Dotted Ovals

I'd like to join in the following challenges with my card:
Craft Stamper Take It Make It February Challenge: Anything goes
World Wide Open Design Team Challenge #1: January
Classic Design Team Challenge #2: Anything Goes

Thanks for stopping by today,

Big hugs,

Shona

Wednesday, February 6, 2019

Rainbow Sherbet Hello!

Hi there,

Just had to pop in quickly to share a fun little card I made today, using the new line of Super Thick Embossing Powders now available at Sparkle N Sprinkle


I lined up all eight of the new Super Thick pastel colors, going from Bluebird to Frosted Lawn.


I applied Versamark ink directly from the refill bottle, to approximately an eighth of the 3 1/4" x 6 3/4" piece of watercolor cardstock. Bluebird (EP471) was then sprinkled on top.


These super thick embossing powders need to be heated from the bottom (otherwise the dry powder would fly everywhere!) I have a system where I hang my heat tool in my drawer and then that leaves both hands free for positioning. 


Look at that bubbly result!


Continuing on with some more Versamark ink and Spring Lilac.


.... finishing with Frosted Lawn.


Here you can see the bumpy surface of the entire piece.


I could have left it like that, but I decided to go in from the top with the heat gun and "blend" the colors into one another. Heat tool comes out of the drawer for this! Below you can see the more blended and less bumpy version.


Putting a piece of 2 1/2" Tear-ific Tape on the back of black cardstock, I ran a hello die through my machine (black side up - don't ask how I know this!!!).


The die cut was inked with the Versamark Pad this time and another new Super Thick color, Smokey (EP480) was applied. I was able to heat this from above as the Versamark is thick enough to hold a single layer of embossing powder. Here you can see it half heat embossed. Look at that shine!


To assemble the card. I mounted self adhesive craft foam to the back of my sherbet rainbow and then stuck it to my 7" x 3 1/2" black cardbase. I removed the protective backing from the die cut and stuck it to the embossed piece.


I hope this has inspired you to go to the SNS website and pick up some (if not all) of these gorgeous colors. I know I will be playing with them lots more. February's video kit club also uses Smokey along with the new Neon (EP481). Take a look at the video to see other fun things to do with these wonderful Super Thick enamels! 

Below is a list of the products I used in my project today - most of which can be found on the Sparkle N Sprinkle website. Also, if you use my special Coupon Code (ShonaDT10) at checkout you will receive an extra 10% off all the products.

Hello die

Hope you've enjoyed my share with you today! Spring is around the corner and these powders
have Spring written all over them!

Thanks for stopping by,

Shona

Friday, February 1, 2019

It's A Girl Thing - Turner Syndrome Awareness Inaugural Blog Hop!


Hello Blogging Friends!!


Turner Syndrome is a genetic disorder where a female is born with only one X chromosome, instead of two, leaving her with life-long medical issues and learning disabilities. This condition occurs one in 2,500 female births worldwide, but is more common among pregnancies that do not survive to full term. That is why Turner Syndrome Females are considered MIRACLES!


Nineteen caring Sponsors and eleven DT Members have partnered with us to bring Turner Syndrome Awareness to the Public. For details on how you might win any of these fabulous prizes, please see Lori's TS home page. Thanks for learning About Turner Syndrome


My TS related project uses a few colors from the TS official color board:


I am so glad to be a part of the Turner Syndrome awareness Blog Hop. I had not even heard of this condition let alone the possible life changing medical issues it can cause. The butterfly has become the symbol for "Turner Girls". Just like a butterfly, they are considered fragile and beautiful miracles.  So I chose to highlight the fragile butterfly on my card.


I cut the butterfly die once from white cardstock and once from vellum.The vellum butterflies were colored with Copics and then turned over to show their paler sides before being slotted in their spaces.


I backed this with a piece of Super Adhesive Sheet to keep the vellum butterflies from fluttering away!

One of the sentiments from Sparkle N Sprinkle Set 933: Ribbons of Love was stamped on to a piece of vellum with Versamark and was heat embossed with Cerulean. I tore the vellum and wrapped it around the back of the butterfly panel. 


Next I attached another piece of Super Adhesive Sheet to white cardstock and ran the butterfly die through the machine again. Six of the butterfly confetti were "colored" with three glitters - Mountain Mint, Daisy and Blue Haze. I took the butterfly and removed the protective layer then burnished the glitters into the sticky surface.


A piece of light blue cardstock was edged with 1/2" Tear-ific Tape and after removing the protective layer the butterfly panel was adhered to the center of the sticky edged cardstock. Blue Haze glitter was then applied to the remaining adhesive.


The butterflies were attached to the butterfly panel with little strips of 1/8" Tear-ific Tape. I curled up their wings to make them more dimensional.


The card front was then adhered to a white cardbase, which finished off my card. 


Below is a list of the products I used in my card today. Use my code, ShonaDT10, to get an extra 10% off any linked items on the Sparkle N Sprinkle website.


Cerulean (EP421) Blue Ribbon (EP279) could have been used!
Copics
Recollections butterfly die


Thanks for joining me and hopefully learning a little about Turner Syndrome today. Please remember to visit the "It's A Girl Thing" Turner Syndrome Awareness Inaugural Blog Hop page to become eligible for the many prizes up for grabs. 

I'd like to enter my card in the following challenges:
Scrapy Land Challenge #106: Use a die cut 
Craft Stamper Take It Make It - February Challenge
World Wide Open Design Team Challenge #1: Anything Goes
Classic Design Team Challenge Blog #2: Anything Goes

Bye for now,

Shona