Sunday, April 30, 2017

SPARKLE N SPRINKLE'S MAY 1ST REVEAL

Hello and Welcome to the Sparkle N Sprinkle
 May Reveal Blog Hop!


NEW STORE - NEW BLOG - NEW PRODUCT LINES!
There are EIGHT new rubber stamp sets being released this month, plus a new Digi Papers set, and two huge Digi Bundles.

The sets are:

840 - Happy Flowers  
(digi version DIGI840FS - see below)

844 - True Beauty  
(digi version DIGI844B)
(digi version DIGI845BG)
(digi version DIGI846BG)


847 - Kaitlyn Mermaid  
(digi version DIGI847LS)

848 - Rory Batter Up  
(digi version DIGI848LS)
(digi version Digi849-850B - see below)
(digi version  Digi849-850B - see below)


Digi849-850B - Graduation Bundle (combines both sets plus includes additional images)

Digi840FS - Happy Flowers Bundle (includes additional images, decoupage sheets, digi papers)

Digi4004FS - Rainbow of Pastels Patterned Paper Pack (Digi Papers)


The new sets are 20% off until May 3, 2017, so after the blog hop, hop on over to the NEW STORE and have fun shopping - be sure to check out the OTHER amazing new products as well! 


Be sure to check out the new SNS Blog, which can be found here!


On May 3, ONE GRAND PRIZE WINNER will be selected from the comments left on all the Designers' blogs listed below.  Please leave a comment with each designer to be eligible for the Grand Prize (checked for compliance).  The Grand Prize Winner will be announced on the SNS Facebook page and the SNS New Blog.  


Also, when you purchase the digi versions of any of the SNS rubber sets, you are getting lots of extras that aren't available otherwise.  These extras include additional images not available with the rubber version, digi papers (in some cases), and now a cut file to use with your electronic cutting machines will also be included with all digi images purchased!

You're definitely going to want both the rubber versions as well as the digi versions of all our new releases.


The new sets are 20% off until May 3, 2017.  So once you finish the blog hop, head on over to the New Store and start shopping.

On May 3rd, ONE GRAND PRIZE WINNER will be selected from the comments left on the Designers' blogs listed below. Please leave a comment with each Designer in order to be eligible for the Grand Prize.  You never know who the Mystery Designer will be that has the winning comment.

The Grand Prize Winner, which will be announced on the SNS Facebook page and the SNS New Blog, will receive ALL of the new rubber stamp sets revealed this month.


The Blog Hop Order this month is:
(*Tip: if you have difficulty with a particular link, try clicking on the Designer's blog title to send you to their Home page.)


We hope you enjoy the New Reveal Blog Hop as much as we do.  Thanks for joining us and remember to comment on each of the Designers' blogs to be eligible for the Grand Prize.  
 Wonder who the Mystery Host will be this month????


Have you checked out the SNS YouTube Channel featuring Demo Donna?  If not, then you are in for a real treat.  Subscribe today to get all the latest Demo Donna tips and techniques!


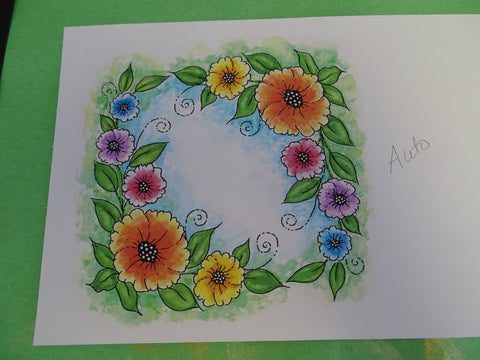
I decided to use the Happy Flowers Set 840. I really love this little set with the fun sentiments and the pretty flowers. This time I chose to do my flowers in a row and use the embossing resist technique. Hope you enjoy my share today.


I began by embossing the sentiment in Versamark and heat setting in Black Detail, the flower image was then stamped to the left and right of the sentiment in Versamark and heat embossed this time with White Detail.


After the image and sentiment were heat set, I stamped two of my new inks, Oxide Distress: Peeled Paint and Broken China, onto my craft sheet and then with a water brush, simply brushed the "paint" over the top of the embossing, which resisted the inks perfectly.


Next I started to "paint" with my new Aqua Flow Markers. I used Soft Rose, Fresh Green (Spring Meadow collection) and Aqua Splash (Summer Holiday Collection) and a little Evergreen Fern (Autumn Woodland Collection) to go over the top of the Distress Inks. The markers painted beautifully. They have a very pointed tip that allows you to get in to the tiniest spaces.


I went over the flowers a couple of times, until I was happy with the coverage. Using the Nuvo Fine Tip Glue Pen I applied Cyclamen (G1090) and Spirited Green (G1070) to the flowers and the leaves.


A lovely sparkly effect. Along with the new Aqua Flow Markers, I also used the new Nuvo Glow Drops. I added Banana Split to the centers of the flowers, some Apple Sour to the Grass and then Blue Crush to the sky.


Here (the card on the bottom) is how it looks without the light on it:


... and here it is in the darkness:


I'll be using these Glow Drops in my next two cards coming up this month. Here is a list of the products that you can purchase over on the SNS website.

Versamark, Distress Oxide: Peeled Paint, Broken China
Cyclamen (G1090), Spirited Green (G1070)
Nuvo Glow Drops: Apple Sour, Blue Crush, Banana Split

Hope you've enjoyed your visit today. Now you need to stop over to the amazing Donna's blog. She is sure to have a show stopper to share with you.

Hugs,

Shona

Thursday, April 20, 2017

Christmas Holly Blessings

Hi there, 
Today I'd like to share with you a card made using the pretty Christmas Holly Blessings Set 841 from the April Reveal..
I began by stamping the image on white cardstock with Memento Olive Grove. I fussy cut around the vase and die cut the piece with Memory Box Cross Stitched Frame Borders, using the out of the box technique (placing the edge of the vase over the top of the frame so it doesn't get cut off).
 
Next I colored the vase with the Nuvo Fine and Medium Tip Glue Pens and left it till it got tacky, then I applied Nuvo Gilding FlakesRadiant Gold to the vase for a lovely shiny appearance.
The image was colored with Copics: BG93, YG03, G99, R29 and then I began going over the berries with the Nuvo Red Berry Crystal Drops. It is best to apply the drops a little at a time, leaving space around them and letting them dry before going in and applying more, otherwise they will run in to one another and become one big blob.
At this point I made my background, which was a white piece of cardstock, run through a Cardmaker Magazine Holly Embossing Folder. This was then daubed with Spring Green Nuvo Embellishment Mousse.
The berries were also applied to the border in stages, like the image. Sentiment, from the set was stamped in Versamark and heat embossed with Gold Detail. This was cut out from one of the smaller dies from the MB die set and was sponged with Lady Bug Memento ink before the die was removed. Three little Red Berry drops were added to the sentiment and then both the image and sentiment were popped up with mounting tape onto the background , which had been previously layered to red cardstock with 1/4" Tear-ific Tape.
That finishes off my card for today. Hope you've enjoyed my share? 
I'd like to play in the following challenges with my card:
Christmas at Sweet Stamping: April - Anything Christmas
Holly and the Ivy Challenge: Anything Christmas
Make My Monday: Challenge #44: Embossing Heat or Dry
Here is a list of the products used in my project. Click on the product and it will take you directly to the SNS store, where they can be purchased.
Thanks for stopping by today,
Hugs,
Shona

Thursday, April 13, 2017

Friend Slider Card

Hi there,
I'm here with you today to share my last card of the April Reveal which uses both the digi bundle and the rubber stamps of Corner Garden Set 842. This one is an interactive slider card. The three little butterflies go flying around the circle! Such fun!
First, I printed out two sheets of the orange version of the designer background paper that came in the digi bundle. Then I put one of the sheets back in the printer so that I could print on top of it, and this I did, in the "Vogue" style of the flower frame which was one of the options that my computer gave me! Who knew! Of course, I'm having trouble replicating what I did. Hoping to work more on that at the weekend. You all know I'm a bit of a newbie when it comes to digis!
This focal piece was then layered on black cardstock, which was layered to the second piece of background paper. I then took the spellbinders Standard Circles and die cut two of the circles from the center of the image:
Here is the back side:
Turning it back over, we now have all the pieces cut out. The sentiment from the stamp set was stamped in Versamark on white glossy cardstock and was heat embossed with Black Detail. This was then cut out with the smaller of the two rings. 
The card front was then layered to a piece of glossy white card base with Mounting Tape, and a little Brushable Glue was put on the underside of the floral ring, which was then stuck down onto the white base beneath, keeping the pattern of the flowered frame intact. Using the glue instead of tape allowed me to move it slightly to get the lines to match up. This was done without the sentiment there (I neglected to take a photo of that stage), which made it easier. The sentiment was then popped up on top of the black circle, which brought it to the same level as the outer ring.
Next I stamped the three butterflies in Memento Tuxedo Black from the left-over piece of the background paper, I then highlighted certain areas of the butterflies with Copics and fussy cut them.
The three colored butterflies were then given two coats of Versamark and Clear Detail embossing powder, heat setting between each application. The two coats of the embossing powder made them more sturdy, as those are the pieces which will be handled.
Next a piece of mounting tape was attached to each of three pennies, the Anti-Static Bag was pounced all over the back of the coins to make sure none of the tape was still sticky. 
The protective backing was removed from the tape and a butterfly was stuck down on each coin. The coin was then slipped under the outer ring and the sentiment, and should move with ease around the indented ring. This was repeated with the other two butterflies and the pennies.
Now the three shiny butterflies can flutter around the sentiment! Three drops of transparent Nuvo Jewel Drops "Grey Mist" were added to each corner of the card front to finish off my card for today.
I'd like to play along in the following challenges:
Whoopsi Daisy Challenge (April): Spring Sings in Flowers
Crafts and Me April Challenge: Things with Wings
Here is a list of the products I've used today, which are linked over to the Sparkle N Sprinkle store, for your convenience.
Hope you've enjoyed my combination of digi and rubber stamping today?
Warm Spring hugs,
Shona

Thursday, April 6, 2017

Every Flower

Hi there,

Today I'd like to share another card using both the rubber stamp Corner Garden Stamp Set 842, together with the Digi Bundle Corner Garden #842. I'm having so much fun with this digi bundle!
For my card today I ran off the the framed colored version of the image on to white cardstock. The joy of this digi set - there are black and white images to color yourself or you can take the pre-colored digis, where the work is already done for you! That's what I did here. 
I fussy cut the flowers and leaves and then thought to have them trailing over a trellis. I cut out Spellbinders Basic Lattice die from black cardstock and then daubed it with Nuvo Embellishment Mousse Mother of Pearl. This gave the trellis a wrought iron look. The vines were "placed" temporarily, which I decided my next step.
Sentiment was stamped in Versamark and heat embossed with Black Detail. This was then cut out with Spellbinders Standard Circles and some Peony Pink Embellishment Mousse was applied to the edge.
The trellis was backed with a piece of Super Adhesive Sheet, mounted to white cardstock and then pieces of mounting  tape were added to the vines to have them pop up.
Cloud Nine was applied to the sticky areas of the trellis. I edged white cardstock base with Nuvo Embellishment Mousses Lilac Lavender and Peony Pink.
Decided it needed more, so stuck down two doilies to the top left and bottom right corners of the edged card with 3/4" Tear-ific Tape behind them. The over lapping edges were trimmed, then I layered the card front  on top of the  base. The sticky areas of the doilies were also applied with Cloud NineSparkling Snow was applied to the flowers and leaves of the vines using the Nuvo Fine Tipped Glue Pen.
I then stamped the little butterflies and two little additional flowers from the Stamp Set in Memento Tuxedo Black and colored them with Copics. They were then added to the gaps around the trellis with Mounting Tape. I added a little copper wire to the butterflies before sticking them down and that finished my card for today.

I'd like to enter my card in the following challenges:
Crafty Gals Corner Challenge 117: 3 layers or more
Stinkin' Inkers Challenge #1: showers of Flowers
World Wide Open Design Team: March 15th 2017 Challenge: Anything Goes
Scrapy Land Challenge #63: anything Goes
Ike's World Challenges #85: In the Garden
 
Product List:
Spellbinders Standard Circles
Spellbinders Basic Lattice
Copper Wire
2 Doilies
Thanks so much for stopping by today. Hope this has inspired you to try the combination of the digi and rubber stamp sets. I'm really liking the flexibility it offers.
Big hugs,
Shona