Hi there,
Today, I'd like to share another card with you from the fabulous February Reveal. Today I chose to use the New Pansies in Teacup Set 833.
Today, I'd like to share another card with you from the fabulous February Reveal. Today I chose to use the New Pansies in Teacup Set 833.

I decided to take a shot at watercoloring with the Distress Crayons on Kraft cardstock. As I would be working with water with the crayons, I began with stamping the image on the Kraft cardstock with StazOn Jet Black ink.

I used a Waterbrush to "paint" the crayon onto the image.

The handle of the Teacup and the little line was applied with glue, using the Nuvo Fine Tip Pen, this was left to dry till tacky and then I applied Nuvo Radiant Gold Gilding Flakes. OK, now what? Let's antique that teacup, shall we? Using a spatula, I put a nice thick layer of the crackled Texture Paste over the whole cup - yes I even covered up the Gold Flakes! Though I did leave the handle as it was.
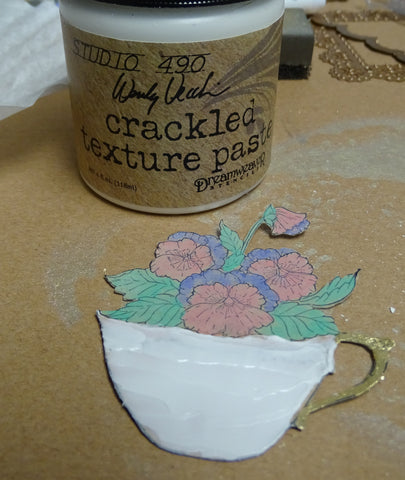
Now to bring those dull flowers back to life! I applied Brushable Glue to the leaves, Dimensional Glue to the flowers and Nuvo Sea Breeze Jewel Drops to the darker parts of the petals. Here is everything before it was left to dry overnight! A big messy blob!

Eight hours later: E voila!

Some Memento Desert Sand was sponged over the cracks of the cup before the cup was applied with Versamark, which was then applied with a coating of Clear Detail and heat set. But the magic happens after another application of Versamark and the Thick Clear Enamel! Ta Da!

OK, I think I'm happy with my focal image now! How about a background? In-keeping with the old and crackled look I decided to make a background using the Crackle Background Stamp Set 609, which was stamped onto Kraft cardstock in Versamark and heat embossed with Clear Detail.

I then took a piece of black cardstock and die cut the Spellbinders Nestabilities Decorative Curved Square. But it needed some antiquing too! So I daubed on some Nuvo Mother of Pearl Embellishment Mousse - a recipe that you will see being repeated!!!


Loving my home-made wrought iron! Here is a look at what the other Embellishment Mousses do on black cardstock:

I found that dabbing the sponge on rather than rubbing it on, gave a nice mottled appearance which I liked. Now I have a whole new cardstock wardrobe!! A little of the mousse goes a long way too!
OK, so I digressed, but I really wanted to share my little metallic discovery! So let's put this card together, shall we?

So the crackle background was layered to the black card base with the wrought iron square taped down on top of that. A strip of cream pearled lace was placed underneath the wrought iron square, and simply snipped at the edges. The sentiment from the same Teacup Pansies Set was stamped in Versamark and heat embossed with Clear Detail. I just fussy cut that it - wanted the focus to be on the teacup. The sentiment was then popped up with mounting foam. It gave everything a pretty vintage look, I thought.

... and that finishes my card for today!
I'd like to enter this card in the following challenges:
Scrapy Land challenge # 59: Using a die that Scrapy Land carries
HeARTful Stamping: Feb 5th to 12th: For a Special Someone and a stamped image
Classic Design Team Challenge # 11: Anything Goes
Hope you've enjoyed my share with you today? Let me know in the comment section down below!
Big Hugs,
Shona
My goodness! I learned a lot today, Shona! Thank you for sharing all the tips and techniques with the mousse, and your use of the different adhesives and Nuvo drops. Incredible! Your card is absolutely beautiful - and the tea cup is pure genius! wonderful card! hugs, de
ReplyDeleteThis is so gorgeous! You really did a great job making those pansies shine.
ReplyDeleteAwesome! I love the M.o.Pearl over the black - YAY - I've got those supplies. Magnificent look on the crazed cup too. So grateful you show the process steps. Lots of sheen & shine where it looks great, and the crackled background was just wonderful with the crazing on the tea cup. How did you bear to cover up the gilding flakes? Brilliant techniques for a stunning look. TFS
ReplyDeleteWOW Shona, all such new techniques to me, but what a transformation of the images and dies, just FABULOUS.
ReplyDeleteFaith
x
Beautiful! I love everything about this card and as always, your amazing techniques! Gorgeous!
ReplyDeleteOh the effect of the crackling texture looks great. Nice job looks beautiful.
ReplyDeleteThank you for sharing with us over here at Classic Design Team Open Challenge and best of luck with your entry.
[Annette Registered Owner/Admin for Classic Design Team Challenge]
beautiful card in your very special style, I really love the cracle effect!!
ReplyDeleteHave a great weekend!
Maria
Fantastic creation love it Thank you for sharing with us over here today at the Classic Open Design Team Challenge and best of luck with your entry.
ReplyDeleteMichelle DT for http://classicdesignteamchallenge.blogspot.com.au/...
Love this - I think my crackle paste dried up by now but now I want some more! Thank you for playing along with my heARTful stamping challenge last week. I hope you'll be back - and I'll be mailing out your prize today/tomorrow!
ReplyDeleteGorgeous...and I love the distressed crackle look to make it look like an antique cup...so very creative (as always) and pretty!!
ReplyDeleteGreat card - beautifully made and it was good to see how you made it all.
ReplyDeleteThanks for joining us at the Classic Design Team Open Challenge.
Helen x