Showing posts with label Bling your brads. Show all posts

Thursday, December 8, 2016

WISHING EWE A HAPPY VALENTINE'S DAY!

Good morning to Ewe!

Today, I'm jumping ahead to 2017, with this fun little set from the December Reveal, Will Ewe be Mine Set 813, to wish the recipient a Happy Valentine's Day.


I n"ewe" right away that I wanted these little lambs to be fluffy, and what better way to do that than with some fun Snow White flocking! Did you know you can color your flocking? Just dab a Copic marker using the side of the nib and the color transfers nicely on to the flocking. If you are doing larger areas - you can use a dauber. I used the marker for the inside of the little lambs' ears.

So to begin, I stuck a piece of 2 1/2" Tear-ific Tape to a piece of white cardstock. I took off the protective backing and added the Snow White Flocking to the sticky surface and burnished it in well with my finger tool. Once I was happy with the coverage, I stamped the image in Memento Tuxedo Black directly on top of the flocking. I then stamped the image on black cardstock in Versamark and heat embossed with White Detail.


After coloring in the lambs' ears, I fussy cut the two white lambs on the left and right so that I could pop them up along side the little black sheep.


I covered the silver brads in Versamark and then dipped them in the Red Apple embossing powder and heat set them.


Using a Versamarker Pen, I added a little embossing ink to the inside of the black sheep's ears and heat embossed with Petal Pink.


The white sheep were then adhered on top of the black version and I used a needle with silver thread to make the heart rope, before adding all the little hearts to the image.


Dimensional Glue was used to add the googly eyes. The red background was die cut with Lifestyle Crafts Nesting Scallop Rectangles before being embossed with the Darice Hearts embossing folder. This was then layered over the image then layered on white cardstock.


The sentiment was stamped on red cardstock in Versamark and then heat embossed  with Black Detail, this was also cut out using one of the smaller Lifestyle Crafts Rectangles. A piece of red and white gingham ribbon was attached to the back of the sentiment and this was popped up with Foam Squares at the base of the card.


The ribbon was attached to the back of the card front before being layered to the black card base to finish.

I'd like to join in the following Challenge with my card today:
World Wide Open Design Team Challenge: 15th November - Anything Goes


I hope "ewe've" enjoyed my share today!

Big Hugs,

Shona

Wednesday, June 22, 2016

BLEACHED FRIEND OF MINE

Hi there,

This is a scheduled post today, as I am in Scotland at my son, Struan's graduation and then jumping down to Italy for a week to visit old friends tomorrow. I am sharing a card using the new Wild Rose Stamp Set 785 and sentiment from the Nasturtium 2 Set 783, from the June Reveal.

Bleached Wild Rose

To begin, I stamped the Wild Rose image in the four corners of the black cardstock square in Versamark and heat embossed with White Detail. The leaves and petals were "colored" using an Aqua Pen filled with bleach. The sentiment was stamped in Versamark and heat embossed with Black Detail and I just tore around the saying. I used three copper brads to attach to the center of the front.  Sheer gold ribbon was wrapped around the bottom left corner and was attached to the back of the panel. This was layered to Kraft cardstock, which was pierced.

Bleached Wild Rose

A gold brad was dipped in Versamark and heat embossed with Black Detail. This was then wrapped around a little hand made bow and inserted through the ribbon to the back. The front panel was layered to black and finally to a white base to finish.

Bleached Wild Rose

Hope you've enjoyed this quick share today.

Till next time,

Shona

Sunday, January 31, 2016

SPARKLE N SPRINKLE'S FEBRUARY 1ST REVEAL

Hi there and welcome to the Sparkle N Sprinkle February Reveal! I'm the last designer on the hop. If you were intending on participating in the hop with the hope of winning all three of the new stamp sets then go back to the beginning with Marie!  This month, I chose to work with the new set Disco Fever, also featuring the new Neon Glitters, some of the new Nuance powders, easy-peasy pull ribbon from Mon Ami Gabby and the new Kiss Cut technique!


We have THREE new stamp sets to share with you today.  These new sets are 20% off until Feb 3.  So once you finish the blog hop, head on over to the store and start shopping.  All of the new sets are available on cling mounted rubber or as a digital image.  

The sets are:

Disco Fever 772 (digi version DIGI772)
Secret Garden 773  (digi version DIGI773)
Disco Girlfriends 774  (digi version DIGI774)

On Feb 3rd, ONE GRAND PRIZE WINNER will be selected from the comments left on the Designers' blogs listed below. Please leave a comment with each Designer in order to be eligible for the Grand Prize.  You never know who the Mystery Designer will be that has the winning comment.

The Grand Prize Winner, which will be announced on the SNS Facebook page and on the SNS Blog, will receive ALL of the new stamp sets released this month (or the digi versions, if preferred).

The Blog Hop order this month is:


(*Tip: if you have difficulty with a particular link, try clicking on the Designer's blog title to send you to their Home page.)

We hope you enjoy the New Reveal Blog Hop as much as we do.  Thanks for joining us and remember to comment on each of the Designers' blogs to be eligible for the Grand Prize.  
 Wonder who the Mystery Host will be this month????


The Sparkle N Sprinkle Creative Challenge also begins today.  There are lots of prizes and recognition badges.  Come check out how you can become a SNS Featured Artist as well.  The theme is always Anything Goes using Loose Glitter, Embossing Powder, and/or Flock.


Have you checked out the SNS YouTube Channel featuring Demo Donna?  If not, then you are in for a real treat.  Subscribe today to get all the latest Demo Donna tips and techniques! 


So - on with my disco party!....... and the fabulous new Neon Glitters!


I began by stamping the disco girl in Memento Tuxedo Black and after fussy cutting her out, she was colored with Copic Markers: E00, Y08, YR16, YG06, RV25, N4, B02, V04. I applied a thin coat of Dimensional Glue to her boots and dress to give the outfit a shine.


After the Glue dried to a shine, the new Neon Green Glitter Exhilerated was added to her boots and scarf. Orchid Glitter was added to her hair. A Sakura Glue pen was used to apply these two glitters.


The panel on the left of the card was created using the Neon Glitters: Exulted (G1132), Energized (G1133), Exhilarated (G1134), Electrified (1135) and the Kiss Cut technique with the Memory Box Large Ringlets Die. A piece of 2 1/2" Tear-ific Tape was attached to a piece of white cardstock and then it was run through the embossing machine with the die (cutting edge) facing down into the adhesive backing. Pieces of the pattern were picked out with an exacto knife and applied with the Neon Glitters.


After all the glitters were applied, Versamark was applied to the entire panel and it was heat embossed with Clear Detail to give a shiny appearance. The panel on the right was created using a circular stencil and four of the Nuance Powders which best matched the colors of the new Glitters (Yellow, Orange, Pink and Green). I sprinkled the powders over the cardstock which had the stencil taped down over it and then spritzed with water. In order to make it shiny, after it was dried,  I again applied Versamark and heat embossed with the Clear Detail embossing powder.


Three silver brads were "blinged" with Tangy Tangerine and Flashy Flamingo and were attached to the Nuance panel. A piece of Mon Ami Gabby green pull ribbon was attached to the same panel before it was taped down to the right side of the black card base. The sentiment was stamped in Versamark and heat embossed with Black Detail. Spellbinders Back to Basics Tags was used to cut it out and then before removing the die, Memento Rose Bud ink was daubered on to the tag. This was attached to the Clear-embossed panel with a Flashy Flamingo-blinged brad, before being attached to the left of the black card base.


Our Disco Queen was attached in the center with Dimensional Foam to finish up the card. Hope you like our new sets and neon glitters? As I am the last designer on the blog - all you have to do now (if you have commented on all the others) is to leave a comment with me and you will be eligible to win the three new sets.

Good Luck!!

Till next time,

Shona

Wednesday, January 27, 2016

... AND THEY LIVED HAPPILY EVER AFTER!

Hi there, 

Thanks for stopping by! Today I'd like to share an easel card using the new Sparkle N Sprinkle Happily Ever After Set 770 and some Want To Scrap Chipboard.

Arch Wedding Easel

I decided to use vellum for a change and so began with stamping the couple on the vellum with Versamark and heat embossing with White Detail. I then colored the image on the back of the vellum with Copic Markers: E000, E02, E08, E13, E33, R20, V04, YG03 and N4.

Arch Wedding Easel

The base of the easel is 11" x 4 1/4", folded at 5 1/2" and 2 3/4".  I cut the arch with Spellbinders Grand Ovals and Ovals Large - a piece of white card was cut just with the Grand Ovals Die to be the backing for the vellum and arch. The arch was run through the Darice Brick Pattern Embossing Folder, a 4 1/4" x 2 3/4" piece of white card was also run through the same folder for the base of the card. Memento Potter's Clay and Desert Sand were swiped over to color the bricks.

Arch Wedding Easel

The vellum piece was sandwiched between the colored arch and the white arch base and was then taped to the end of the easel base. The 2 3/4" piece of bricked cardstock will be taped to the "inside" of the card after a sheer bow and the flower with brad center are added to the panel.

Arch Wedding Easel

Now onto the embellishments! I stamped the sentiment on white cardstock in Versamark and heat embossed with Sienna (my favorite Tuscany color! These are fine detailed powders that are great for sentiments and detailed images, when you want to use something other than black.) I die cut this with Lawn Fawn Stitched Tags.  This was attached on top of the ribbon with Dimensional Foam and serves as the "stop" for the easel. Another two ribbons were made and were attached with glue dots as shown.

Arch Wedding Easel

Three Prima Flowers were covered in Versamark and heat embossed with Copper Dreams. A silver brad was applied with Versamark and heat embossed with Sienna Star and became the center of the flower.  The Want To Scrap Chipboard word "Love" was applied with Versamark and heat embossed with Copper Dreams to tie in with the flower. This was attached to the card with Dimensional Glue.

Arch Wedding Easel

... and they Lived Happily Ever After!

Hope you've enjoyed my share today.

Warm hugs from a rather snowy (but melting now) New Jersey!

Snow Blizzard 2016 memories - my two younger kids - although 20 and 15 now - still very young at heart!


.... and what about these cool horizontal icicles trying to come in the house?...


Hope you have a wonderful day!

Shona

Thursday, September 10, 2015

JUST BREATHE ....

Hi there, today I'd like to share with you another  beach -themed card.  For this one  you need to take a step  into the ocean and take a dip along side this cute mermaid!
SNS Just Breathe

I created the background by adhering  a piece of Super Adhesive Sheet to blue cardstock and rubbing the back of the Dreamweaver Wave Stencil with  Hawaiian Soap before laying it down on the sticky surface of the blue card. I then burnished Metal Leaf on to the stencil. Once the stencil was lifted up, Velvet Glitter Cobalt Glaze was applied to the remaining sticky surface.
Serena was stamped in Memento Tuxedo Black ink and then colored in with Copics: YR000, YG05, YG11, Y17, YR24, YG13, YR23. After fussy cutting, I applied Versamark and heat embossed with Clear Detail.
Just Breathe
The Sentiment from the same set was stamped on glossy white cardstock in Versamark and was heat embossed with Cerulean, one of the detailed Tuscany colors. It was then die cut with a Spellbinders Grommet Tag and before removing the die a little Memento Cantaloupe ink was daubed over the text.  The brads were applied with Versamark and then heat embossed with Cerulean Star to coordinate with the blues. See this video for a how to bling your brads. A piece of blue ribbon was tied in a bow and attached to the card front with one of the brads along with the sentiment. Serena was attached with Dimensional Foam.  Adhesive pearls were added as air bubbles and to Serena's necklace and flower centers. The card front was then layered onto a white card base to finish.
Just breathe

Hope you've enjoyed my share today.
Hugs,
Shona

Thursday, July 23, 2015

THE RIGHT SHOES!

Hi there,

Today I'd like to share with you another card using the Birds of a Feather Set 726. I loved this cool little lady with the high heels and decided to combine the set with the Cinderella Slipper Set 528 for my card today.


I stamped the chick in Versamark and heat embossed with Dragon Fruit. I used the Spellbinders Eyelet Circles die to cut and emboss and daubered a little Memento Lulu Lavender around the image before I removed the die. She was then colored with Copics: V01, RV02, RV04 and V04. A Sakura glue pen was used to apply Lavender Iris Glitter to her wing, tail and tufts. Dimensional Glue was added to her eye and to the heels. A little thread of Diamond Mesh from Mon Ami Gabby was attached for her necklace. She was set aside at this point for the glue to dry.


To make my background I spritzed white cardstock with water and then applied some Violet Color Burst on top of the spritzed cardstock. I dried the cardstock with my heat tool. The Cinderella Slipper was stamped randomly in Versamark and heat embossed with Belgian Cream. I then decided to go over the entire background with Memento Lilac Posies, I rubbed a tissue gently over the entire piece to take any ink off the embossing powder, this really made the shoes pop!


The sentiment from the Cinderella Slipper Set was stamped in Versamark and then heat embossed with Mulberry (one of my favorite detailed Tuscany EPs that I like to use for sentiments!). It was die cut with Lifestyle Crafts Nesting Rectangles, daubered with some more Lulu Lavender.


Three brads were "blinged" with Mulberry and attached to the circle along with some pink adhesive pearls and rhinestones (Want to Scrap Bling). Three white feathers were threaded through holes and attached to the back with tape. The card was finished by layering the background piece to the card based, which had been edged with 1/2" Tear-ific Tape, then some Diamond Mesh from Mon Ami Gabby was added around the sticky edges. There was still some stickiness around the mesh and so I applied Bubble Gum glitter to take care of that! The sentiment and the image were then added with Dimensional Foam to finish up the card.


I hope I have given you some inspiration today to maybe pick up this sweet little chick set. Both of these new sets are such fun and are so versatile, they can be used for many different occasions.

Hope to see you this weekend for our Joint Blog Hop with Die-Versions where we will be featuring Cancer Awareness. 

Thanks for stopping by today,

Shona

Thursday, June 4, 2015

BRUSHO'S BLOOM!

Hi there,

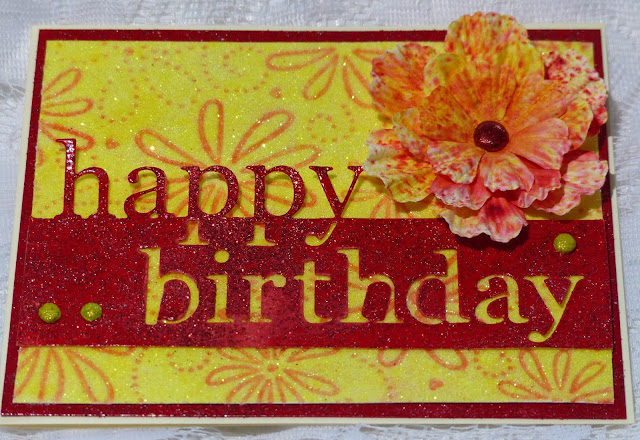
Things have been a little hectic around here for the last month, so I've barely been able to keep up with my stamping "duties". The end of the school year always does that to me and this year although I've not got proms or graduations for any of my kids, there is plenty volunteering activities to take care of. Today's card was put together for my Sister-in-Law using the Memory Box Grand Happy Birthday die, a couple of  Brushos, two embossing powders and a Sparkle N Soft from Sparkle N Sprinkle.


I cut a 4" x 5 1/4" piece of Super Adhesive Sheet. I removed the protective backing and covered the entire piece with Sun Dazzle Sparkle N Soft. Next I ran it through the Darice Daisy and Swirl embossing folder, which had been inked on the inside with Memento Lady Bug ink. There is a detailed tutorial on how to make these flocked backgrounds here.


Next I cut out the Happy Birthday die from white cardstock, covered it in Versamark ink and heat embossed the entire piece with Firecracker Red.

Dandy Dandelion and Firecracker Red embossing powders were used to bling up the silver brads. 


The flower was three Prima flowers layered on top of each other, after I had spritzed them with water and shaken the Brusho Crystals on them. Another spray of water and then they were dried with the heat tool, to compliment the colors of the card.


The card front was put together using the brads to hold everything in place. It was then layered to a piece of white cardstock edged with Versamark and heat embossed with the Firecracker Red. It was this was then layered to a cream card base. 


I'd like to enter this card in the Scrapy Land: Challenge 19 - Use a die cut that Scrapy Land carries.

Hope you've enjoyed my quick share with you today. 

Till next time,

Shona
Sunday, May 31, 2015

SPARKLE N SPRINKLE'S JUNE 1ST REVEAL

Hi there and welcome to the June 1st Reveal.


We have THREE new stamp sets to share with you today.  These new sets are 20% off until June 3.  So once you finish the blog hop, head on over to the store and start shopping.  All of the new sets are available on cling mounted rubber or as a digital image.  Ballet 709 is the stamp set featured with this month's Technique Video Kit.

The sets are:

Ballet 709   (digi version DIGI709)
Hearts Like Dogs 711   (digi version DIGI711)
Life Is Better 712   (digi version DIGI712)

On June 3, one GRAND PRIZE WINNER will be selected from the comments left on the Designers' blogs.  Please leave a comment with each Designer in order to be eligible for the Grand Prize.  You never know who the Mystery Designer will be that has the winning comment.

The Grand Prize Winner will receive all of the new stamp sets released this month (or the digi version, if preferred) and will be announced on June 3 on the SNS Facebook page, the Designer's blogs, and here on the SNS Blog.

In addition to our regular Designers, two of our 2015 Guest Designers, Diane and Ashley, are with us again this month.

The Blog Hop order this month is:


(*Tip: if you have difficulty with a particular link, try clicking on the Designer's blog title to send you to their Home page.)

We love reading your comments and hope that we have inspired you as well.  If you can not leave a comment for some reason, please email icinganne@yahoo.com with your comment and the name of the blog or the Designer you are commenting about.


The Sparkle N Sprinkle Creative Challenge also begins today.  There are lots of prizes and recognition badges.  Come check out how you can become a SNS Featured Artist as well.  The theme is always Anything Goes using Loose Glitter, Embossing Powder, and/or Flock.


We hope you enjoy the New Reveal Blog Hop as much as we do.  Thanks for joining us and remember to comment on each of the Designers' blogs to be eligible for the Grand Prize.  
Last month Belinda was the Mystery Designer with the winning comment.  Wonder who it will be this month????

I especially love the two new doggie sets this month, and couldn't resist using some flocking not only on the fluffy pup but went fuzzy with the background too!


I stuck a piece of Super Adhesive Sheet to white cardstock then peeled off the protective backing and applied Snow White Flocking, burnishing it in with my finger. The fluffy pup from the Hearts Like Dogs Set 711 was then stamped in Memento Tuxedo Black ink and fussy cut. I highlighted the white flocking using Copics W7, W5, W1 and R21. Here is the tutorial on how to accomplish this look. I find just using the side of the Copic on top of the flocking gives the best results.  Do not try to color like you would normally blend your Copics - this will result in "rubbing" a hole in the flocking. You can find a complete tutorial here for this technique.


So then, on to the background! I loved the saying in this set - and it just barked out that it needed to have hearts somewhere. Keeping in the warm and fuzzy mood I thought about a flocked embossed background.


I flocked up 3 3/4" x 5" piece of  Super Adhesive Sheet, attached to a piece of white cardstock, with Snow White flocking and then ran it through the embossing machine with the Cuttlebug Heart Blocks embossing folder, which had been inked on the inside with Memento Rose Red Ink. See here for a complete tutorial. The fuzziness of the dog and the background show up quite well in the photo below:


The sentiment was stamped in Versamark and heat embossed with Belgian Cream. I also heat embossed the two little bone brads with Vintage embossing powder before attaching them to the embossed Spellbinders Mega Oval die cut. 

The ribbon with paw prints was pulled gently through a Memento Angel Pink Ink Pad to give it a little pink hue and was attached to the back of the card front. The sentiment and pup were attached with Dimensional Dots and the little paw brad was attached before layering to a brown cardstock and then to a white card base.


Thanks for stopping by today, hope you've picked up some inspiration from the designers this month. Still two more to come - next up is the very talented Eret!

Till next time - sending warm and fuzzy hugs,

Shona