Showing posts with label Magic Speckle EP. Show all posts

Thursday, February 16, 2017

Bird Flourish Wall Hanging

Hi there,

Today I'd like to share something other than a card - a little Spring wall hanging. I really liked the saying from the Cattelya Friendship Set 818, so decided to highlight that, along with some of the fun Tonic Studio products that SNS is now carrying.


I was using some Chipboard pieces from Want to Scrap, that were flourish like, so in order to keep that idea going I started by taking the Dreamweaver Large Flourish Stencil, laying it in the top right corner of the canvas and I then applied Lilac Lavender Nuvo Embellishment Mousse. This Mousse is very quick drying, but I set it aside anyway while I worked on the bird chipboard piece. I like to give the chipboard pieces two coats of white embossing powder to cover up the darkness of the chipboard. So I applied a coat of Versamark and heat embossed with White Detail, then repeated that step. This leaves a nice finish for the lighter colors to adhere to.


I applied Versamark Ink and then heat embossed with Key Lime and Raspberry Tart. Spring Willow and Pear were applied using the Versamarker Pen. Do you see my boo boo?


So let's use a little Magic Speckle and get some mottling effect going, shall we?


Magic Speckle was heat embossed (from the bottom) after being applied with Versamarker to specific areas on the branch and bird. OK, now that green tail has to be rectified!! Some Mulberry embossing powder and then Magic Speckle was how I handled it, making the tail a bit darker than the bird's body. On to the sentiment. After giving it two coatings of Versamark  and White Detail, I stamped directly on top of the Flourish Tag with Versamark and then heat embossed with Mulberry.


I used the Clearly Art Molding Film to make some more flowers, using the Spellbinders Rose Creations Die. These were then colored with Adirondack Inks with an applicator before being molded.


Ta da!!


So time to put it all together. The sentiment (with bows) was attached with Mounting Tape as was the Bird Flourish. The flowers were put together and attached with black brads which were then applied with some Brushable Glue and Sparkling Snow.  Then it was time to add the drops!


Nuvo Crystal Drops, Crushed Grape and Sweet Lilac and Glitter Drops Pink Champagne were applied as extra flourishes. A Nuvo Crystal Drop Ebony Black was applied as the bird's eye.


A couple of holes were punched in the canvas and then the same sheer purple ribbon, which was used on the sentiment, was attached with knots behind as a hanger.

Today I'd like to enter my project in the following challenges:
Crafty Creations #335: Anything Goes
Crafty Galz Corner #110 : Use your favorite things (Nuvo Glitter and Jewel Drops - at the moment!)
Simon Says Stamp: Fantastic Florals: Clearly Art Molding Film
World Wide Open Design Team Challenge (15 February 2017): Anything Goes


... and that's it for today. Something a little different in anticipation of Spring! Hope you've enjoyed stopping over?

Till next time,

Big warm hugs,

Shona

Wednesday, June 15, 2016

SNS Butterfly Sympathy

Hi there,

Well, unfortunately I'm back today with yet another sympathy card. .... and even more unfortunate, is that it is for the same person. After losing her older sister just three week's prior, a dear friend has now lost her father. Absolutely devastating for her mother and the remaining family. This is what I came up with for my friend.


Using the Poppy Stamps Clara Corner die, I die cut and embossed two of the corners out of white cardstock. I inked one of the corner pieces with Memento London Fog ink. They were placed kitty corner to one another on a black cardstock square, popping up the center flower with a foam square, for a little dimension.

The sentiment (from Sympathy Set 579) was stamped in the top left corner with Versamark and then heat embossed with White Detail. The butterfly was die cut using the Memory Box Lunette Butterfly die from white cardstock. I applied Versamark to the antenna and heat embossed with Belgian Cream. The butterfly body was applied with Versamark and then heat embossed with Black Detail. More Versamark was applied and then I heat embossed from underneath the piece with Magic Speckle to give the mosaic look.


A piece of sheer, white ribbon was attached to the left hand side, before being layered to the white card base and the butterfly was added to the bottom corner with a foam square for more dimension. I decided to leave the card just like that, simple and clean.


I also made a card using the same Corner die, for my friend's mother. I used silver butterfly stickers for this one, and the sentiment is from the same Sympathy Set 579.


That concludes my share for today. I am trying to get several cards taken care of, before we leave on Friday for Scotland. We have my eldest son, Struan's graduation next week in St. Andrews and then David and Calum and I are headed to Italy for a week, back to Scotland for a few more days and then home the 4th of July. I'm going to try to schedule another blog for next Thursday, then you won't hear much else from me 'till my return.

Till then,

Enjoy the beginning of summer,

Big hugs,

Shona

Wednesday, April 27, 2016

PEACE, LOVE AND JOY!

Hi there, 

Today, I'd like to share with you a Christmas card, using some Want 2 Scrap Chipboard pieces and the new Nuvo Crystal Drops. I have to say - I sure am having fun with these new drops!

Peace, Love, Joy

I began my project using the line and dots from Sparkle N Sprinkle's Donna's Stylin' Sayings Set 777. I put them both on an acrylic block and applied Versamark.

Peace, Love, Joy

Starting at the top I stamped the Versamarked images and heat embossed with Sangria Star. Moving down the card front I repeated the process another two times with Tuscan Star and then Moss Star. These are from the Tuscany color set, my favorite! They are very fine powders and are great for detailed work. I decided to use the sparkly versions of them this time, since there was to be a lot of sparkle on this Christmas card! The Want 2 Scrap Words of Love were applied with Versamark and each given two coats of the same three embossing powders. In order to have them stick well to the card front, I covered the lines and dots panel with a piece of Super Adhesive Sheet, cut it to size, removed the protective backing and positioned the words so that they all had different colored backgrounds, directly on top of the adhesive. Sparkling Snow Glitter was applied to the remaining sticky surface.

Peace, Love, Joy

The Pine Tree embellishment was applied with Versamark and heat embossed twice with Moss. I then added more Versamark and sprinkled on some Magic Speckle and heat embossed from the bottom (as this is an ultra thick powder and would fly off otherwise). This gave my tree a look of being snow-laden. I forgot to take a photo of the tree before he was lit!

Peace, Love, Joy

Various new Nuvo Crystal and Glitter Drops were applied to the tree as lights! I used the following colors: Golden Sunset, Silver Moondust, Ruby Slippers, White Blizzard,  Sweet Lilac, Sugared Almond, Apple Green, Dandelion Yellow and Red Berry. So much fun! Once the drops were dry, (after an hour) a little white Mon Ami Pull Ribbon bow was tied to the top of the tree for the star.

Peace, Love, Joy

The card front was attached to an orange, then purple layer before the white card base. The Christmas tree was then attached to the card with Dimensional Foam to finish.

Peace, Love, Joy

Hope you like my sparkly creation? Leave me a comment to let me know you stopped by!

I'd like to also take the opportunity to enter this card in the following challenges:
Crafty Gals Corner Challenge #69: Anything Goes

Till next time,

Shona

Friday, March 13, 2015

SHARING YOUR SORROW

Hi everyone,

Well, I'm back quickly because unfortunately I have a sympathy card to share. Our family friend of 30 years, our softball coach - when David and I first met and "Uncle" Tommy to the kids, passed away rather unexpectedly this week. It's taken me a few days to get over the shock and put "ink" to "paper". Tommy was very connected to the Irish community in D.C. and so I wanted to keep the card in the green family in his honor. So out came the Brusho Crystals again!


I spritzed normal white cardstock with water and then sprinkled the paper with Yellow, Leaf Green and Emerald Green Brusho Crystals. I chased them around the paper with my heat gun until it was dried. (Not quite sure where the random pink spots came from?) So now what? It was a pretty background, but you know I can't leave well enough alone, and I had no idea in what direction this card was going.

I cut out the Die-Namics Daisy Bunch (love this die) from a lime green and yellow cardstock, saving the negative pieces of the die. One of the negatives was temporarily taped to the brusho surface after applying lots of anti-static dust. I used a dauber with Versamark to pounce down through the negative die. I lifted up the "stencil" and applied Black Detail embossing powder, which was then heated.


I covered that entire piece with Versamark and heat embossed with Clear Detail, then applied a little Magic Speckle on top of that, which gave it a marbled look. (Wish I had taken my camera upstairs with me!) It looked too dark, so I decided to put the die back over the top of the black "image" and cut it from the brusho piece. I used it in the inside of the card instead:


So then I took the yellow die cut piece and placed it back in the space where the black version had been. It was taped down from the back. I cut all the flowers off the green version and glued it on top of the yellow version. Using a Sakura Glue Pen I added Spirited Green Glitter to the stems and leaves and then Sunny Daze Glitter to the petals and buds.

I used Spellbinders Classic Scalloped Circles Large to cut out the center piece. The Grand Scalloped Circles was used to cut the black base card (leaving a fold uncut at the top of the circle). I die cut the same size Grand circle for the outside frame, from the brusho panel and glued that to the black base. I turned the front circle piece slightly so that the scallops had the black showing behind. It was then attached with Dimensional Foam.

h

The sentiment from Sympathy Set 579 was stamped in Versamark onto yellow cardstock and then heat embossed with Pine (one of the awesome Tuscan colors, which come in various colors and are detailed powders so are great for sentiments, when you don't want to use black). I fussy cut the sentiment and sponged it with a little Memento Pear Tart ink before attaching it to the card with dimensionals and tape.


I liked the inlay look. It gives dimension to the card without adding the bulk.

I'd like to enter this card in the following challenges:
Creatalicious Challenges #72: No square or rectangle cards
Scrapy Land Challenge #13: Use brand of die that Scrapy Land Sells

Here's a photo of Tommy giving me flowers as I arrived at the church before our wedding in Scotland. I think I remember he was crying more than I was!


I hope Wava, Tommy's wife will like the card. We're all going to miss this really special man. 

Hugs,

Shona

Wednesday, February 4, 2015

VALENTINE BIRTHDAY LOVE!

Hi there,

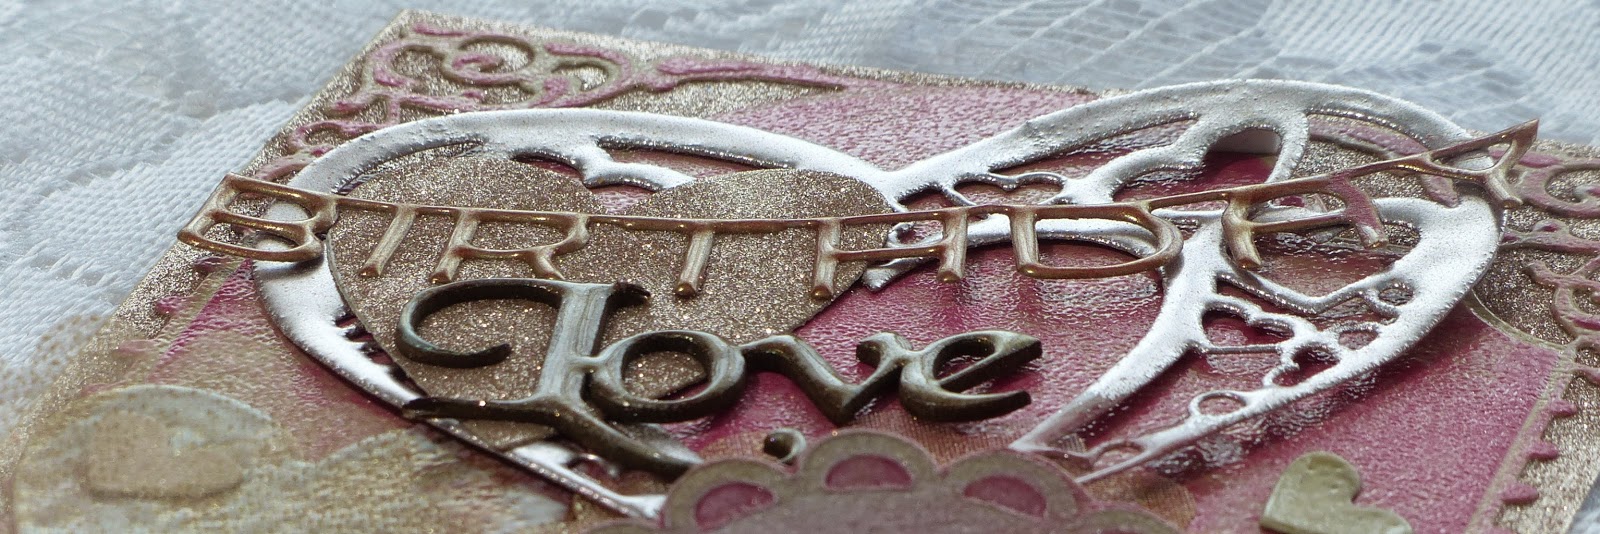
I spent most of the morning playing in my stamping room with a couple of goodies that I had received on Monday as part of blog candy that I won from Carolina Cards. One was a Darice embossing folder Valentine Hearts and the other was the Spellbinder's 5 x 7 Enchanted Labels 28. Thank you so much Mary! Here is what I ended up with:


I started with the embossing folder. I inked up a piece of Kraft cardstock with Memento Angel Pink and then added some Rosebud. I then ran it through the embossing machine and sanded the raised pattern to remove the ink (sounds counterproductive - but the colors stay in the recessed areas). After fussy cutting the heart, I dabbed some Moonlight White Brilliance ink over the piece and heat embossed with Clear Detail.  


Next, I cut and embossed the largest frame from the Enchanted Labels 28 and inked it up with the same two pink as before. I applied Versamark to the entire piece and heat embossed with Clear Detail again.

I lay two strips of 2 1/2" Tear-ific Tape side by side on a piece of 5" x 7" Kraft cardstock. After removing the protective backing the frame was centered on top. Peruvian Lily Velvet Glitter was then applied to the remaining sticky areas.


I then die cut the Cheery Lynn DL 178 Heart Within my Heart from Kraft cardstock and after putting the little heart inserts aside (to reuse later) I applied Versamark and heat embossed with Bronze Rose.


Three of the little hearts were used. One was inked with Rosebud, then applied with Versamark and Magic Speckle. Another was inked with Versamark and heat embossed with Clear Detail, the third was heat embossed with Vintage.  

The big heart insert from the Cheery Lynn die was inked with the two pink inks first and then applied with Versamark. Vintage was then added and then Magic Speckle to achieve the lovely mottled look.


The Die-Versions Birthday die cut was inked heavily with Rosebud before I covered it in Versamark and then heat embossed with Vintage (Vintage is "near transparent" so that is why you see some of the pink showing through). I love using this embossing powder on any vintage/shabby chic project.


The "Love" chipboard was applied with Rosebud ink before being heat embossed with Vintage. 

A new technique for me today was to emboss a piece of tulle! But first I die cut it! So after cutting it with the Spellbinders Classic Scalloped Hearts (which it cut through very well, I may add!) I covered it in Versamark and then holding it with tweezers from the bottom of the heart I heat embossed with Vintage again. Loved the subtle look it gave. You can see it peeking out from behind the Darice heart.


So then to put it all together. The dilemna was to get everything to stick and stay put.

I figured if I stuck the words to Super Adhesive Tape then they weren't going anywhere - so that is what I did! I ran the Cheery Lynn die cut through the machine with a piece of Tear-ific Tape that was attached to a piece of Kraft that was big enough to hold the bigger heart from inside the die cut. I then removed the protective backing and attached both the "birthday" die cut and the "Love" chipboard to the surface, before applying Peruvian Lily glitter to the remaining sticky surface.


Tear-ific tape was used to adhere the hearts down, with some Dimensional Dots for dimension! Then the little hearts were adhered with Dimensional Glue. 

A look at the finished project once more:


I'd like to enter this card in the following challenges:

Sweet Stamps: Love is in the Air
Crafty Sentiment Designs: Include a Heart
Scrapy Land Challenge 11: Use a Die that Scrapy Land Carries
 (Spellbinders, Die-Versions, Cherry Lynn)

Thanks for stopping by today! 

Hugs,

Shona

Thursday, April 24, 2014

SEASIDE PEACE

When I think of the word peace, calming sounds are what come to my mind.  When it comes to calming sounds - nothing can beat that of the tide lapping up on a beach, with the soft breeze rustling the sea grasses - just all so soothing! 

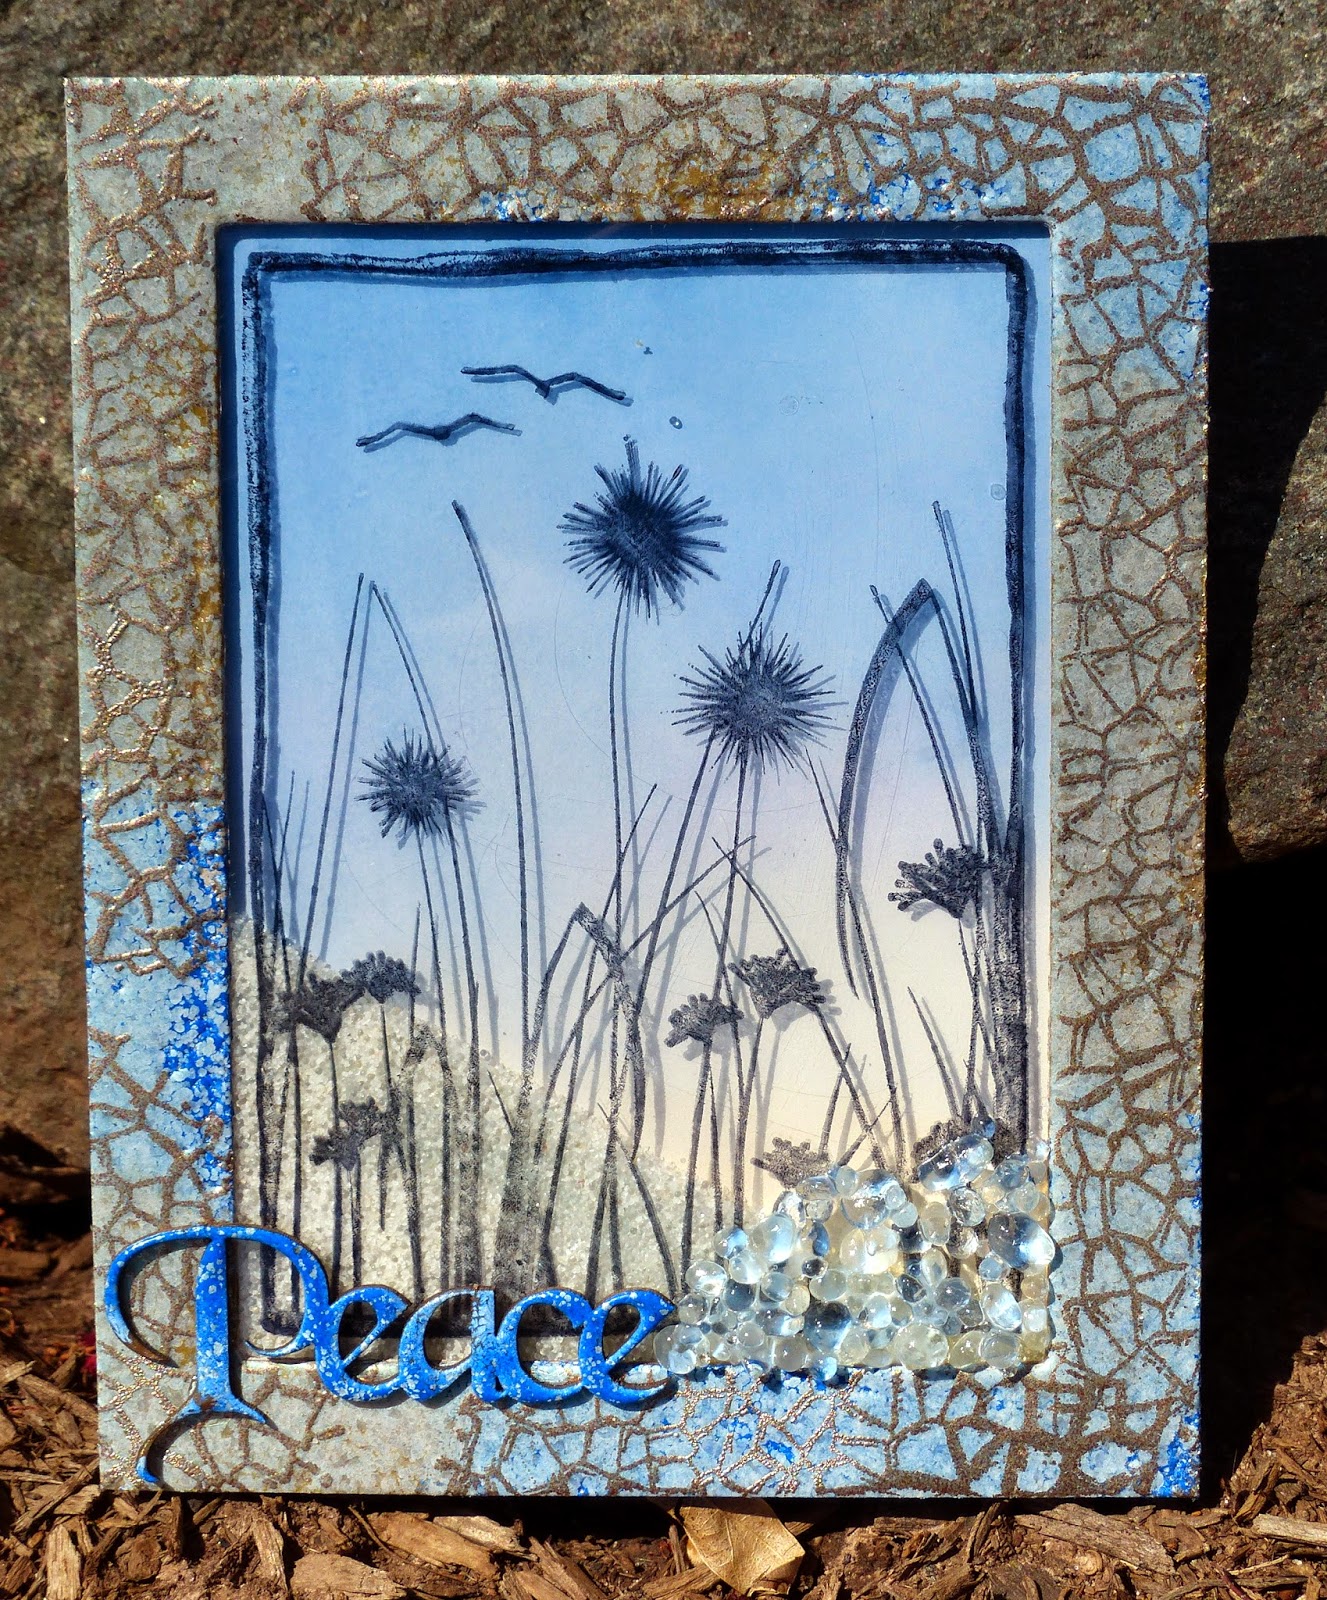
So here is my photo of peace: The North Sea!! Taken from behind the sand dunes in St. Andrews, Scotland. It was a warm and not windy day, I might add!


In an attempt to capture the sea breeze and the sound of the tide I used Sparkle N Sprinkle's Set 493: Silhouettes, which till now has been one of my favorite sets. I have to say I am a little partial to silhouette stamps on the whole - and therefore was delighted when another Silhouette Set was brought out - it's with a garden theme, but you'll have to wait till next week for the May 1st Reveal to see that one!


After stamping the scene on Embossable Acetate with Black StazOn, I tried to make the scene look like it was viewed through an old cracked window, as I wanted to use the new Crackle Background from this month's reveal. However, it was too much on top of the scene, so I decided to go with a "crackled" frame instead.

The frame was cut and embossed from a piece of chipboard and then after applying Versamark, I heat embossed with Ocean and Squash embossing powders first. Versamark was reapplied and then Magic Speckle was next. It is best to heat from the underside when using the marbled embossing powders as the white flecks tend to fly off if heated from the top. With the chipboard being thicker, it took a while to emboss this! Vintage embossing powder was used to achieve the crackled background.


The background isn't quite so swirly in reality - but I loved what the camera did here, so kept it!  I wanted to create a dreamy looking background and was able to achieve it by dabbing ink from the Kaleidacolor Creole Spice Ink Pad directly onto an acrylic pad, then misting with water, before placing glossy white cardstock face down in the ink.


The acetate scene was attached to the back of the frame and then I attached dimensional foam to make a well for the shaker card.  I put in some real sand and some micro beads, thinking that when it got shaken it would make the noise of the tide on the beach! Which it actually does! The protective backing was removed from the tape and the inked background was placed over the well, encasing the sand and the beads.


The Chipboard word "Peace" was covered with Versamark and heat embossed with Antiquities, then again with the Ocean marbled powder. I added some Ice Sea Glass Mudd Puddles to the right hand side and attached "Peace" with some Mega Tack Glue to finish off the card.

I'd like to enter today's "Peace" card in the challenge over at the Path of Positivity. 


Can't you just hear the tide swishing over the beach? Summer will be here before we know it! Yeah!

Remember to stop back next week for our May 1st Reveal - to check out the new Garden Silhouette set. I assure you - you will not be disappointed! OK, I'll be nice - here's a little sneak preview!  


Hope you've enjoyed your visit, see you next week!


Hugs,

Shona