Showing posts with label Gilding flakes. Show all posts

Thursday, March 15, 2018

Gilded Elephant Birthday Wishes

Hi there,

Thanks for stopping by! Today I'd like to share with you a card using the new March Reveal Amazing You Paisley Elephant Set 884. This fun stamp has so many possibilities - I chose to highlight my elephant with the Sunkissed Copper Gilding Flakes.


To begin I took the Nuvo Large Glue Pen and ran it over the surface of the elephant and then stamped on to a piece of black card.


You need to leave it a little while until the "creamy" color goes clear, which means that the glue is ready to be applied with the gilding flakes.


I applied the Sunkissed Copper gilding flakes to the glue. Using a textured dauber I removed the excess flakes.


The Copper Flakes only stay where the glue is.


For the background I cut black cardstock with the Tonic Floral Blooms die using the Tangerine.


This was then placed over a piece of Sticker Paper and then the Gilding Flakes were applied to the sticky surface.


Again, the excess Gilding Flakes were rubbed off using the texture dauber.


A strip of pompoms was stuck to the top of the floral background with 1/4" Tear-ific Tape. I added some Autumn Spice Microfine Glitter over the top of the ribbon, so that any adhesive would be covered.


This was layered to a piece of rust cardstock and I made the easel card base from rust cardstock and attached the front panel to the card base. Next I applied Hybrid Ink Acorn Brown to the elephant stamp and stamped on two scraps of the rust cardstock.


Once this was dry I swiped each piece with the Anti Static bag then stamped the sentiments on to each of the pieces in Nuvo Clear Mark ink and heat embossed with Black Detail.


The sentiments from the same set were cut out and stuck to little black strips that had two folds on either edge so that they would have some height to them to be used as stops for the easel. The elephant was attached with mounting foam to finish off the card.


Hope you've enjoyed my latest share? Here are the products that I used to create my card:


Black Detail (EP171)
Autumn Spice (GM2030)

Note that Sparkle N Sprinkle is trying something new this month instead of our traditional Blog Hop. You will be eligible to win a $20 gift certificate when you leave a comment both here and over on the SNS blog (you must do both to be eligible). One lucky winner will be chosen from one of the Designers' posts on the last day of each month. The winner will be announced on the 3rd of the following month, both on the SNS Blog and on the SNS Facebook page. Thanks for leaving us some love and good luck!

Unitl next time,

Shona

Thursday, October 6, 2016

MERRY CHRISTMAS CIRCLE FLIP-IT

Hi there,

Today I want to share a couple of new products over in the Sparkle N Sprinkle shop: Gilding Flakes and Glimmer Pastes along with one of the new Reveal Sets: Christmas Tags 805.


I took a Super Adhesive Sheet and trimmed off a little on the length and stuck it down on to a half sheet of white cardstock. I ran it through my machine with the Sizzix 657586: Card, Circle Flip-its Die.


I took the backing off the left front and the back front. I placed the backing from the left to the right edge of the back front, before applying the Silver Bullion Gilding Flakes to the sticky surfaces.


So then the two remaining background taken off and the Radiant Gold Flakes were applied to the stick surfaces. 


End result:


I cut the circle piece out of a Super Adhesive Sheet from the Circle Flip-Its die and applied it to the back of the circle. I pulled back the backing before applying the Silver Bullion to the right side


... and then peeled off the remaining backing and applied the Radiant Gold to the left.


The sentiment was stamped in Versamark and then heat embossed with Gold Detail and Silver Detail. It was cut out with Spellbinders Standard Circle die. Then I rubbed a little Indian Gold Embellishment Mousse around the edge of the circle.


I applied Moonstone Glimmer Paste to the entire piece and set it aside to dry, while I did the "to and from" tag for the back of the flip in Silver Detail embossing powder.


Nuvo Silver Lining Crystal and Silver Moondust Glitter drops were applied to the gold corners. Honey Gold Glitter and Bright Gold Crystal drops were applied to the silver corners. Once the Glimmer paste was dry the image was attached to the front panel with Foam Squares to finish off my project.


Hope you've enjoyed my share today.

Hugs,

Shona


Friday, September 30, 2016

SPARKLE N SPRINKLE'S OCTOBER 1ST REVEAL

Hi there and welcome to the Sparkle N Sprinkle October 1st Reveal. I know right, how can it be October already?  Leaves are now falling of the trees and we're experiencing much cooler temperatures and of course next month is already Thanksgiving! So my card today has a bit of all this to get us in the Fall mood.


We have five new stamp sets to share with you today.  These new sets are 20% off until the 3rd of the month.  So once you finish the blog hop, head on over to the store and start shopping.  All of the new sets are available on cling mounted rubber or as a digital image.  

Here are the sets this month:


Turkey Dish 801  (digi version DIGI801)
Elephant Christmas Tree 802  (digi version DIGI802)
Christmas Tags #1 805  (digi version DIGI805)
Christmas Candles 807  (digi version DIGI807)
Autumn Girlfriends 810  (digi version DIGI810)

On October 3rd, ONE GRAND PRIZE WINNER will be selected from the comments left on the Designers' blogs listed below. Please leave a comment with each Designer in order to be eligible for the Grand Prize.  You never know who the Mystery Designer will be that has the winning comment.

The Grand Prize Winner, which will be announced on the SNS Facebook page and on the SNS Blog, will receive ALL of the new stamp sets released this month (or the digi versions, if preferred).

The Blog Hop order this month is:


(*Tip: if you have difficulty with a particular link, try clicking on the Designer's blog title to send you to their Home page.)

We hope you enjoy the New Reveal Blog Hop as much as we do.  Thanks for joining us and remember to comment on each of the Designers' blogs to be eligible for the Grand Prize.  
 Wonder who the Mystery Host will be this month????

The Sparkle N Sprinkle Creative Challenge also begins today.  There are lots of prizes and recognition badges.  Come check out how you can become a SNS Featured Artist as well.  The theme is always Anything Goes using Loose Glitter, Embossing Powder, and/or Flock.


Have you checked out the SNS YouTube Channel featuring Demo Donna?  If not, then you are in for a real treat.  Subscribe today to get all the latest Demo Donna tips and techniques!


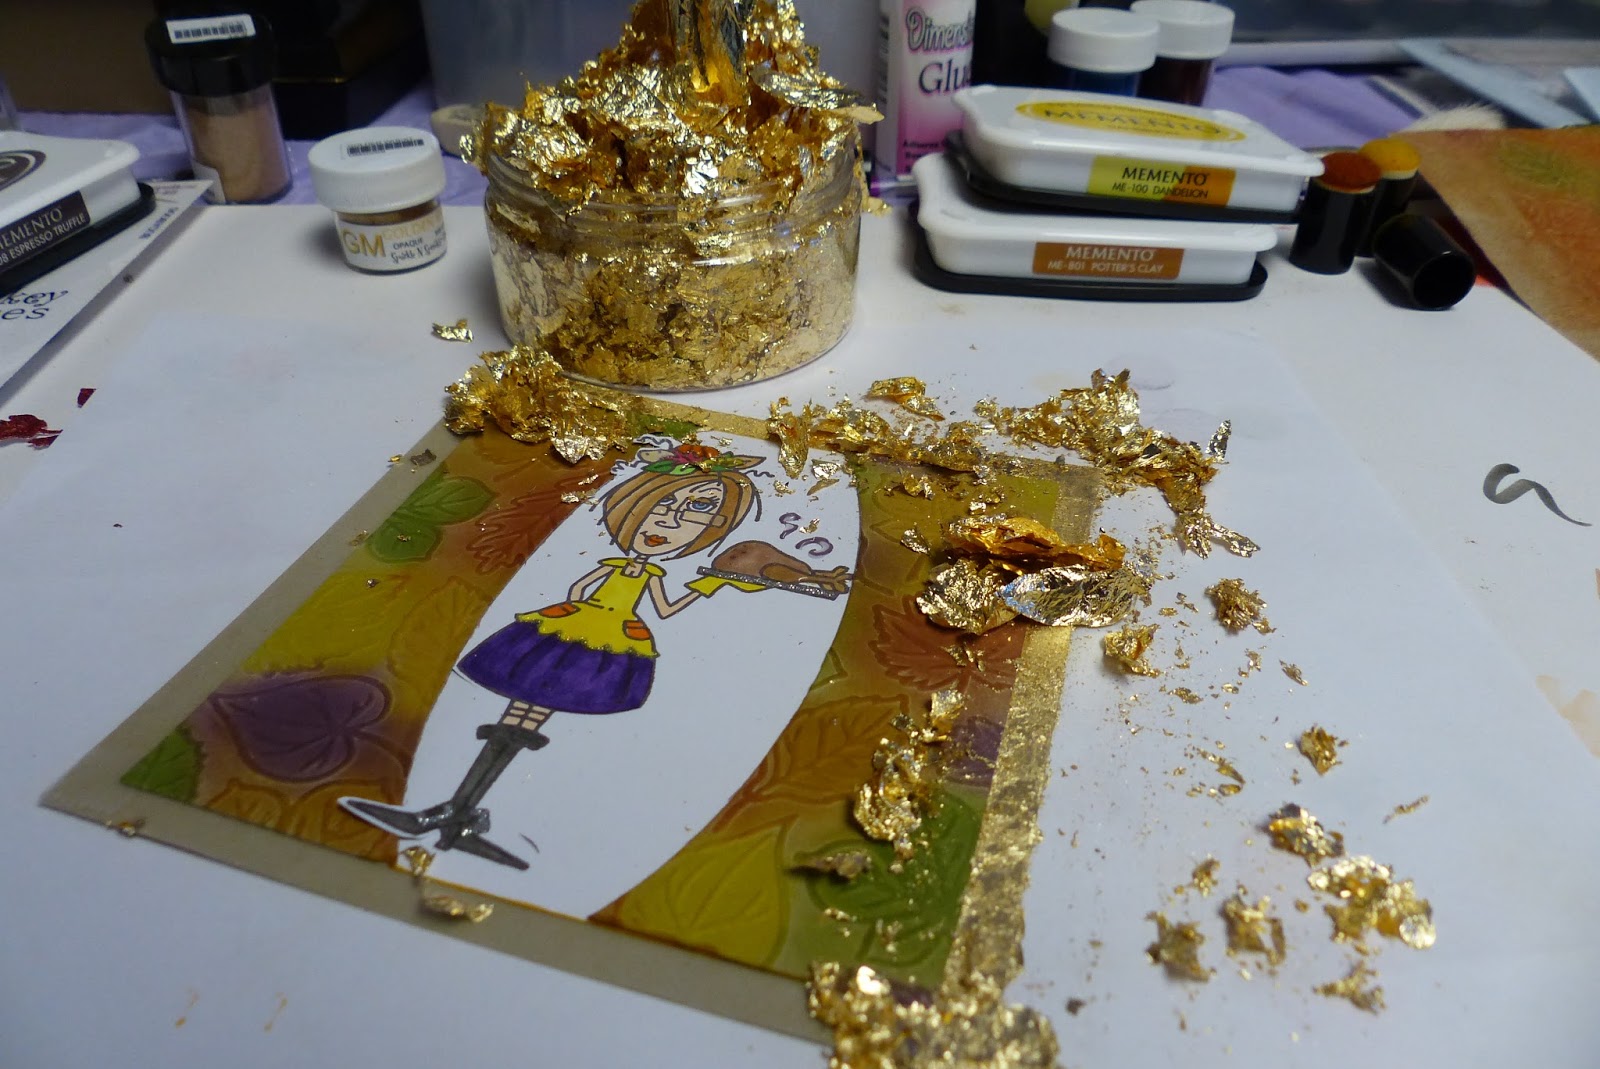
My card today uses the Turkey Dish Set 801. After stamping her with Memento Espresso Truffle, I colored her with Copics Y32, YR00, Y08, YG06, G07, R37, YR07, V09, E33, E25, E36, W7, B34. The Fine Tip Nuvo Glue Pen was used to apply a little Reflection Glitter to her shoe buckles and tray and Daisy Glitter to the base of her apron. I then took Dimensional Glue and applied it to some areas of the image to give some clear dimension. This was set aside to dry while I worked on the background.


I took a piece of Kraft cardstock and ran it through the Darice Foliage Embossing folder, then using various Memento inks (Dandelion, Cantaloupe, Morocco, Potter’s Clay, Lady Bug, Bamboo Leaves and Lilac Posies), colored in the leaves.


This background was cut in half vertically and then I used Spellbinders Mega Ovals Large die to put a curve on each side. I also used the "out of the box" technique on the image so that her shoe and hat were not cut off.


The image and background pieces were attached so that they measured 5 1/2" x 5 1/2". This was then centered on to a 6" x 6" piece of Kraft cardstock edged with 1/2" Tear-ific Tape. 


Radiant Gold Gilding Flakes were adhered to the exposed sticky edges. What a fun product!


After the card front was put together I felt the white background was too stark, so I sponged around the image with Memento Dandelion ink.


Now for the leafy decorations! A piece of white cardstock was the base for the Garnet Red, Emerald Green and Golden Crystal Glimmer Pastes. I just used a spatula to apply the paste to the cardstock. These are also so much fun to use. They dry fast and leave you with a nice pliable result. Just a little tip here: I found that if I worked on top of "one of your left over pieces of protective backings from the Super Adhesive Sheets", (I keep all mine), if the paste goes off the edge of what you are coloring, then it is easily scooped up with the spatula to be put back in the jar - No waste! 


I used a scrap of orange cardstock for the Moonstone Glimmer Paste, since it is semi transparent. In fact, thought later that I could have made my glimmer cardstock in any color using different colored scraps of cardstock. There is a video here by Demo Donna that shows some fun ways to use these pastes. I die cut the ivy using the Creative Expressions Trailing Ivy die. I needed to put a couple of shims under the piece of glimmer cardstock in order for it to cut completely through.


The other leaves were punched out using Marvy punches.


The sentiments were stamped in Versamark and then heat embossed with one of the Tuscany embossing powders, Tuscan Sun. These are my go to colored eps! They provide great detail, so are perfect for sentiments when you don't want to use black. I cut them into little rectangles and added them to the card front with Foam Squares. The leaves were then added randomly to the card front with Dimensional Glue to finish off the card.

I'd like to join in the following challenges with my card:

Catch the Bug October Anything Goes Challenge
QKR Stampede Challenge #211: Cut it Up
Cardz for Galz #32: Fall/Autumn Colors
DRS Designs#246: Autumn Wonders
Moo-Mania & More: Fall Foliage
Stampavie and more Challenge #270: Autumn Colors
Cards in Envy: Goodbye Summer, Hello Fall
Crafty Cardmakers #73: Autumn
World Wide Design Team Challenge #14: Anything Goes


Hope you've enjoyed my share today. Now you need to skip on over to Jess and see what she has in store for you. Remember to comment on all of the designers' blogs, that way you will be eligible to win the entire reveal set! Good luck and I hope to see you back here soon.

Hugs,

Shona

Thursday, August 25, 2016

LEO IN INK SPLATS

Hi there, 

Today I'd like to share a card made with a couple of Sparkle N Sprinkle's new products - the Nuvo Gilding Flakes (Sunkissed Copper) and the Medium Nuvo Glue Pen.

Leo the Lion

For the background I used the Dreamweaver Ink Splats stencil. I attached a 4" x 5 1/4" piece of Super Adhesive sheet to a piece of white cardstock and removed the protective backing. I then applied Hawaiian Coconut soap to the stencil, before laying it down on top of the adhesive (if you don't use the soap, you will not be able to unstick the stencil from the adhesive sheet). I poured the Sunkissed Copper Gilding Flakes on to the exposed adhesive and burnished it in using a little piece of a scrub mat.

Leo the Lion

I peeled the cardstock from the stencil and then Jasper Blue Velvet Glitter was burnished in to the remaining sticky areas.

Leo the Lion

Here is the finished background:

Leo the Lion

On to Leo! After stamping him (Leo the Lion Set 547) in Memento Espresso Truffle, I colored him with Copics: YR21, YR24 and R22. I then took the Nuvo Medium sized Glue Pen and applied the glue to his mane. Yellow Gold Glitter Tinsel was applied to the glue to give him a nice shimmery mane.

Leo the Lion

I fussy cut him out and he would be adhered to the card front later with a wobble. The Poppy Stamps happy birthday banner flags was die cut from white cardstock and I stuck them to the card front using a twisted piece of 1/4" Tear-ific Tape.

Leo the Lion

I applied a little Rose Gold Velvet Glitter to any exposed tape.

Leo the Lion

The background was layered to a white cardstock base and Leo was attached with a wobble to finish my project.

Hope you've enjoyed my share today.

Till next time,

Shona