Showing posts with label Sparkle Embossing Powder. Show all posts

Monday, May 24, 2021

Blue Peace Dove

Hi there and welcome back to my blog! Today I get to share some exciting news - I've joined the Holly and Ivy Christmas Design Team. This is a fortnightly challenge every 2nd Tuesday. I'm looking forward to being part of this team and hope to stack up some more Christmas cards to avoid that Christmas rush!! Maybe you would like to join in with us? We'd love to see your creations and this is an anything goes challenge, just has to be Christmas related!

For my first card for the team, I chose to use the Technique Junkies Christmas Dove image, I don't think I have ever used it before. I thought maybe blue and silver would be a good combination - of course, photographing mirror cardstock is a nightmare, so I hope you get the gist! It's very pretty in real life!


I inked the image up with the Versafine Clair Blue Bell ink and then before it had a chance to dry, I applied Sparkle embossing powder. This gave it a lovely sparkle.


Then it was on to the framing. I used the Spellbinders Grand Large Labels dies (the three smallest). I cut the silver frame using the two smallest dies.


 The outer blue was the inside part of the third smallest die. Then it was just assembling. The blue die cut was layered to a white card base. I cut down the image a little and added strips of mounting tape to the back of the silver cardstock. 


The framed image was then layered to the card front. I tied a little piece of silver ribbon around the left side. Was going to add a sentiment, but thought I'd leave well alone as it said it several times in the image!


Below is a list of the ingredients for my card today:

Technique Junkies Christmas Dove
Versafine Clair Blue Belle Ink
Sparkle embossing powder
Spellbinders Grand Large Labels dies (3 smallest)
Silver Mirror Cardstock
Silver Ribbon
Mounting Tape

Thanks so much for stopping by! I hope you enjoyed my card share? Please do check out my new teamies' cards over on the Holly and Ivy Challenge blog and we hope to see you join in the fun!

Till next time,

Shona


Wednesday, July 8, 2020

O Holy Night!

Hi there, and welcome to July! Isn't it just crazy how quickly the time is going by? My July header is one of the fun flowers in my backyard that has just started to bloom - Crocosmia.


My card today is for the Design Team of Christmas Crafts Creations and our theme for July is to include a Christmas Character! 
My card this month includes six Christmas characters - Mary, Joseph, Jesus and the three wise men!! I chose to use the Inkadoo stamp set O Holy Night for my card. I used three of the images on the outside of the card and I used the verse and the angel on the inside.


I brayered a 3" x 6 1/2" piece of glossy white cardstock with the Soothing Sunset ink pad to created my sunset background.


The three stamps were arranged in the stamp positioner and then stamped in Versafine Clair Nocturne ink.


In order to dry off the ink,  I added Sparkle embossing powder and heat embossed, this gave the images a bit of a sparkle too.


This panel was added to a piece of purple cardstock which was then layered to a white card base. I used orange and white baker's twine for the ribbon across the top to finish the card off.


I hope you've enjoyed my share today? I also hope that you will upload a card to the Christmas Craft Creations Challenge. There is a fun little stamp set to be won this month. All Christmas characters are welcome! Pop over to the challenge and check out who the other designers have used as additional inspiration.

Below are the items I used to create my little Christmas scene:

Inkadoo stamp set O Holy Night (⅚ stamps)

Big and Juicy Ink Pad - Soothing Sunset

Brayer

Versafine Clair Nocturne

Sparkle Embossing Powder (EP107)

Orange and White Baker’s twine


I'd like to join in the following challenges today:

The Holly and the Ivy Christmas Challenge #75: Anything Goes

Crafty Catz Challenge #514: AG with Christmas option

Aud Sentiments Challenge Blog #255: Christmas in July + A sentiment

Krafty Chicks Challenge #515: Anything Christmas

ABC Christmas Challenge: N & O are for?


Till next time - stay safe and happy stamping!

Shona

Wednesday, October 8, 2014

PENGUIN PARTY TIME!

Hi there, 

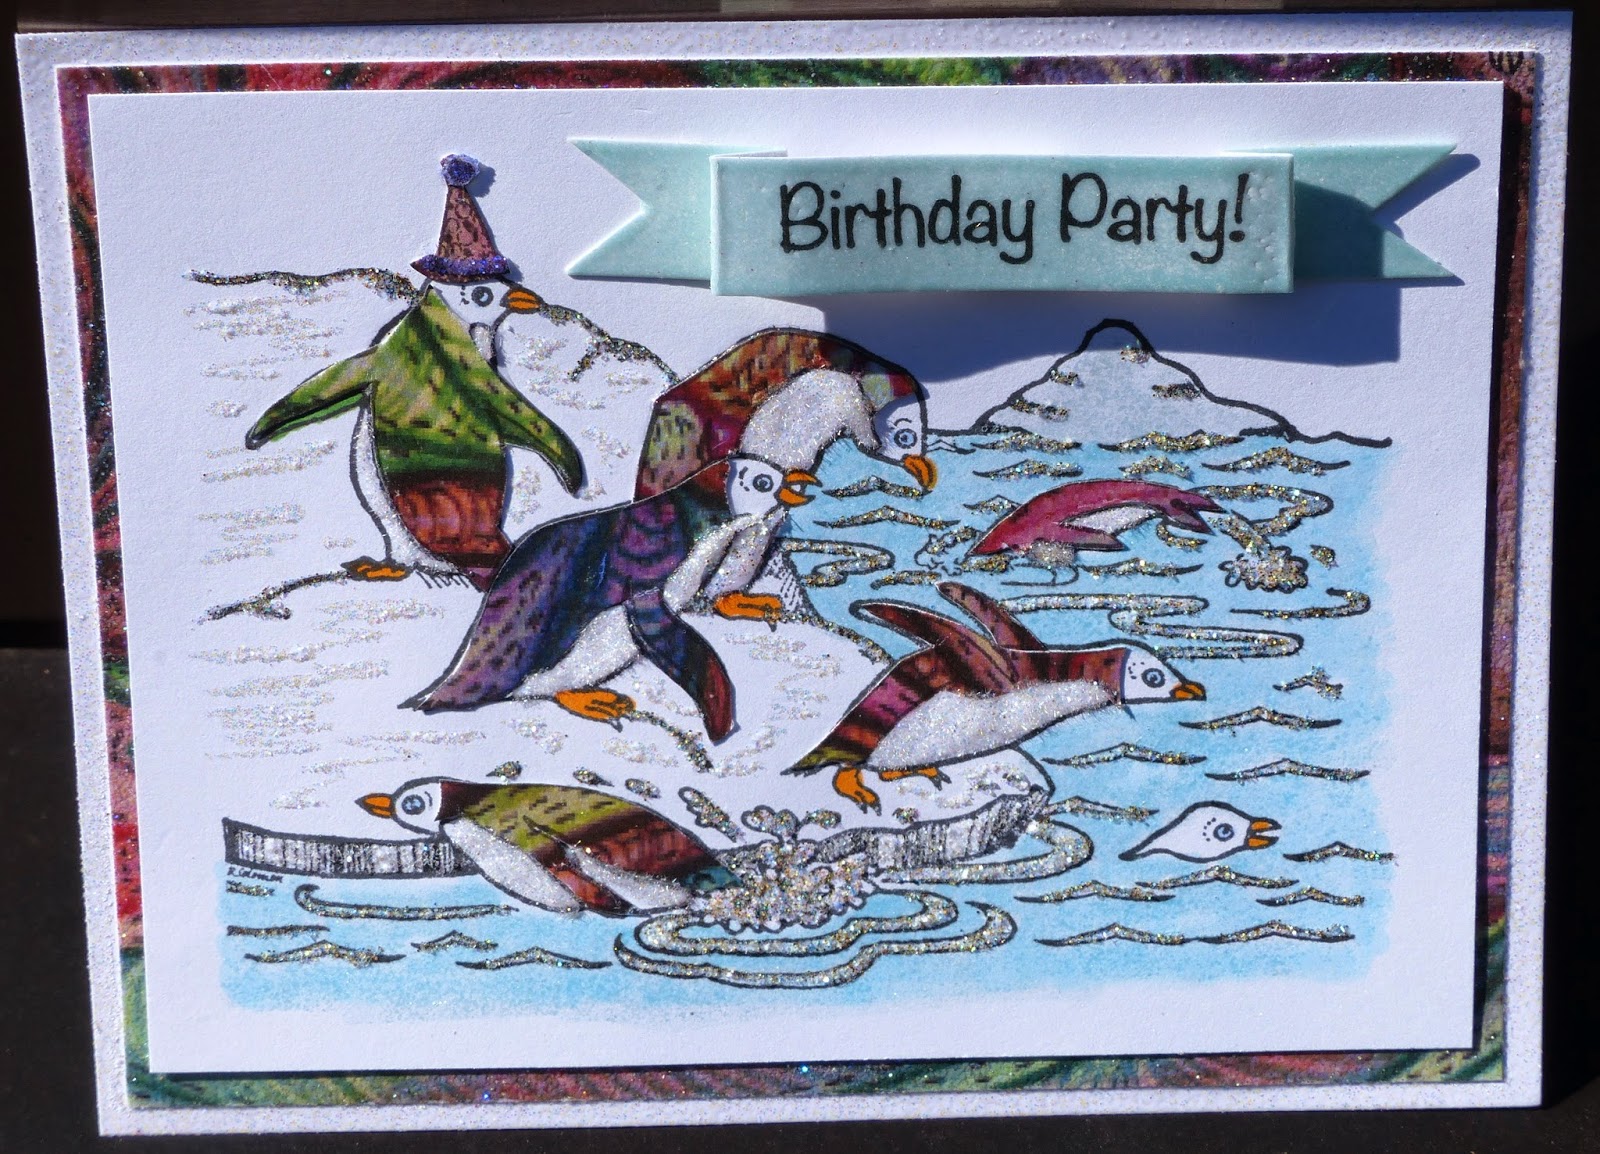
Here is the sneak preview that I shared with you last week. It's using one of the other SNS October Reveal Sets: 654 - Party Penguins. These guys are all dressed up in paper-pieced tuxedos ready for their festivities!


First, I stamped the image twice - once on white cardstock in black ink and then again on the Paisley, Pocket Full of Papers paper. I fussy cut the penguin backs from the DP, using the paper-piecing technique and set them aside, while I colored the image - beaks, feet, eyes and water (not the ripples) with Copics. I then took a Versamarker Pen and applied ink to the iceberg and over the top of the blue water and heat embossed with Ice. This gave the water a glassy look.


Try embossing the water in a vase of flowers or a jar to give the jar a glassy look! It looks great over a stamped and colored image!

I attached the designer paper penguin backs with Brushable Glue and added Twinkling Clouds with Dimensional Glue to the tummies. The party hat was done in the same way, but I used Purple Dust glitter for the trim.


I added Surf (G1117) glitter to the ripples in the water with a Sakura Glue Pen and Diamond Dust (G1116) to the edge of the ice block with Brushable Glue. The Sakura Pen was scribbled over the snow ledges and Sparkling Snow Glitter was applied. You can see from the photo above, the different dimensions achieved using the various glues and glitters.

I stamped the sentiment in Tuxedo black and cut and score to make the banner. It was also covered in Versamark and heat embossed with Ice.


The paisley designer paper was layered to a white card base. I then applied some Versamark around the edges and heat embossed with Sparkle. This gave a sparkly edge for the card front to be layered to. Full directions can be found in the SNS gallery if needed.


Hope you've enjoyed your visit today and that I've inspired you to get out some of your glitter and glues!

I would like to enter this card in the following challenges:

A Sprinkle of Imagination - Color Challenge
Tando Creative Challenge - As Cold as Ice
Love to Scrap - #39 - Anything Goes (No digis)

Thanks for stopping by,

Shona

Tuesday, September 30, 2014

SPARKLE N SPRINKLE'S OCTOBER 1ST REVEAL

Welcome to fall and the inspiration of  the Sparkle N Sprinkle's Design Team as we introduce our six new sets for October. As you may know, autumn is my favorite season and I just love flowers, so I "picked" the Beautiful Friendship Set 665 to work with in autumnal hues.


This month SIX new stamp sets are being introduced.   These sets are 20% off their regular price, until October 3rd.  All the new reveal sets are available on Cling Mounted Rubber and as a digital image. The Bubble Gum, set #664 is the stamp set featured in  This Month's Technique Video.

Here are the six new sets:


Welcome Autumn #650   (Digi version - DIGI650)
Party Penguins #654  (Digi version - DIGI654)
Witches Brew #660  (Digi version - DIGI660)
Bubble Gum #664  (Digi version - DIGI664)
Beautiful Friendship #665  (Digi version - DIGI665)
Ellie's Dance Lesson #667  (Digi version - DIGI667)


On Oct 3rd,  one Grand Prize Winner will be selected from the comments left on the designers' blogs listed below.  The Grand Prize Winner will receive their choice of:

1) all SIX of the new rubber stamp sets
or 
2) all the new digital stamps and digital stamp sets. 

The new SNS Creative Challenges also begins today, with lots of prizes and recognition badges. 

The winner of the blog hop will be announced on Oct 3 on Facebook, the SNS blog, and on our blogs:


(Tip: if you have a problem with a particular link, try clicking on the person's blog title to send you to their Home page.)

Don't forget to leave a comment with each Designer to be eligible for the Grand Prize.  We love reading your comments and hope we have inspired you as well.  If you absolutely can not leave a comment for some reason, please email icinganne@yahoo.com with your comment and the name of the blog or Designer you are commenting about.

So let's see what I did for my project this month. In September I worked with Margaret at the Somerset Scrapbook Convention. Here's a quick look at a bunch of awesome ladies about to find out a really quick and easy way to add sparkle to any project:


On the Scrapbook page project, we had used Sparkle embossing powder just to bling up a little bird's nest.  I had totally forgotten what a big sparkly impact you can get just by covering your image or piece of paper with this awesome embossing powder! So I decided to highlight this simple technique in my project this month:


Isn't that just lovely with the added sparkle, not only to the image, but the plain white cardstock? Here are four examples of some hand-made glitter paper:


Just by applying Versamark and heat embossing with the Sparkle embossing powder, you can transform a matte finish to a sparkly glittered masterpiece, which can be punched, used for backgrounds or as I did in my card - even add sparkle to a colored image!

I stamped the bigger image in Versamark off the bottom left of the card front and then heat embossed with Sienna embossing powder. I thought rather than using black it would be more inkeeping with my autumnal feel. Plus, these Tuscany embossing powders are detailed powders, so they work really well on detailed images with fine lines, as well as sentiments. There are 12 colors to choose from too, so there will be one to go with each of your projects. You don't have to stick to black anymore! On my project I used the Sienna embossing powder for the sentiment too. Look at the fine detail it produces:


Next I colored in the big image with Copics. I repeated the process with the little rose image on a scrap piece of white cardstock. Then I used the "Out of the Box" Technique to die cut and emboss the circle. I then took my Versamark Pad and applied it to the entire piece - the white frame with the colored image in the corner. The entire piece was then heat embossed with Sparkle.

For my background I used a technique called Alcohol Marker Marbling, which I found on Splitcoast Stampers a couple of weeks ago. Using four of the same Copics that I used to color the roses, I scribbled on a Ziplock bag, spritzed on some Alcohol Blending Solution, and smooshed glossy white cardstock onto the bag. It resulted in a background that matched my project perfectly! 

Next on to my Chipboard word. I learned something new about chipboard pieces at the Convention. I had noticed that when I tried to emboss these chipboard pieces, they would often leave an outline of their shape on my Versamark pad. Apparently the chipboard shapes are cut by a laser machine and in essence are being burnt while they are being produced. The black outline is actually soot, and if you take a paper towel around the edges of your chipboard piece, the soot will come off on the paper towel and not your Versamark pad. I keep an older pad specifically for my chipboard pieces. The other option is to use a dauber applicator for your embossing ink.


 The Chipboard piece was covered with Versamark and then heat embossed with some Sienna Star. This powder is the same as the Sienna, but with glitter added. I then reapplied a little Versamark and heat embossed some Magic Speckle to give it the mosaic look.

To finish the card, I placed the stamped, marbled background piece in the window of the frame. I then edged a piece of yellow cardstock with 1/4 Tear-ific Tape and layered the card front to the sticky edged card base, applying Sunset glitter to the exposed sticky edges. The "Friends" chipboard piece was stuck down using Dimensional Glue and the little rose image was attached with Dimensional Foam.


For a little extra bling I added a little strip of the jewelled ribbon, a strip taken from the Diamond Mesh, to the top of the card, which completed my project for today. I hope I've given you some ideas to go and play with. Full instructions for this card, can be found in the SNS gallery.

Remember to leave a comment here and on the other Designers' blogs to be eligible for the Grand prize of all six of these new sets!

Here's a little sneak preview of my next post, which will feature the paper-piecing technique! It uses one of the other new reveal sets - Party Penguins - too cute!


Hope you'll pop back next week to check out this project! Till then, hugs and get your Sparkle On (the cardstock)!

Shona

Friday, August 15, 2014

DIE-VERSIONS/SPARKLE N SPRINKLE BLOG HOP


Welcome to the Die-Versions and Sparkle N Sprinkle Blog Hop!


I hope you have ventured here via our SNS talented Anita? If not, in order to be eligible for the Grand Prize, you do need to comment on all the Designers, so you should go back! Here are my two sneak peaks!


The joint blog hop with Die-Versions and Sparkle N Sprinkle begins today (7am EST) and goes until Aug 17th (5pm EST), so there will be plenty of time to check out all the great projects created by both teams.  The theme is Christmas, so you'll get lots of great inspiration for your upcoming Holiday cards.

Die-Versions manufactures low profile dies made right here in the United States and Sparkle N Sprinkle manufactures rubber stamps, glitters, embossing powders, and flocking, also made in the US.  This is like a match made in heaven - low profile dies combined with lots of bling!  Doesn't get much better than that.

One winner will receive a Grand Prize consisting of a $50 gift certificate from Die-Versions and a $50 gift certificate from Sparkle N Sprinkle, for a total of $100.  The winner will be announced on Aug 17th on both the DV Blog and the SNS Blog as well as their Facebook pages.


In order to be eligible for the Grand Prize, please: 
  • Leave a comment on each Designer's blog
  • Follow both companies on Facebook (DV Facebook pageSNS Facebook page) if you haven't already so you can keep up to date on all the latest goings on.   (I'm sure that all of the Designers would love for you to Follow them too, but that isn't a requirement to win this prize.)  

You should begin at the Die-Versions Blog and end at the Sparkle N Sprinkle Blog.  We'd love it if you'd like to leave a comment at either the DV Blog or the SNS Blog telling us which projects were your favorites.  :-)

Enjoy this sneak peek of some of the projects you'll be seeing during the hop.


We hope you enjoy this blog hop and it gives you lots of inspiration!  Don't forget to leave each of us a comment and follow both Die-Versions and Sparkle N Sprinkle on Facebook.

So, here we go ... on with the show ....


I received three die cuts to play with from Die-Versions. I cut them all out and took a while figuring out what I wanted to do with them. So who out there, is like me and needs a lot of Christmas cards? Last year I sent out 152, and by the time I finished it was already (year) 2014!! I am thinking that I'm going to start much earlier this year (seem to remember saying the exact same thing last year. But I really am this year!) This Die cut from Die Versions is great for multiples. It pretty much covers the whole of a 4 1/4" x 5 1/2" page, with a little border. (So for a CAS idea - try this!)

I cut out the Merry Christmas from white glossy cardstock and layered it on to a piece of SNS Super Adhesive Sheet, then applied Cherry Sparkle Sparkle N Soft to the remaining exposed tape.

Three bronze Christmas Tree brads were heat embossed with Belgian Cream (which covers everything - as it is opaque)  and then again with Sparkle to provide the glitz!

I centered that on white cardstock edged with 1/2" Tear-ific Tape and then burnished Black Suede Velvet Glitter on the the remaining exposed tape. I was going for Santa colors, but of course, the sky is the limit - metallic cardstock for the sentiment with other flocking colors? Use the die as a stencil? I know a good few of my 152 this year will be using this die. Full directions for this card are here in the Gallery

Another die I received was this cute Mistletoe branch....


 Last month you saw that we had this cute little Penguin fellow as one of our new releases over at Sparkle N Sprinkle! Match made in Heaven I thought. As you can see, I'm still using these glass beads - only this time I didn't color them. These dies really do cut out well - without wax paper! 

After coloring in the Black StazOn image with watercolor crayons and a waterbrush, I stamped the sentiments from the set in Versamark and heat set with Black Detail


In order to make him fit with the mistletoe above him, I decided to go with a letter size card, so I cut the rectangular frame from a piece of 3 1/4" x 6 3/4" green cardstock before layering it to the red 3 1/2" x 7" card base. (I thought it worked well with the vertical greeting too!)


I cut the die from watercolor paper too, and colored it with crayons and the water brush, just like the penguin. Then I added Dimensional Glue to the ribbon and little blobs were placed here and there on the Mistletoe for the glass beaded Mistletoe berries. Complete instructions for this card can be found here.


... and that's all there is to it!  You've completed the Blog Hop. Hope you've been inspired today by all the Designers on both teams - Die Versions and Sparkle N Sprinkle. To be eligible for the Grand Prize of $100 worth of product, you only need to leave a comment on each of the Designer's Blogs. 

... so what are you waiting for ....?

Stop by and leave a comment at the Sparkle N Sprinkle Blog too, let us know what your favorite project was. 

Thanks for joining us, 

Till next time,

Shona

Tuesday, October 8, 2013

LAST ROUND OF GOLF (for a bit!)

I'm back this morning with a quick post, showing the last of the cards that I made using Sparkle N Sprinkle's Golf Set 509.  This is definitely one for the ladies!   


I used the little purses from another Set 411: Just Like Mommy to create my stage for the lady golfer and golf bag.

I colored them with Copics using pinks and purples. A few of them were stamped twice, fussy cut and popped up. I added Sparkle embossing powder over the top of my sentiment and some Sparkling Snow to the golf clubs. 

  
Full directions can be found here, if needed.

Thanks for stopping by today.

Shona  

Tuesday, September 17, 2013

ANOTHER ROUND OF GOLF!

Hi there, and thanks for stopping by!  Today I'm sharing another card that I made from the new Golf Set 509.  I needed a birthday card for a golfer, so this is what resulted:


Although I needed the card to be masculine, so not all glitzy and glamorous, I still wanted to add a little shine and pizzaz.  So using some Gold Detail embossing powder to "distress" the image panel and to edge the card, I was able to add some masculine bling! 

There's also some Peruvian Lily Velvet Glitter applied with a glue pen to the Celebrate embossed border!  You know a card's not complete without some glitter! Oh, and do you see that sparkle on the golf ball - it was embossed with Sparkle embossing powder.


I'm not sure, if in the last month I have not used Sparkle embossing powder somewhere on every card?  Every card "needs" sparkle - if there is one "go-to" embossing powder - then this is your man!  

Here is the end result - shiny AND masculine!


Hope you've enjoyed your "round of golf" with me today!  

Have a wonderful day and remember to take time to "Sparkle"!

Monday, September 9, 2013

GOLF ANYONE?

Hi there, I'm back today with another new release from Sparkle N Sprinkle - this time it is the new Golf Set 509. It's a great set for those masculine cards, with which I always seem to have trouble getting started.  I made four different cards, so I'll start with the one I did last - just because I want to!


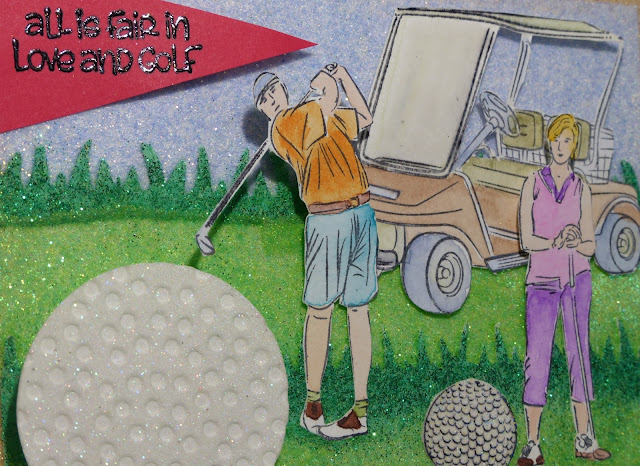
Using plenty of Sparkle N Sprinkle product - I made the sky and grass with Tear-ific Tapes and Sparkle N Soft.  So there's a lot of fuzzy texture going on in this card.  I colored the images with watercolor crayons and a waterbrush.  Versamark and Sparkle embossing powder were applied to the golf balls to give them that shiny golfball look. Full details can be found here.

Here's another angle of the card which shows off more of the sparkle!  I also framed the card with Sparkling Sands Sparkle N Soft. 


Thanks for stopping by today.  

Till next time!


Shona

Tuesday, August 20, 2013

VAMP STAMP NEWS PUBLICATIONS

Hi there,

Just got a note from Nancie Waterman letting me know that I'm in the latest edition of the on-line Vamp Stamp News Magazine.

This month we were challenged to use Gelatos or gel sticks.  Have to confess I enjoyed playing around with these little guys for much longer than I should have!!

Here is the first one I came up with using the Gelatos to color in an image:


For the second one, I used the Gelatos as a wash for the background:


.. and for the third I tried a little experimenting!  


So much sparkle on this third card.  I had just received the new marbled embossing powders from Sparkle N Sprinkle, so wanted to try them too! I learnt that if I colored on glossy cardstock with Gelatos, it would just rub off when touched, but I loved the vibrant colors it produced, so after coloring, I covered the entire colored card with Versamark and added a little "Sparkle", so that all the color would stay put!  A pretty Gelato Butterfly and we were done!

Click here if you need the instructions to any of the three cards:

That's all the Gelato for now!

Shona