Showing posts with label dimensional glue. Show all posts

Wednesday, January 12, 2022

Eat, Drink and bee Merrry

Hi there and welcome back to my second blog of the new year! Today I am sharing the card I made for the January Christmas Craft Creations Challenge, where we have to include some stenciling. For my card I am using the cutest little Bee Merry set from Clearly Besotted. A "newbee" for me!!


I began by stamping the cute little stamps in Versafine Clair Nocturne ink and heat embossing them with Clear Detail.


The images were then colored with Copics and fussy cut.


I inked the honey comb background using one of the Recollections Stencil set and Distress Oxide Peeled Paint ink. 
 

The sentiment was die cut with an old Spellbinders Hexagon die to match the stenciled background. I added some of the Peeled Paint before removing the die.


Dimensional Glue was applied to the snow on top of the hive to which I added Diamond Dust Glitter. 


Sparkling Snow glitter was applied to the bauble using the same glue and Snow White Flocking to the Santa hat.


The glue was also applied on top of the colored lights. Everything was set aside to dry.


Here is a close-up of the finished card, once the pieces had been attached with foam pads to the stenciled card base. Hopefully, you can see the dimension of the different glitters and flocking.


A red and white bakers twine was tied around the side of the card to finish off.


Below, you can see the products that I used on my card today:


Clearly Besotted Bee Merry set

Recollections Stencils 658160

Distress Oxide Peeled Paint ink

Versafine Clair Nocturne ink

Clear embossing powder

Copics

Spellbinders Hexagons dies

Dimensional Glue

Diamond Dust Glitter

Sparkling Snow Glitter

Snow White Flocking

Foam pads

Red and white bakers twine


I hope I've inspired you to take a look at the rest of the Team members' cards. Please give the stenciling theme a try while adding  to your 2022 Christmas card stash!

I'd like to join in the following challenges with this one:
Dies R Us Challenge #184: Using a die that DRU carries
Peace on Earth Challenge #7: Anything Christmas Goes
Stamps & Fun = Creativity #401: Colors of Christmas
Critter Crazy Challenges #58: Anything Goes with critters

So that's it from me today! Hope to have you stop by soon! Till the next visit, stay safe and warm!

Cheerio for now from chilly New Jersey,

Shona

Thursday, March 21, 2019

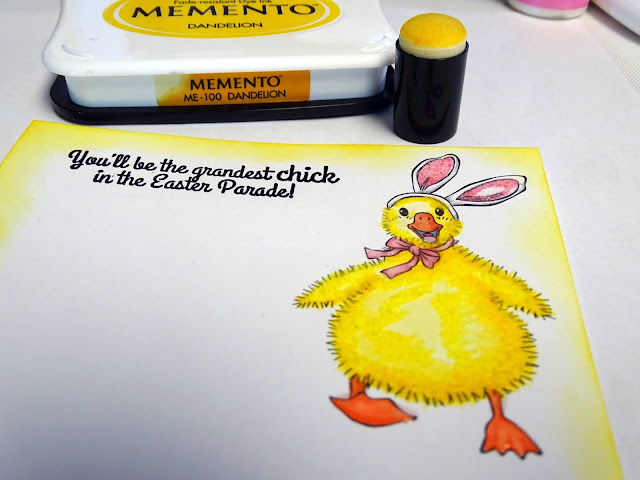
Grandest Chick!

Hi there and Happy Spring!
Today I have an Easter card for you combining the fun digi set 945: Easter Parade with the Easter Parade Stamp Set 945
To begin with I printed out the little duck and cut the paper so that he would be in the top right hand corner, leaving enough space for his other two pals! Another duckling was printed out, as was the little chick. These last two were fussy cut. 

The eggs were stamped with Distress Inks Fossilized Amber and Wilted Violet and were then given a coat of Clear Detail and then heat set. That produced nice shiny eggs. I fussy cut them to make them look like the chicken and ducklings had just hatched!
The ducklings and chick were flocked with Canary Yellow with some smooth precision gluePinkerbell glitter was added to their ears in the same manner. 

Using the same glue pen I added Lemonade glitter to the yellow flowers on the chick's bonnet. 

Dimensional Glue was then added to all the ribbons, wellies and feet and set aside to dry. This gives a raised glossy look when dry.
The sentiment from the stamp set was stamped in Versamark and was then heat embossed in Black Detail. I then sponged some Memento Dandelion ink around the edges of the card. 

The front panel was layered to purple, then to a yellow layer before the white card base. I then mounted the second duckling with mounting tape along with the eggs. The little chick was attached with a wobble. I added some Violet Galaxy Nuvo Crystal Drops to pull out the purple elements of the card. 

 That finished off my card for today. 

I hope you've enjoyed my share today. Below are the products used in my card.  You will also receive an extra 10% off anything in the Sparkle N Sprinkle store by using my code ShonaDT10 at the checkout.
I'd like to join in the following challenges:
2 Crafty Critter Crazies #24: Use a Critter
Crafty Animals #24: Must use animals
World Wide Open Design Team Challenge #3: AG
Have a great day!
Shona

Thursday, September 13, 2018

Snow One Like You!


Hi there,

Today I'd like to share with you my second SNS September Reveal card, using the
Great Horned Owl Set 912, only I changed it to be a Snowy Owl and paired it with one of
my flocked and glittered backyard photos!


Using the Stamp Platform, since I was working with Watercolor paper and would want to make a couple of inkings in order to get a good impression, I stamped the owl image in Metro Grey Hybrid Ink.


After fussy cutting the owl (and cutting off his ears) with the 5" Mini Scissors I used

His eyes were colored with yellow Copic marker YR23 and then I added Dimensional Glue on top.
Dimensional Glue was also put down at the feet for more flocking. Snowy owls have hairy feet!


Did you know that Snowy Owls are not nocturnal like other owls? So, I took one of my backyard snow day photos, and using the Quickie Glue Pen I added Twinkling Clouds to the snow on the branches.


I edged a piece of cardstock with 1/2" Tear-ific Tape. After removing the protective backing I applied the Oceanic Glass Glitter, and then filled in any spaces with Ocean Breeze Glitter.


The sentiment from the Snow One Like You Set 515 was stamped in the Stamping Platform with Empire Blue Hybrid Ink and die cut with the Spellbinders Grommet Tag. I then edged the tag with the Nuvo Medium Glue pen and applied Ocean Breeze Glitter.


Taking a strip of 1/4" Tear-ific Tape and twisting it around to make it into a piece of sticky twine, it was then rolled in the Ocean Breeze Glitter.


I put a little mounting tape behind the sentiment tag and attached the twine through the holes in the tag to the back of the photo. The photo was then adhered to a white card base with Mounting Tape. The owl was positioned on the branch with 1/4" Tear-ific Tape and a piece of Mounting Tape behind the head. Then Silver Moondust Glitter Drops were added to the sentiment and around the photo to finish of the card.


Below is a list of products used in my card today. You can get an extra 10% off your SNS purchases by using my code, ShonaDT10, at the check out.

Mounting Tape
Yellow Copic YR23
Grey Copic N2
Spellbinders Grommet Tags
Backyard Photo: Snowy Branches

I'd like to play along in the following challenges:
ABC Christmas Challenge: S is for snow and T is for Teal
2 Crafty Critter Crazies Challenge #18: Must include a critter
Morgan's Artworld Open Challenge #9: Anything Goes
Classic Design Team Open Challenge September #9: Anything Goes

Thanks again for stopping by today!

Shona

Thursday, September 6, 2018

Sunflower Hello!

A Sunshiny hello,

Today I am sharing the first of my September Reveal cards. I combined both the Sunflower Cheer Set 916 along with the digi version and then the background is the Stampendous Cling Sunny Sketch 6CR004 stamp.


I began with stamping the background on watercolor paper with the Hybrid Ink Acorn Brown, using the Stamp Platform.


Masking Fluid was applied sporadically to different areas of the image and once dry, the image was sprayed with water using the Light Mist Sprayer and Shimmer Powders were applied.


I used a Water Brush to move the colors around. Solar Flare, Catherine Wheel and Garden Parade were the colors I used.


Cherry bomb mixed with Solar Flare was used for the background.


I printed out the digis, while I was waiting on the background to dry. I printed one 5" x 7" sunflower and then two 4" x 6". These were fussy cut using the 5" mini scissors.


Versamark was applied to all three sunflowers and they were heat embossed with Sparkle. Dimensional Glue was then applied to the center of one of the smaller sunflowers and Sparkling Coffee was added.


The Masking Fluid was then gently rubbed off the background piece.


Yellow and orange Glitter Markers from the Ember Glow pack were applied with a water brush to certain areas of the petals.


Aquaflow watercolors were used to color the bee and the leaves.


Honey Gold Glitter Drops were applied to the wings of the bee.


Caramel Cream Crystal Drops were added to the little circles around the flower on the right.


The background was placed back in the Stamp Platform and was dusted with the anti static bag, before the sentiment was stamped in Versamark and then heat embossed with Timber.


I cut off the stem and leaves of the larger digi and one of the smaller ones. The petals of the flowers were cut with the 5" mini scissors and were curled a little before being attached to the background with Tear-ific Tape and Mounting Tape.


Raffia ribbon was tied around the stem of the flocked flower before it was attached to the panel with Mounting Tape.


A watercolor paper card based was edged with 1/4" Tear-ific Tape and the card front was centered on top, leaving a then edge of adhesive to which Autumn Frost glitter was applied.


Here is a close up of the completed project.


Below is a list of the products I used. You can receive 10% off any of the products by using the code ShonaDT10 at checkout.

Sunflower Cheer Set 916
Timber (EP469)
Mounting Tape
Rafia Ribbon

I'd like to join in the following challenges:
World Wide Open Design Team Challenge #8: Anything Goes
Classic Design Team Challenge #9: Anything Goes
Morgan's Artworld Open Challenge #9: Anything Goes
Craft stamper - Take it Make it Challenge September: Anything Goes

Thanks so much for stopping by today.

Shona