Showing posts with label Sakura Glue Pen. Show all posts

Thursday, August 11, 2016

Dimensional Flower Cart

Hi there, 

Today I'd like to share a card with you made with the new Flower Cart set 798 from the August Reveal.

Flower Cart

I decided to spotlight the flowers on the cart, so stamped the image on black cardstock with Versamark and heat embossed with White Detail.

Flower Cart

I then stamped the flower part of the cart on white cardstock with Memento Tuxedo Black.

Flower Cart

The flowers were colored in with Copics and then were fussy cut. Dimensional Glue was added to the yellow roses and was left to dry dimensionally clear.

Flower Cart

When the glue was dry, Orange Crush and Sunny Daze were added to the orange and yellow flowers with the Sakura Glue Pen. Black cardstock was run through Spotted Flowers embossing folder by Crafts Concepts.  I applied the Green AppleDandelion Yellow and Ripened Pumpkin Nuvo Crystal Drops to the little wells, as shown.

Flower Cart

When the drops were dry, I tore around the image and attached it with Foam Squares. I then centered this to a piece of white card base, edged with 1/4" Tear-ific Tape, after removing the protective backing and burnished in Sun Dazzle Sparkle Sparkle N Soft to the exposed adhesive.

Flower Cart

The flowers were then popped up on top of the white image with Foam Squares.

Flower Cart

Depending on how you look at this card with the torn edges, it looks like the image is actually sunken in, instead of being popped up as in reality:

Flower Cart

I'd like to join in the following challenge:
Anything goes with a Create with TLC Element: Challenge No. 2

Hope you've enjoyed my share today.

Till next time,

Shona

Thursday, July 28, 2016

DANCING MILDRED

Hi there, 

Today I'm here to share a card using the July reveal set: Milton Catching Snowflakes. I chose to repurpose the stamp:

Dancing Milton

I matched my dancing giraffe with a saying from the Spring Time Spunky set, added a fuzzy giraffe background and some purple tulle for a totally different look. I began with the background. Taking a piece of yellow cardstock, I applied a 4 1/2" x 6 1/2" piece of Super Adhesive Sheet. After removing the protective backing I applied Mimosa Sparkle N Soft. 


Then I applied Memento Rich Cocoa ink to the raised patches on the inside of the Darice Giraffe embossing folder and ran the top half of the fuzzy cardstock through the embossing machine, then reinked the patches and ran the bottom half through.


Here is the finished background:

Dancing Milton

Milton was stamped on white cardstock in Versamark and heat embossed with Teddy BrownCopics were used to color. Sparkling Coffee Sparkle N Soft was applied to the patches with Brushable glue.

Dancing Milton

Dimensional Glue was then applied to the hooves. This was then set aside to dry.

Dancing Milton

I stamped the sentiment in Versamark on white glossy cardstock and heat embossed with Sienna. The Tuscany EP's are my go to detail embossing powders, which I use a lot on sentiments. The saying was cut up as shown to be attached to the card with foam squares. When the glues were dry, I added the velvet glittersHyacinthOrchid Rose and Ballerina, to the scarf, using the glue pen - Milton becomes Mildred!!

Dancing Milton

Spellbinders Mega Ovals Large was used to cut out the giraffe and before removing the die I sponged some Memento Cantaloupe ink around the image.

Dancing Milton

The background was layered to a piece of mustard cardstock, edged with Memento Rich Cocoa ink, before being layered to a white card base. I then attached a piece of purple tulle to the back of the image before attaching both the cut up sentiment and image with foam squares as shown.

Dancing Milton

That finishes my project for today. Hope I've inspired you to try out some of the Sparkle N Softs.

I'd like to enter my card in the following challenges:
Crafty Sentiments Designs - Animals Challenge
Simon Says Stamp - Monday Challenge: Add some texture


Hugs,

Shona

Sunday, January 31, 2016

SPARKLE N SPRINKLE'S FEBRUARY 1ST REVEAL

Hi there and welcome to the Sparkle N Sprinkle February Reveal! I'm the last designer on the hop. If you were intending on participating in the hop with the hope of winning all three of the new stamp sets then go back to the beginning with Marie!  This month, I chose to work with the new set Disco Fever, also featuring the new Neon Glitters, some of the new Nuance powders, easy-peasy pull ribbon from Mon Ami Gabby and the new Kiss Cut technique!


We have THREE new stamp sets to share with you today.  These new sets are 20% off until Feb 3.  So once you finish the blog hop, head on over to the store and start shopping.  All of the new sets are available on cling mounted rubber or as a digital image.  

The sets are:

Disco Fever 772 (digi version DIGI772)
Secret Garden 773  (digi version DIGI773)
Disco Girlfriends 774  (digi version DIGI774)

On Feb 3rd, ONE GRAND PRIZE WINNER will be selected from the comments left on the Designers' blogs listed below. Please leave a comment with each Designer in order to be eligible for the Grand Prize.  You never know who the Mystery Designer will be that has the winning comment.

The Grand Prize Winner, which will be announced on the SNS Facebook page and on the SNS Blog, will receive ALL of the new stamp sets released this month (or the digi versions, if preferred).

The Blog Hop order this month is:


(*Tip: if you have difficulty with a particular link, try clicking on the Designer's blog title to send you to their Home page.)

We hope you enjoy the New Reveal Blog Hop as much as we do.  Thanks for joining us and remember to comment on each of the Designers' blogs to be eligible for the Grand Prize.  
 Wonder who the Mystery Host will be this month????


The Sparkle N Sprinkle Creative Challenge also begins today.  There are lots of prizes and recognition badges.  Come check out how you can become a SNS Featured Artist as well.  The theme is always Anything Goes using Loose Glitter, Embossing Powder, and/or Flock.


Have you checked out the SNS YouTube Channel featuring Demo Donna?  If not, then you are in for a real treat.  Subscribe today to get all the latest Demo Donna tips and techniques! 


So - on with my disco party!....... and the fabulous new Neon Glitters!


I began by stamping the disco girl in Memento Tuxedo Black and after fussy cutting her out, she was colored with Copic MarkersE00, Y08, YR16, YG06, RV25, N4, B02, V04. I applied a thin coat of Dimensional Glue to her boots and dress to give the outfit a shine.


After the Glue dried to a shine, the new Neon Green Glitter Exhilerated was added to her boots and scarf. Orchid Glitter was added to her hair. A Sakura Glue pen was used to apply these two glitters.


The panel on the left of the card was created using the Neon GlittersExulted (G1132), Energized (G1133), Exhilarated (G1134), Electrified (1135) and the Kiss Cut technique with the Memory Box Large Ringlets Die. A piece of 2 1/2" Tear-ific Tape was attached to a piece of white cardstock and then it was run through the embossing machine with the die (cutting edge) facing down into the adhesive backing. Pieces of the pattern were picked out with an exacto knife and applied with the Neon Glitters.


After all the glitters were applied, Versamark was applied to the entire panel and it was heat embossed with Clear Detail to give a shiny appearance. The panel on the right was created using a circular stencil and four of the Nuance Powders which best matched the colors of the new Glitters (Yellow, Orange, Pink and Green). I sprinkled the powders over the cardstock which had the stencil taped down over it and then spritzed with water. In order to make it shiny, after it was dried,  I again applied Versamark and heat embossed with the Clear Detail embossing powder.


Three silver brads were "blinged" with Tangy Tangerine and Flashy Flamingo and were attached to the Nuance panel. A piece of Mon Ami Gabby green pull ribbon was attached to the same panel before it was taped down to the right side of the black card base. The sentiment was stamped in Versamark and heat embossed with Black Detail. Spellbinders Back to Basics Tags was used to cut it out and then before removing the die, Memento Rose Bud ink was daubered on to the tag. This was attached to the Clear-embossed panel with a Flashy Flamingo-blinged brad, before being attached to the left of the black card base.


Our Disco Queen was attached in the center with Dimensional Foam to finish up the card. Hope you like our new sets and neon glitters? As I am the last designer on the blog - all you have to do now (if you have commented on all the others) is to leave a comment with me and you will be eligible to win the three new sets.

Good Luck!!

Till next time,

Shona

Thursday, December 17, 2015

Let's take a Sleigh Ride!

Hi there,

A quick post from me today - mainly because I'm still feverishly getting my cards made and secondly because I didn't photo document this one as I was making it (as it was bits and pieces of other cards that ended up together)!


I had received a free package of an embossing folder (with border strip), a British Robin stamp and a couple of sayings, with a magazine last month and had used the folder on this piece of purplish textured cardstock.

I had some scraps of watercolor paper where I had been playing with my purple and green Nuance powders, which I had also heat embossed with Sparkle. I used the anti static bag over the piece before stamping the couple sleigh riding in Versamark and heat embossing with black detail. It was then cut and embossed with Spellbinders Classic Oval die.


The sentiment was also from the freebie package and I stamped in black StazOn before coloring the poinsettias with pencils to match my scrap piece of "Nuances Poinsettia" left over from a project that I will share next week. The sentiment was die cut and embossed with Spellbinders Mega Ovals and I added some Lavender Iris to the purple petals using a Sakura Glue Pen.

A little green sheer ribbon bow was tucked behind the sentiment and then it was all attached with dimensional foam. This was layered on to a white card base to finish the card.


That was it! Not bad for a bunch of bits and pieces, right?

OK, that's all for now - back to the drawing board or should I say craft room!

Hugs,

Shona

Wednesday, October 8, 2014

PENGUIN PARTY TIME!

Hi there, 

Here is the sneak preview that I shared with you last week. It's using one of the other SNS October Reveal Sets: 654 - Party Penguins. These guys are all dressed up in paper-pieced tuxedos ready for their festivities!


First, I stamped the image twice - once on white cardstock in black ink and then again on the Paisley, Pocket Full of Papers paper. I fussy cut the penguin backs from the DP, using the paper-piecing technique and set them aside, while I colored the image - beaks, feet, eyes and water (not the ripples) with Copics. I then took a Versamarker Pen and applied ink to the iceberg and over the top of the blue water and heat embossed with Ice. This gave the water a glassy look.


Try embossing the water in a vase of flowers or a jar to give the jar a glassy look! It looks great over a stamped and colored image!

I attached the designer paper penguin backs with Brushable Glue and added Twinkling Clouds with Dimensional Glue to the tummies. The party hat was done in the same way, but I used Purple Dust glitter for the trim.


I added Surf (G1117) glitter to the ripples in the water with a Sakura Glue Pen and Diamond Dust (G1116) to the edge of the ice block with Brushable Glue. The Sakura Pen was scribbled over the snow ledges and Sparkling Snow Glitter was applied. You can see from the photo above, the different dimensions achieved using the various glues and glitters.

I stamped the sentiment in Tuxedo black and cut and score to make the banner. It was also covered in Versamark and heat embossed with Ice.


The paisley designer paper was layered to a white card base. I then applied some Versamark around the edges and heat embossed with Sparkle. This gave a sparkly edge for the card front to be layered to. Full directions can be found in the SNS gallery if needed.


Hope you've enjoyed your visit today and that I've inspired you to get out some of your glitter and glues!

I would like to enter this card in the following challenges:

A Sprinkle of Imagination - Color Challenge
Tando Creative Challenge - As Cold as Ice
Love to Scrap - #39 - Anything Goes (No digis)

Thanks for stopping by,

Shona

Wednesday, September 24, 2014

WELCOME TO AUTUMN!

Hi everyone!

Yes, I'm back! I'm so sorry that I've not been able to keep up with my duties here in Blog Land over the summer. It was just one thing after an other. I'm sorry if I've also not been visiting your blogs either, hopefully I have righted that on my return from Scotland!

As soon as I got home I went straight into the Somerset Scrapbook Convention. I was teaching the classes and it was so much fun meeting all our lovely customers. Now we are exploring the possibility of teaching classes in NJ.


I've taken a couple of weeks to get things organized from being away for such a long time. We're now down to a little family of three. My older two now being away - one in St. Andrews, Scotland, and now the second just 45 minutes away studying her dream - Music, at Westminster Choir College! We're feeling blessed - 'though very poor!

Our third, Calum, has risen to the occasion! Now that the other two are off, he seems to have come into his own, and is doing academically well so far in his first year in High School. Named Captain of the Freshman soccer team, and occasionally playing for JV and Varsity, obviously has had an enormous boost to his overall ego. Long may it continue, as it adds tons of crafting time to one's schedule, if you don't have to be continuously nagging to get one's homework done!!

I really enjoyed getting back upstairs to my craft room. I've spent most of the past two days reorganizing everything. I can't work when there is clutter! ... and I have control over that in my studio!! Not so much in the house!! You know what I mean - but I still love them! Smelly soccer socks and all!


While I was at the Convention with Margaret two weeks ago, I found a booth that had different embossing folders (and you know how obsessed I am about embossing folders!) Along with a couple of others, I picked up this "Sheena" Oriental birds EF. To be honest, I didn't find too much about it oriental - but thought it would make a great fall card! 


I was looking for something really easy to do to get back in the swing of things, so I ran the Oriental Birds through the machine. It was then inked up with London Fog on the embossed side. Then I took all my Semi-Transparent "fall" glitters out of the drawer and randomly applied them with my Sakura Glue Pen to each of the leaves.

The sentiment was stamped in Versamark and heat embossed with Sienna. Memento Cantaloupe was applied before removing the die and then I edged the die cut with Rich Cocoa Memento ink. I popped the die cut (Spellbinder's Grommet tag) using dimensional dots with brads that had been customized with Sienna Star embossing powder.


The card front was attached to a gray card base and then I sponged Versamark around the edges, to which I added Shimmer Embossing Powder. 

... and that was pretty much it.

I'd like to enter this card in the Scrapy Land challenge: Die cuts and heat embossing. 

Hope you've enjoyed your visit here today, I'll be back next week, with the Sparkle N Sprinkle October Reveal. Prepare to be amazed at what the Design Team has in store for you!

Till then, enjoy the first few days of Fall!

Hugs,

Shona


Thursday, December 19, 2013

WARM WINTER WISHES

Hi there, So are you done making your Christmas cards yet? I'm getting there, only another 40 to go. Today I'm going to share one with you that I made using one of my photos taken last week in the early morning of a snow day!

I was lucky - as I was looking out the kitchen window last Tuesday, I saw this rather handsome little chap crossing over the back yard. I grabbed my camera quickly and took a few snaps, most of which were blurred, but then the clever little guy stopped (and posed!).


Unfortunately, you can't really make out his handsome tail, which was a fine specimen, but I thought the picture came out well nonetheless. I immediately thought of what I was going to do with this snap. It got e.mailed to Costco!

I used the Spellbinders Labels 23 to cut out the photo and then taped it down on to a glossy white cardstock base with the die still in place.  I ran a silver Uniball pen around the outside of the die, to create a border for the photo.


For the snow on the log and bottom of card, I applied Brushable Glue with our new "chunky" Diamond Dust glitter on top. For the tree branches I used a Sakura Glue Pen and Starfire glitter. See the difference in the textures of the glitters. All these Sparkle N Sprinkle products are acid free, so will not harm your photos at all.


The greeting, which is from Stamp Set 384: Holiday Penguins, was stamped in Versamark and heat embossed with Silver Lightning. This is a detail opaque powder, so it works well with sentiments.

.. and that was all I did! A quick and effective card for Christmas:


Till next time, "my" fox says - enjoy the holidays!

Shona

Friday, June 24, 2011

Two Passions in One

Well I came down and looked out the kitchen window this morning.  The deer have been in last night and had themselves quite the gourmet meal!  I now have a sinking feeling in my tummy!  Well, I'll just have to get out the nasty smelling spray, it's raining, so we won't be eating out on the porch today anyway.  As you know, if you've already read my profile, gardening and stamping are two of my favorite passions.  That's why I was furious this morning!  I love taking pictures of my yard, as each new plant comes into bloom (of course, I'll have to wait a couple of weeks now, 'till they come back), but there is usually something new every week.  Today, I want to show how I put the two passions together in my latest card.

Our challenge for this month with Sparkle N Sprinkle, was to create a card using at least one glittery product and a greeting.  I had done a Scrapbooking Convention with Margaret, about a month ago, and we demonstrated on how to add "bling" to photos.  So I decided to go that route for my glittery card.

I took a photo out in my yard and sent it down to Costco, but had it developed in black and white, instead of color.  I took four Copic markers: two pink, RV02 Sugar Almond Pink and RV42 Salmon Pink, 0 the Colorless Blender and G99 Olive and put color back into the photo.


Next I punched the bottom of the photo with the Tulip punch from EK Success.                           


Sparkle N Sprinkle has started to carry this great 2 1/2" tear-ific tape (SAT11).  It is wonderful for making all kinds of backgrounds - just apply it to card stock and remove the protective backing and apply glitter, flocking, tinsel, even beads - it is very sticky and everything sticks to it!  I took this tape and stuck it behind the punched area of the  photo.  I then applied Cyclamen Glitter (G1090) which stuck to the open areas of the punch.


Cut the photo down to 4" x 5 1/4" at this point, so it will fit nicely on to your finished card.  Then using the Quickie Glue Pen draw around the petals and leaves of the roses and add different glitters (one at a time).  For my card, I used Cyclamen (G1090), Bubblegum (G1088) and my all-time favorite SNS Glitter Sparkling Snow (G1003).  When you want some bling, but don't need color - then he's your man!  Put the photo aside at this point to dry (although it only takes five minutes).  Meanwhile make the label for the card.

Take a piece of pink card and stamp your sentiment in Staz-On ink.  I used the saying Happy Birthday to You from the new  Happy Birthday Set 416  from Sparkle N Sprinkle.  A very versatile set, full of great sayings for every birthday occasion!            

Cut and emboss the saying with Spellbinder's Ribbon Tag Trio Two.  Then take a Versamark pad and cover the entire label with the ink.  Heat emboss with the "one and only" Sparkle Embossing Powder.  It gives a lovely sparkly, intensified color to the label.


Thread a piece of white organdy ribbon through the label as shown and using dimensionals attach it to the front of the card.

Tape the ribbon down on the back of the photo with Tear-ific tape and then remove the protective backing of the 2 1/2" tape then you can go ahead and stick it down to your card front.

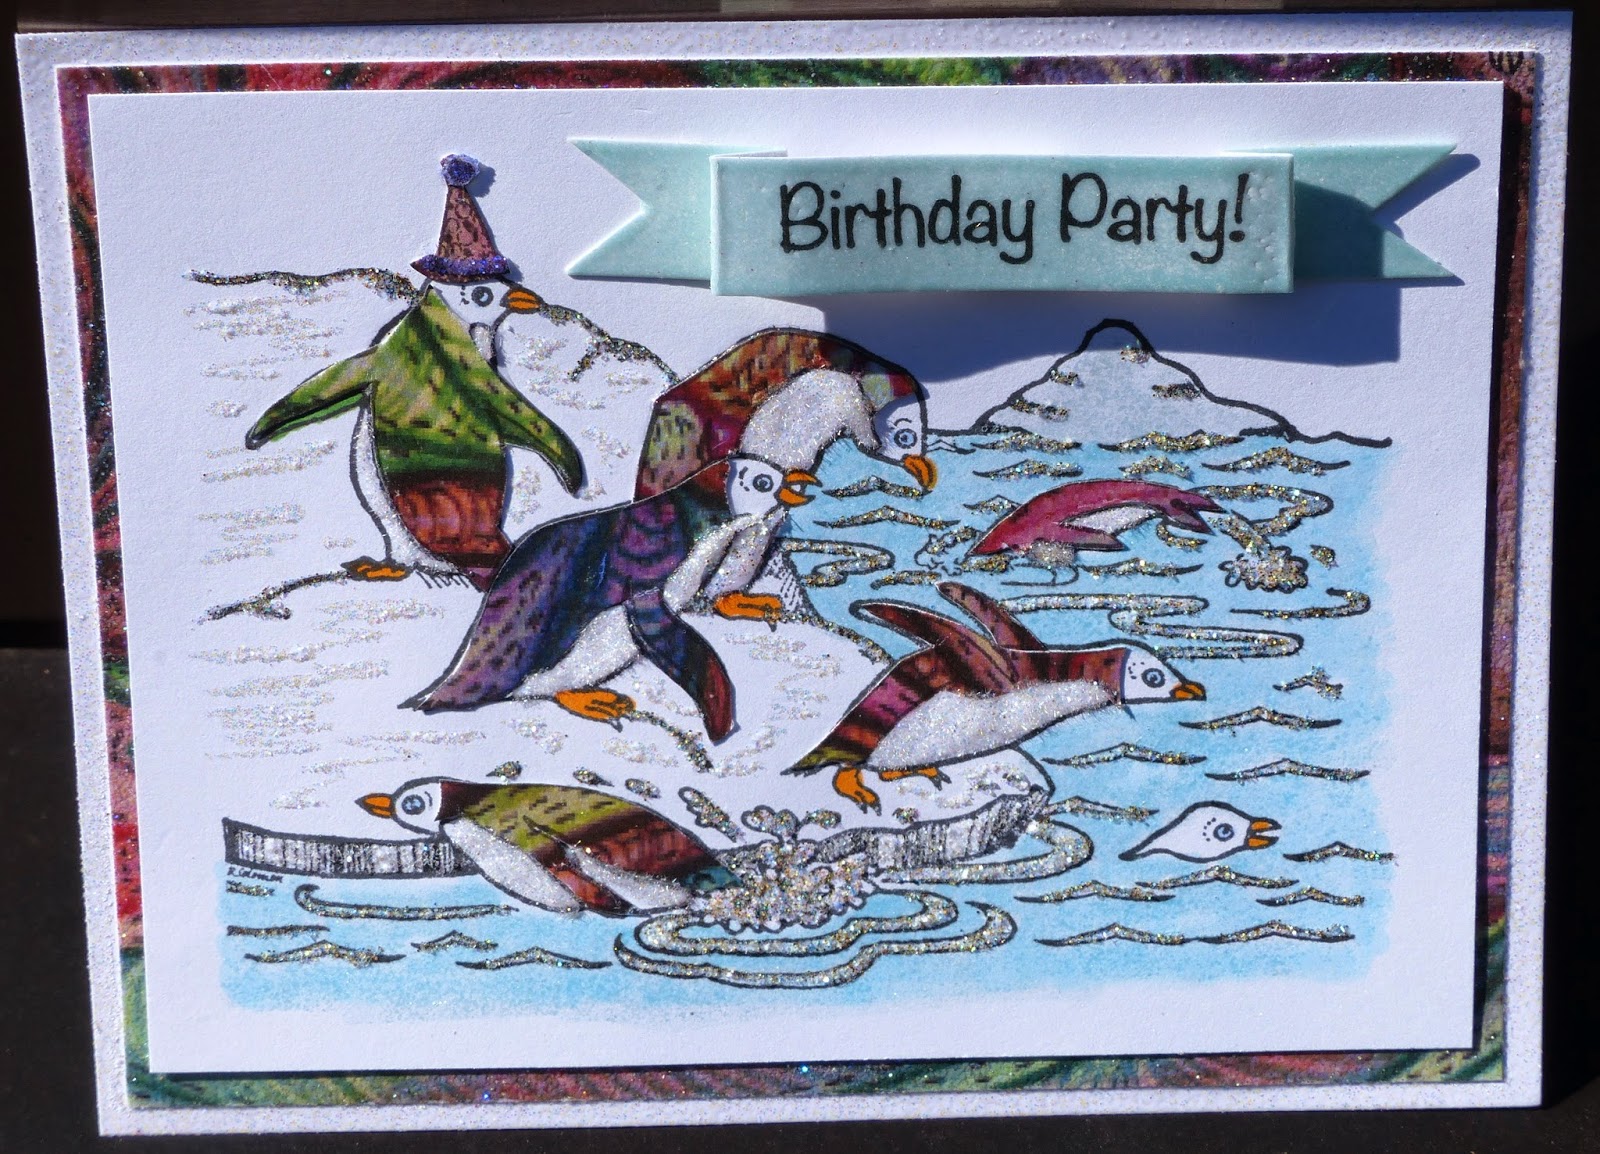
Here is the finished card:

I hope you have enjoyed making this card with me.  I also hope that you will see the endless possibilities you have with your very own black and white photos.   Have fun!