Showing posts with label Monochromatic. Show all posts

Tuesday, April 5, 2022

Christmas Tree Joy

Hi there and welcome back. Today I have a card for the Holly and the Ivy Challenge, where it is always anything goes. An easy way for you to keep adding to your Christmas card stash twice a month throughout the year. I haven't changed my header this month as blogger has changed something with the header option in layout! So you are stuck with a bee for a bit longer!! This happened before, so I am hoping that it will revert back to being able to change the header image. Anyway, on to my card!


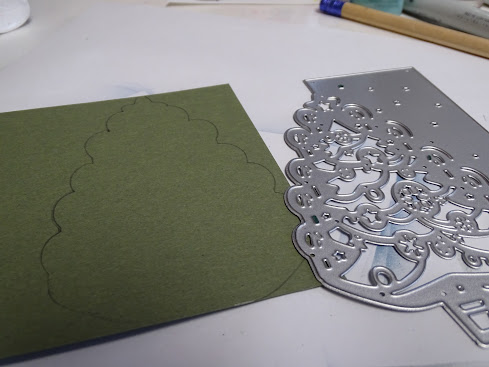
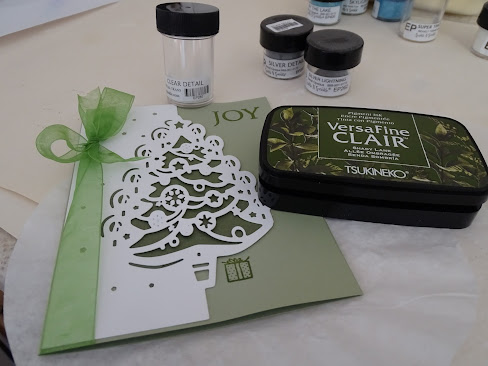
Another of the die cuts that I recently purchased from Lifescraft. It's a Christmas tree edger, but I decided to use it a little differently. I ran the die cut through my machine with white cardstock.


Then I drew around the outline of the tree and flipped the die to pencil in both sides on a darker piece of green than the card base that I was going to use.


This was then fussy cut along the inside of the pencil marks and was taped down to the inside of the tree. The tree was then taped down to the front of the card base. The sentiment and little package were from the following stamp set.


The sentiment and gift were stamped with Versafine Clair Shady Lane Ink and were then heat embossed with Clear Detail powder to give them a little sparkle.


I wrapped a green organdy ribbon around the left side of the card to finish it off!


Hope this has inspired you to join in with us at the Holly and the Ivy Challenge

I'll be back soon!

Shona


Tuesday, March 22, 2022

Joy to the World

Hi there and welcome back and Happy Spring!!!

 Today I have my second card for March for the Holly and Ivy Challenge. I decided to go with a monochromatic card and do white on white.


 I recently bought a few articles from Lifescraft and one of them was this town houses and trees die. 


I ran it through my die cutting machine with white cardstock. Yellow cardstock was taped to the back of the die cuts to look like there was light coming from inside the houses. 


Next I ran the Cuttlebug dot embossing folder through with a piece of white cardstock. This would be my snowy background!


Adhesive foam was then added to the back of the die pieces.


The two pieces were then layered to the front of the snowy background.


The second piece was layered to the top of the first to give some dimension. The sentiment from an old Sparkle N Sprinkle set was stamped in Versafine Clair Nocturne ink and heat embossed with Clear Detail.


This was then die cut with the Spellbinders Grommet Tag die.


The sentiment was attached to the front panel with pale yellow brads to finish my card off for today.


Hope you've enjoyed your visit today and that I have inspired you to join in the fun over at the Holly and the Ivy Challenge? It is always an anything goes theme and it is a great way to add to your 2022 Christmas card stash! You know how fast time flies!!

Till next time, take care!

Shona

Friday, February 28, 2020

Heart Embossed Butterflies

Hi there, I'm back to share with you a monochromatic card that I made for the Dies R Us Design Team, using the Memory Box Large Circle Burst die and the Poppystamps Embossed Heart Butterfly. I want to give a shout out to Lori Kobular for this gorgeous die - I won it over on the recent Turner Syndrome Awareness Blog Hop! Thanks so much Lori - I love it!!


I had a piece of purple card stock laying on my desk that I had die cut with the Circle Burst last week. I was thinking monochromatic for my card today and I was thinking pink, so instead of using it as a die cut, I used the piece as a stencil. Using a finger dauber, I applied Distress Oxide Worn Lipstick through the stencil.


I then die cut the Embossed Heart Butterfly and after cutting, I ran it through the machine again with an embossing pad to emboss the hearts. Leaving the die in place, I daubed the Worn Lipstick to the little raised hearts. I repeated this three times. 


Fuchsia metal antennae were attached to the back of the butterflies with tape. The sentiment from Sparkle N Sprinkle set Pansies was stamped with Versafine Claire Morning Mist. I used my stamp positioner for this, to be able to stamp a couple of times to get a clear impression.


The sentiment was then heat embossed with  Sparkle embossing powder.


The three butterflies were attached with foam tape for dimension. 


Below are the products that I used on my card today:

SNS Pansies Set 826
Sparkle (EP107) 
Fuschia metal thread
Mounting Foam

I hope you've enjoyed your visit today!

I'd like to join in the following challenges:
World Wide Open Design Team Challenge #2: Anything Goes
Cut it Up Challenge #194: Your favorite color
Crafty Gals Corner Challenge #204: Add a Heart

See you next time!

Shona

Wednesday, April 10, 2019

Seasons Greetings!

Hi there, 

Welcome to my first card for April! We're in the 70's today and the forsythia, crocuses (my header photo) and daffodils are putting on quite a show. The trees are starting to bud out too, I was in shorts and t-shirt setting up my bee hives today - as my bees are due to arrive sometime this week!

Today I have a card to share with you for the Christmas at Sweet Stampin' April 2019 Challenge.  Be sure to take a look at the inspiration from the Design Team. This month they have an optional theme, which is monochrome. I chose to play with silvers.


To begin with I stamped the background stamp from Technique Junkies - Winter Wonderland in Versamark and heat embossed with Silver Lightning


As you will see I failed to get a good impression with the stamp up in the sky area - so I decided to stamp in Versafine Claire Morning Mist and then heat emboss with Sparkle


Here you can see the difference:


So I fussy cut the sky area out of the Versafine Claire version and added it to the top of the Silver Lightning background. I die cut three snowflakes from glossy cardstock. Two were inked with Versamark and heat embossed with Silver Lightning and the third was heat embossed with Sparkle. I also die cut the Sweet Cuts Classy Deer from Silver cardstock and heat embossed with Silver Lightning.


I placed them on the card and thought that it would be better if the deer was a little darker, for contrast, so I added a little Versafine Claire Morning Mist on top of the embossed deer and then heat embossed with another silver embossing powder, Shimmer, this worked out nicely. The Tonic die Seasons Greetings was cut from silver cardstock. Then it was time to assemble everything. I layered the background to white glossy which was then layered to silver cardstock, but I didn't have it go all the way to the bottom of the card. The snowflakes were then adhered with mounting tape.


The deer was added with mounting tape, positioned like it was touching the white snowflake. The Seasons Greetings die was attached using Nuvo Precision Glue, overlapping the base of the front panel.


That finished of my project for the day! Hope you've enjoyed my monochromatic share and I look forward to seeing some of your projects over on the CASS site!

Below are the products that I used today. If they have a link - that means they are from the Sparkle N Sprinkle website and you can receive a further 10% of anything on the website by using my personal code ShonaDT10 at the checkout.

Technique Junkies Winter Wonderland #S635
Silver Mirror Cardstock
Sweet Cuts Classy Deer die
Joy Crafts Winter Wishes die
Mounting Foam

I'd like to join in the following challenges:
Scrapy Land Challenge #111: Use a die that Scrapy Land carries.
2 Crafty Critter Crazies - Challenge #25: Use a critter
World Wide Open DT Challenge #3: ATG
The Holly and the Ivy Christmas Challenge #47
Craft Stamper: Take It Make It Challenge - April

Wednesday, March 13, 2019

Winter Deer

Hi there,

Today I have a card for the Christmas at Sweet Stampin' Challenge Blog. I decided to go with a sparkly monochromatic look this month. 


I began with stamping the large Penny Black Snowy Grove stamp in Hybrid Ink Metro Grey on glossy white cardstock. I used my stamp positioner for this since it is such a big stamp and it required a couple of applications of ink.


The three deer were cut out from the Sizzix Winter Deer die cut, which was cut from Black cardstock.


The Memory Box Merry Christmas die was cut from white cardstock covered in 2 1/2" Tear-ific Tape.


I cut out the "Merry" and "Christmas" from black cardstock and placed them in their spots before covering the snow bank with Twinkling Clouds Flocking. 


I used the Sakura Glue Pen with Starfire glitter to fill in the snow particles on the background. This glue dries clear.


A piece of Bakers Twine was strung around the top of the card before I mounted the front panel to a grey card base.


I hope you can see the sparkly snow on the background panel. It's so twinkly in real life.

Below are the products that I used in my card today, some of which can be found over on the Sparkle N Sprinkle website:


Penny Black Snowy Grove
Hybrid Metro Grey
Memory Box Curved Merry Christmas Die
Sizzix Winter Deer
Foam Pads
Foam Strips
Grey bakers twine

I'd like to join in the following challenges with my card today:

Classic Design Team Challenge #3 - March: Anything Goes
Craft Stamper: Take It Make It March Challenge: Anything Goes
Scrapy Land Challenge - March: Use a Die that Scrapy Land Carries
The Holly and the Ivy Christmas Challenge #45: Anything Christmas

Thanks for stopping by today,

Shona

Wednesday, March 22, 2017

Sending You a Smile!

Hi there, today I'd like to share with you a card I made using the new Flowers Silhouettes Set 824.
Such a fun and versatile little stamp set. I decided to go monochromatic with my card this time round, incorporating some of the awesome Nuvo products that Sparkle N Sprinkle now carries. To begin with I made some plaid background paper by daubing Nuvo Embellishment Mousse Peony Pink in stripes on white glossy cardstock and then turning it a quarter turn and sponging lines over the top with Lilac Lavender. I then ran the plaid cardstock through the embossing machine with Spellbinders Floral Doily Motives. 
A circle was then cut (using Lifestyles Nesting Circles) from the middle of the plaid background. The image was stamped on glossy white cardstock and then heat embossed with Concord (one of the fine detailed embossing powders that work so well on detailed images). A portion of the image was cut and embossed with the same circle used to cut the plaid layer. 
After turning the "doily", to break up the plaid a piece of Super Adhesive Sheet was put behind the entire piece. Purple Rain Microfine Glitter was added to the sticky surfaces around the doily.
The flowers were then colored with Copics. Next a piece of pink cardstock was dry embossed with the Die’sire Ornate Butterflies Embossing Folder. Nuvo Embellishment Mousse Lilac Lavender was sponged over the raised butterfly pattern.
This was then cut into a circle using Lifestyles Nesting Circles, and three butterflies were fussy cut from the middle of the piece to be used as embellishments.
 
A real doily was then sponged with Nuvo Embellishment Mousse Peony Pink, as the last layer to the card base. 
The sentiment was stamped in Versamark and heat embossed with the same Concord EP and was die cut with the little doily from the Floral Doily Motifs set. 
The card was put together with Tear-ific Tape and Mounting Tape on top of a textured pink base. Pale Periwinkle Nuvo Jewel Drops were added around the card for some extra dimension.
That finishes my card for today. Hope you've enjoyed my share today?
I'd like to enter my card in the following challenges:
Double D Challenges: Things that Fly
Shona

Thursday, October 27, 2016

OH CHRISTMAS TREE!

Hi there, 

Today I'd like to share my last SNS October Reveal card.  I used the Christmas Tree Tag from the Christmas Tags #1: Set 805.

Oh Christmas Tree

I started with cutting out the Spellbinders Holiday Dies set, from different scrap pieces of green cardstocks and before removing the dies I sponged Memento Bamboo Leaves ink over the pieces, which gave each of the pieces a different two-toned look.

Oh Christmas Tree

I stamped the Christmas Tree tag onto white cardstock in Versamark and heat embossed with Pear and cut out with the a Spellbinders Standard Circles die. I was aiming to give this card a monochromatic look, so each of the pieces were then daubed with Indian Gold Embellishment Mousse. I burnished extra onto the edges of the trees with my finger tool.

Oh Christmas Tree

I made my background by using the big daubers to apply a piece of white cardstock with Lemon Sorbet and Spring Green Embellishment Mousses.

Oh Christmas Tree

The background was layered to dark green before the white card base. The trees were then added overlapping one another using Tear-ific Tape and Foam Squares. The little orange star was punched from a scrap of orange cardstock which had been applied with some Moonstone Glimmer Paste.

Oh Christmas Tree

The Nuvo Crystal Drops Bottle Green were applied to the top right corner as shown.

Oh Christmas Tree

I hope you've enjoyed my monochromatic card today?

I'd like to join in the following challenges:
Shopping Our Stash #275: Three Trees
613 Avenue Create: #190: Use Green and Gold

Be back soon,

Shona