Showing posts with label Concord EP. Show all posts

Wednesday, March 22, 2017

Sending You a Smile!

Hi there, today I'd like to share with you a card I made using the new Flowers Silhouettes Set 824.
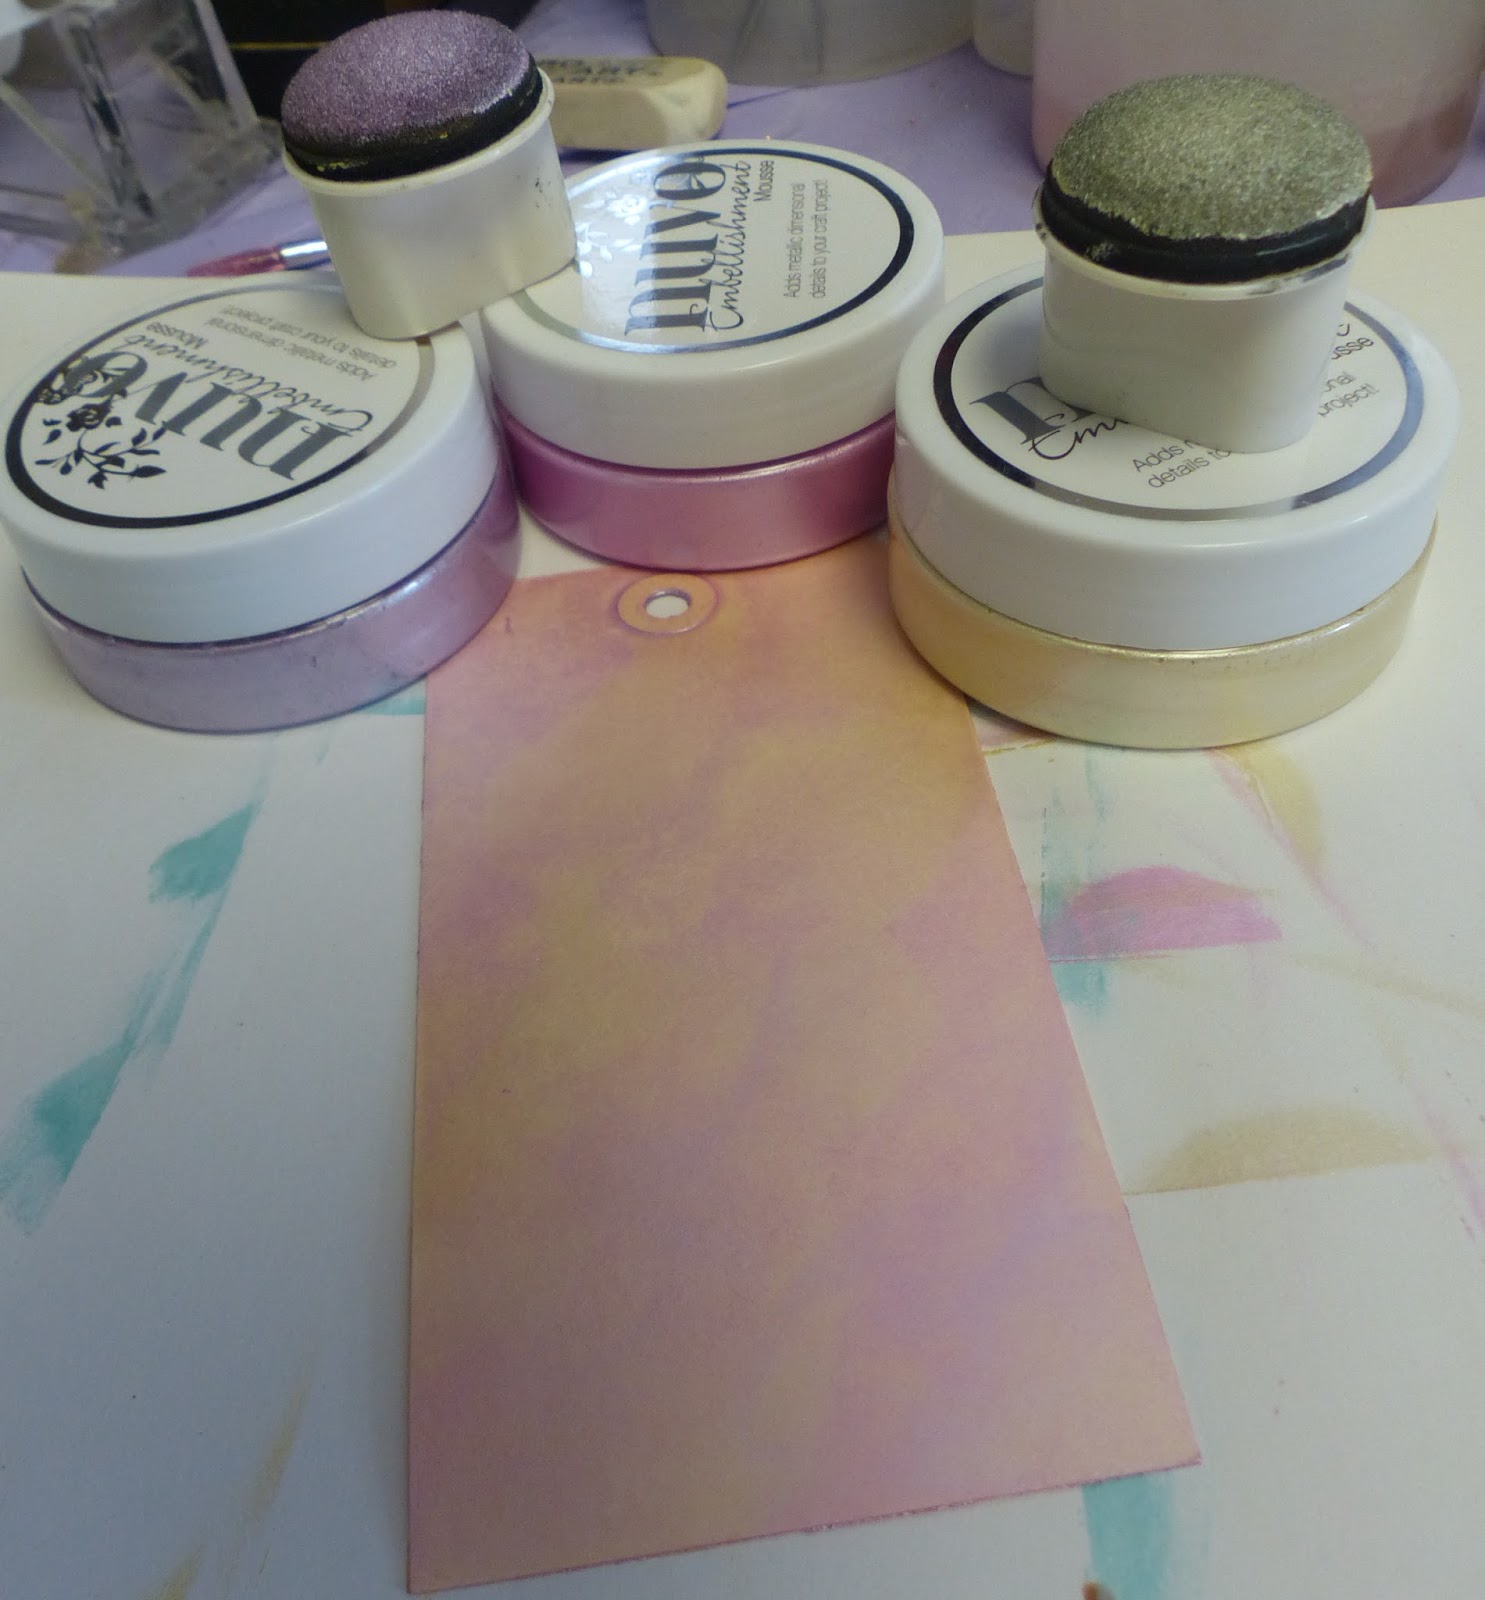
Such a fun and versatile little stamp set. I decided to go monochromatic with my card this time round, incorporating some of the awesome Nuvo products that Sparkle N Sprinkle now carries. To begin with I made some plaid background paper by daubing Nuvo Embellishment Mousse Peony Pink in stripes on white glossy cardstock and then turning it a quarter turn and sponging lines over the top with Lilac Lavender. I then ran the plaid cardstock through the embossing machine with Spellbinders Floral Doily Motives. 
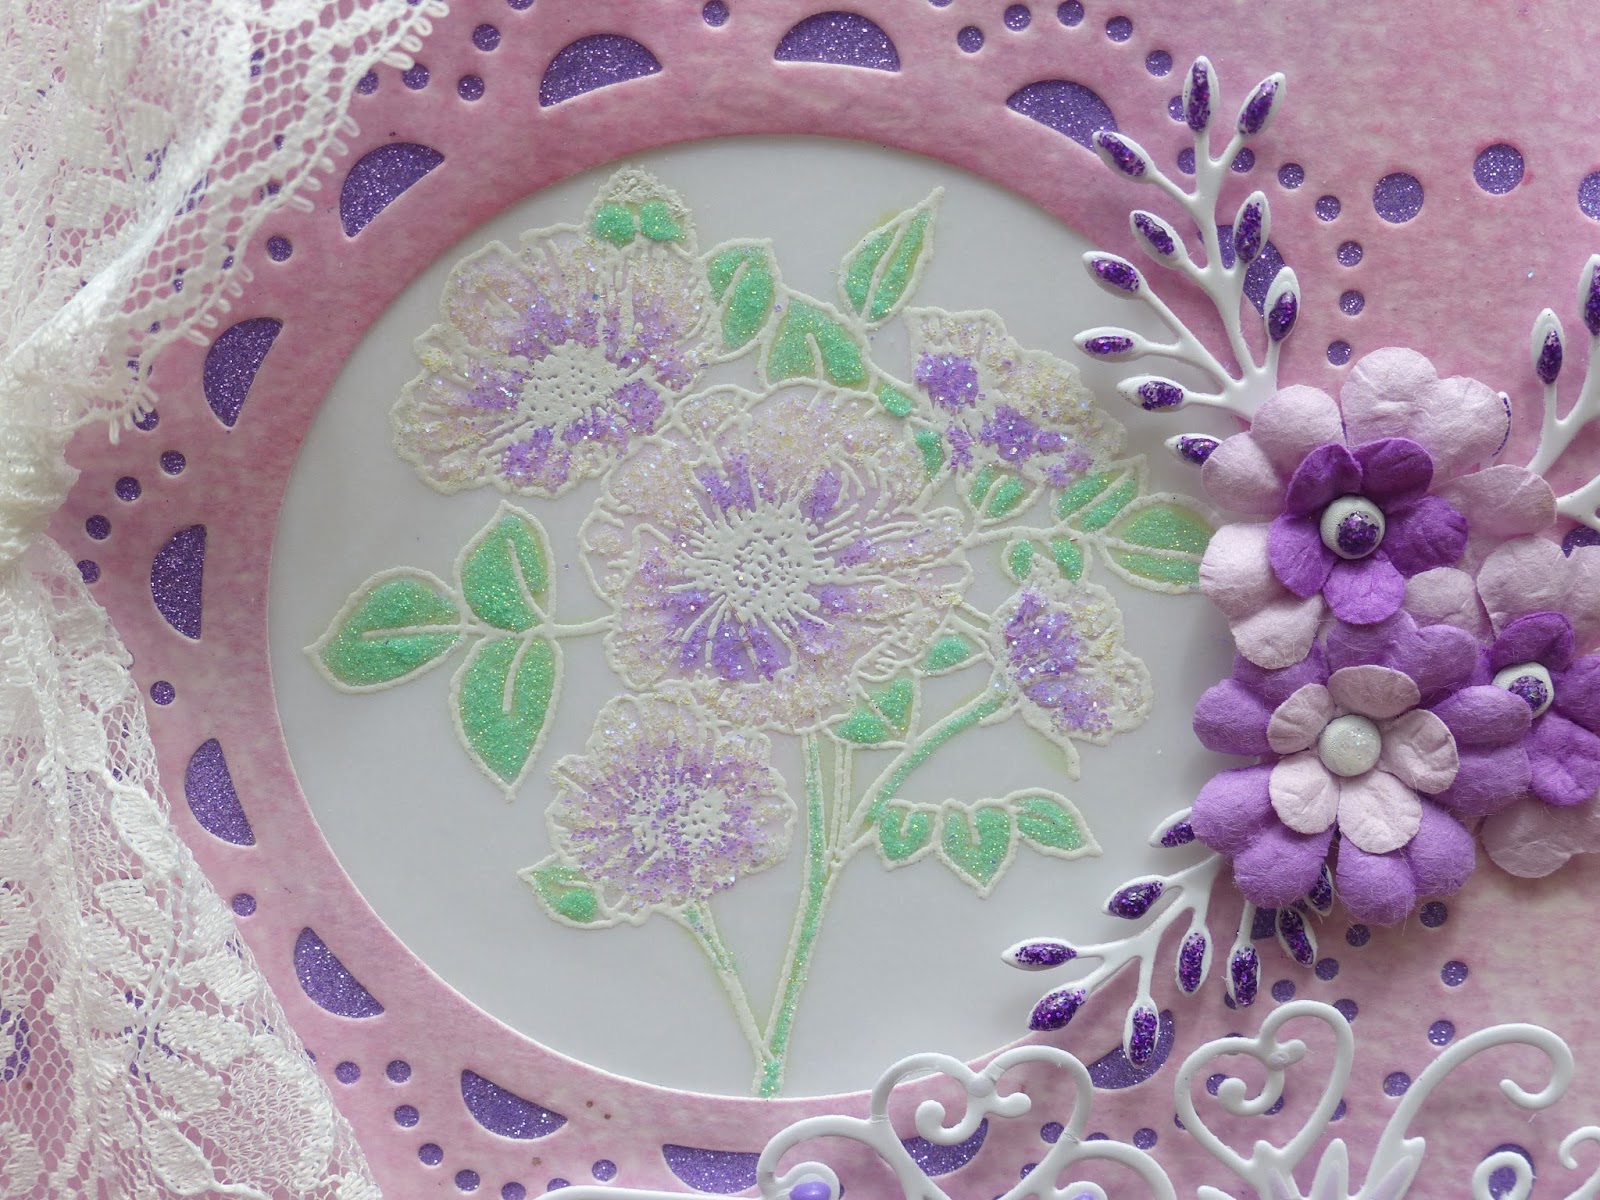
A circle was then cut (using Lifestyles Nesting Circles) from the middle of the plaid background. The image was stamped on glossy white cardstock and then heat embossed with Concord (one of the fine detailed embossing powders that work so well on detailed images). A portion of the image was cut and embossed with the same circle used to cut the plaid layer. 
After turning the "doily", to break up the plaid a piece of Super Adhesive Sheet was put behind the entire piece. Purple Rain Microfine Glitter was added to the sticky surfaces around the doily.
The flowers were then colored with Copics. Next a piece of pink cardstock was dry embossed with the Die’sire Ornate Butterflies Embossing Folder. Nuvo Embellishment Mousse Lilac Lavender was sponged over the raised butterfly pattern.
This was then cut into a circle using Lifestyles Nesting Circles, and three butterflies were fussy cut from the middle of the piece to be used as embellishments.
 
A real doily was then sponged with Nuvo Embellishment Mousse Peony Pink, as the last layer to the card base. 
The sentiment was stamped in Versamark and heat embossed with the same Concord EP and was die cut with the little doily from the Floral Doily Motifs set. 
The card was put together with Tear-ific Tape and Mounting Tape on top of a textured pink base. Pale Periwinkle Nuvo Jewel Drops were added around the card for some extra dimension.
That finishes my card for today. Hope you've enjoyed my share today?
I'd like to enter my card in the following challenges:
Double D Challenges: Things that Fly
Shona

Tuesday, January 31, 2017

SPARKLE N SPRINKLE'S FEBRUARY 1ST REVEAL

Welcome to Sparkle N Sprinkle's
 February 2017 New Reveal Blog Hop!

We have another HUGE reveal for you this month, plus something new!


 There are SEVEN new rubber stamp sets being released this month, plus a new Digi Papers set (with 12 amazing papers), and a Digi Only Bundle set full of lots of extras. 

Also, when you purchase the digi versions of any of the SNS rubber sets, you are getting lots of extras that aren't available otherwise.  These extras include additional images not available with the rubber version, digi papers (in some cases), and now a cut file to use with your electronic cutting machines will also be included with all digi images purchased!

You're definitely going to want both the rubber versions as well as the digi versions of all our new releases.


The new sets are:


* 815 Leafy Flower Spring Wreath
Leafy Flower Spring Wreath digi version DIGI815B

* 826 Pansies (set one)
Pansies mini digi set DIGI826833FS

* Pansies fabulous digi bundle, includes papers DIGI826-833FS

* 832 Girlfriend Support Set 1
Girlfriend Support Set 1 digi version DIGI832

* 833 Pansies in Teacup (set two)
Pansies mini digi set DIGI826833FS

* 835 Sitting Pretty Kitty
Sitting Pretty Kitty digi version DIGI835LS

* 836 Luck of the Irish Enchantress - St. Patrick's Day
Luck of the Irish Enchantress - St. Patrick's Day  digi version DIGI836LS

* 837 Rory's Lucky Clover - St. Patrick's Day
Rory's Lucky Clover - St. Patrick's Day digi version DIGI837LS

* Eleven Watercolor Papers - Purple Pink (to coordinate with the Pansies sets)  DIGI4003FS

This month the digi versions of the Pansies (826FS) and the Teacup Pansies (833FS) have been combined into one HUGE digi bundle set: 
DIGI826-833FS  
There are tons of bonuses in this set, including decoupage sheet sets, a total of 34 images, 11 gorgeous digi papers, and a cut file.

The new sets are 20% off until February 3, 2017.  So once you finish the blog hop, head on over to the New Store and start shopping.

On Feb 3rd, ONE GRAND PRIZE WINNER will be selected from the comments left on the Designers' blogs listed below. Please leave a comment with each Designer in order to be eligible for the Grand Prize.  You never know who the Mystery Designer will be that has the winning comment.

The Grand Prize Winner, which will be announced on the SNS Facebook page and on the SNS Blog, will receive ALL of the new rubber stamp sets released this month.


The Blog Hop order this month is:

(*Tip: if you have difficulty with a particular link, try clicking on the Designer's blog title to send you to their Home page.)

We hope you enjoy the New Reveal Blog Hop as much as we do.  Thanks for joining us and remember to comment on each of the Designers' blogs to be eligible for the Grand Prize.  
 Wonder who the Mystery Host will be this month????


Have you checked out the SNS YouTube Channel featuring Demo Donna?  If not, then you are in for a real treat.  Subscribe today to get all the latest Demo Donna tips and techniques!


Today I chose to work with the pretty Pansies Set 826. The sentiments in this set are so pretty - I decided to make my project for a bride to be. I was cleaning up my stamping room after the holidays and I found a few things that I forgotten I had, including this Clearly for Art Modeling Film. I played around with it. It is like Shrinky Dinks, but it doesn't shrink, and it is more pliable, can be reshaped over and over again, as long as you heat it. You can use it clear, as is, or color it with alcohol inks - as in this sneak peak of a project to come:


So for my project today I stamped with Archival Jet Black ink, and turned it over and colored it with Copics. The colors were muted, so I decided to add a strip of 2 1/2" Tear-ific Tape to the colored side and then I fussy cut around them.


I took off the protective backing and added Sparkling Snow: I liked that effect.


The flowers were then individually cut out and then given some heat and I played with the leaves to make them look more life-like.


They were set aside, while I worked on my card. I stamped the row of pansies in Memento Tuxedo Black on either side of a square piece of  watercolor paper and colored in using the same Copics that I had for the flowers.


Once the coloring was complete, I die cut an oval out of the middle with the Spellbinders Die D-Lites Frill Oval. I elongated the oval by running it through again (about half an inch higher).


The pansies were applied with glue with the Nuvo Fine Tip Glue Pen and sprinkled with Sparkling Snow and each flower center was given a drop of Pale Periwinkle (Nuvo Jewel Drops).


The first cut out oval was stamped in Versamark and the sentiment from the same set was heat set in Concord (EP419). This is a very nice detailed font and the detailed Tuscan embossing Powders are perfect for these fine sentiments. I then threaded a piece of white ribbon around the oval, leaving the ends to trail down. I thought it looked like a veil. One of the prepared flowers was attached to the base of the "veil" using a rhinestone brad. 


The card front was then layered to a black card base and the veiled oval was attached to the center of the opening with mounting tape to finish off my project for today.

I'd like to enter my card in the following challenges:
Classic Design Team Open Challenge Blog: #11
HeARTful Stamping Challenges: Jan 29 - Feb 5: Anything goes with a stamped image
Pile it On Challenge # 125: Quotable


Hope you've enjoyed my share with you today. Next on the hop is our talented Belinda. Remember to comment on each of the designers' blogs to be eligible for the entire set of our new Reveal.

Till next time,

Big hugs,

Shona

Thursday, September 15, 2016

LOVE IS LIKE A BUTTERFLY!

Hi there,

September 15th already? Where did the summer go? I do really enjoy the Fall weather, especially since we had such a hot summer this year, but I really don't enjoy having to get up at 5.45am to get the youngest up for the High School bus which comes at  6.28am!!

Before summer is officially over, I would like to share this butterfly tag that I made, which was inspired by my garden where the Coneflowers and Joe Pye Weed, in particular, have had many visits from the beautiful Swallowtail butterflies. I've taken many photos of them again this year and have often wondered "what happened to that little guy's tail?" .... and it always amazes me how different each one of the markings are, although they are the same species. Another Mother Nature miracle!


I decided to have a little play this time! What fun. I still used many SNS products, but this time the stamps I used were from quite a while back set 437: Fancy Butterflies. I started with a Kraft tag and daubed on Nuvo Embellishment Mousse: Mother of Pearl, Peony Pink and Lilac Lavender.


Then I took the smaller butterflies from the set and stamped them sporadically all over the tag with Memento Lulu Lavender.


I then stamped the bigger butterflies in Versamark and heat embossed them with White Detail.


The "Want to Scrap" Butterfly chipboard piece was daubered with Stampendous embossing ink. This saves marking your Versamark pad with the chipboard.


I heat embossed Dragon Fruit to the bottom and Mulberry to the top half of the butterfly. Then I started to play around!


Magic Speckle was sprinkled around and heated from the bottom (otherwise the powder would have gone everywhere!)  Love the mosaic look that this EP gives. Then a little more Dragon Fruit, then a little more Magic Speckle! You get the idea!


I took Crafter's Workshop: Mini Butterfly Meadow stencil and stenciled a few little insects on the tag. I positioned the stencil at different spots around the tag and put the Nuvo Embellishment Mouse in the little areas. Clean the stencil immediately - this stuff is really quick drying!


After I added the Mousse insects, I quickly gave them a little "bath" with Crystal Ice, which gave them a lovely sparkle.


After the sentiment was stamped in Versamark and heat embossed with Concord, I took some of the Peony Pink Mouse and used my finger to edge the tag. The tag was then layered to a slightly bigger piece of black cardstock.


I did the same method with the Love "Want to Scrap" piece, as I did with the butterfly, except I heat embossed with Concord and then added a  little Magic Speckle again.


The Butterfly was added with Foam Squares and "Love" was attached with Dimensional Glue. Black and Pink Ribbons were threaded through the hole. Then Nuvo Drops Ebony Black, Raspberry Pink and Glitter Drops Purple Rain were then just dotted around the piece as I saw fit, to finish my project for today.


I'd like to enter my tag in the following challenges
Fab 'n' Funky Challenge : Inspired by Nature
Stampotique Designs Challenge no. 257: Put a bug on it
Ike's World Challenge 72: Things that Fly

Here are a couple of photos of the butterflies in my yard. See what I mean about the tail?


Hope you've enjoyed your visit today.

Hope to see you back again soon,

Hugs,

Shona


Thursday, September 8, 2016

GRANNY WITCH

Hi there, 

I'm here today to share another Halloween card with you from the new reveal set 799: Call me Witch.

Granny Witch

Isn't this little Granny a hoot? I began with stamping her on white cardstock with Memento Tuxedo Black and she was colored with Copics.

Granny Witch

After she was colored, I sparkled up her buckles on her shoes and hat with a Sakura Glue pen and Reflection Velvet Glitter. She got Dimensional Glue applied to the her glasses and I used the Nuvo Medium Tip Pen to add Blissfull Blue Sparkle N Soft to her hair. Orange Crush was also applied to her blouse. She was cut out with the Spellbinders Mega Ovals Large, but before I removed the die I sponged some Dandelion Memento ink around her. Then some Indian Gold and Lilac Lavender Embellishment Mousse was rubbed on to the edges of the piece with a dauber. OK, now she needs a background.

Granny Witch

I took a piece of 5 1/4" by 4" piece of Super Adhesive tape and stuck it down to a piece of white cardstock, then removed the protective backing and started to line up various strips of Tear-ific Tape diagonally on top. When the whole piece was covered with the strips, I straightened the edges then lined up the Velvet GlittersPurple RainTiger Orange, Celebration, DaisyHyacinthMargarita and Golden Wheat were burnished in one at a time as each strips' backing was removed.

Granny Witch

This piece was layered on to black cardstock. The sentiment was stamped in Versamark and heat embossed with Concord, one of  my favorite detailed Tuscany colors. It was cut out with a QuickKutz Speech bubble die and was sponged with Cantaloupe ink.

Granny Witch

I made my broom from a skewer and some raffia. Coloring the handle with brown Copic Marker and then taking several pieces of raffia and bending them over to make the head of the broom. Some more raffia was wrapped around the base of the head, attaching it to the skewer. I punched a hole in the witch image and used invisible thread to attach the broom head to the image. I made a "long glue dot" by taking a piece of 1/8" Tear-ific tape and attached it to the bottom of the broom to keep it in place on the card. The witch and the sentiment were attached to the card with Foam Squares and then the Nuvo Crystal DropsCrushed GrapeWisteria Purple and Purple Rain Glitter Drops were randomly applied to spots on the card front to finish it off.

Granny Witch

Hope you liked my project today?

I'd like to play along in the following challenges:
My Time to Craft Challenge 328: Something that flies!

Till next time,

Shona

Tuesday, May 31, 2016

SPARKLE N SPRINKLE'S JUNE 1ST REVEAL

Hi there, and welcome to the Sparkle N Sprinkle June 1st Reveal! Today we have three lovely flower sets to share with you. I chose to work with the Wild Rose Set 785 for my reveal card this month, making things a little more feminine than usual!


These new sets are 20% off until June 3.  So once you finish the blog hop, head on over to the store and start shopping.  All of the new sets are available on cling mounted rubber or as a digital image.  

The sets are:


 Roses 784 (digi version DIGI784)
  Wild Rose 785 (digi version DIGI785)
   Country Flowers 786 (digi version DIGI786)


On June 3rd, ONE GRAND PRIZE WINNER will be selected from the comments left on the Designers' blogs listed below. Please leave a comment with each Designer in order to be eligible for the Grand Prize.  You never know who the Mystery Designer will be that has the winning comment.

The Grand Prize Winner, which will be announced on the SNS Facebook page and on the SNS Blog, will receive ALL of the new stamp sets released this month (or the digi versions, if preferred).

The Blog Hop order this month is:

(*Tip: if you have difficulty with a particular link, try clicking on the Designer's blog title to send you to their Home page.)


We hope you enjoy the New Reveal Blog Hop as much as we do.  Thanks for joining us and remember to comment on each of the Designers' blogs to be eligible for the Grand Prize.  
 Wonder who the Mystery Host will be this month????


The Sparkle N Sprinkle Creative Challenge also begins today.  There are lots of prizes and recognition badges.  Come check out how you can become a SNS Featured Artist as well.  The theme is always Anything Goes using Loose Glitter, Embossing Powder, and/or Flock.


Have you checked out the SNS YouTube Channel featuring Demo Donna?  If not, then you are in for a real treat.  Subscribe today to get all the latest Demo Donna tips and techniques!


For my card today I began with stamping the wild rose image on vellum in Versamark ink and heat embossed with White Detail. I turned over the vellum and used four Copics (V12, YG11, YG03, R21) to color on the back of the embossed image. 


Then I went on to the frame, I took a piece of white cardstock and die cut with the Die'sire: Aurora die. The center circle was a perfect size for the image. Then I took some Memento Angel Pink, and Lulu Lavender inks and rubbed both pads directly on to the cardstock. 


After I thought it had enough color, I decided to apply Versamark to the entire piece and heat emboss with Clear Detail, which resulted in a nice shiny look.


The image was cut with Spellbinders Standard Circle which happened to be just slightly larger than the cut out in the frame. I attached it to the back with a little tear-ific tape to hold it in place, before placing the entire frame down on a piece of 5 3/4" x 5 3/4" Super Adhesive Sheet. The new Hyacinth glitter was then burnished in to the sticky spaces.


The sentiment from the same set was stamped in Versamark on white glossy cardstock and was heat embossed with one of my favorite Tuscany embossing powders, the fine detailed Concord. It was then die cut using the Spellbinders Ornamental Tags One. A little Lulu Lavender ink was daubed over the die before removal, which gave the little tag some purple highlights. 


Some Crushed Grape Nuvo Crystal Drops were added to the tag for extra bling!


Creative Expressions (Sue Wilson) Olive branches were die cut from glossy white cardstock and were decorated with Nuvo Glitter Drops: Purple Rain, for a little more bling!


So then I started the put the card together. I tied a lace ribbon around the left side. I placed the three little flowers by the edge of the frame, using white brads on top of which I added White Blizzard and Purple Rain Nuvo Glitter Drops. The olive branches were tucked in behind the flowers as shown.


The sentiment was added with Foam Squares for dimension. This was all layered to a 6" x 6" piece of glossy white cardstock.


I found the image to be "washed out" with not enough pop for the rest of the card, so decided to add some sparkle to the image. Using Mountain Mint, Lavender Iris and Orchid glitters, which I applied with the Sakura Glue Pen, it turned out like this:

Much better! Don't you agree? So that finishes off my card for the Reveal. 

I'd like to join in the following challenges:
Die Cuttin' Divas Challenge # 268: Anything goes with die-cuts
Simon Says Stamp: Monday Challenge: Monochrome
Scrapy Land Challenge #43: Anything goes using dies that Scrapy Land carries - Die'sire: Aurora, Creative Expressions (Sue Wilson) Olive branches, Spellbinders Ornamental Tags One, Spellbinders Standard Circle


Your next stop will be Marie. She has a beautiful creation using the Country Flowers Set 786. Remember to leave a comment on all the blogs to be eligible to win all three of these pretty floral sets! Good luck!

See you soon,

Shona