Showing posts with label Bubblegum Glitter. Show all posts

Thursday, July 23, 2015

THE RIGHT SHOES!

Hi there,

Today I'd like to share with you another card using the Birds of a Feather Set 726. I loved this cool little lady with the high heels and decided to combine the set with the Cinderella Slipper Set 528 for my card today.


I stamped the chick in Versamark and heat embossed with Dragon Fruit. I used the Spellbinders Eyelet Circles die to cut and emboss and daubered a little Memento Lulu Lavender around the image before I removed the die. She was then colored with Copics: V01, RV02, RV04 and V04. A Sakura glue pen was used to apply Lavender Iris Glitter to her wing, tail and tufts. Dimensional Glue was added to her eye and to the heels. A little thread of Diamond Mesh from Mon Ami Gabby was attached for her necklace. She was set aside at this point for the glue to dry.


To make my background I spritzed white cardstock with water and then applied some Violet Color Burst on top of the spritzed cardstock. I dried the cardstock with my heat tool. The Cinderella Slipper was stamped randomly in Versamark and heat embossed with Belgian Cream. I then decided to go over the entire background with Memento Lilac Posies, I rubbed a tissue gently over the entire piece to take any ink off the embossing powder, this really made the shoes pop!


The sentiment from the Cinderella Slipper Set was stamped in Versamark and then heat embossed with Mulberry (one of my favorite detailed Tuscany EPs that I like to use for sentiments!). It was die cut with Lifestyle Crafts Nesting Rectangles, daubered with some more Lulu Lavender.


Three brads were "blinged" with Mulberry and attached to the circle along with some pink adhesive pearls and rhinestones (Want to Scrap Bling). Three white feathers were threaded through holes and attached to the back with tape. The card was finished by layering the background piece to the card based, which had been edged with 1/2" Tear-ific Tape, then some Diamond Mesh from Mon Ami Gabby was added around the sticky edges. There was still some stickiness around the mesh and so I applied Bubble Gum glitter to take care of that! The sentiment and the image were then added with Dimensional Foam to finish up the card.


I hope I have given you some inspiration today to maybe pick up this sweet little chick set. Both of these new sets are such fun and are so versatile, they can be used for many different occasions.

Hope to see you this weekend for our Joint Blog Hop with Die-Versions where we will be featuring Cancer Awareness. 

Thanks for stopping by today,

Shona

Wednesday, December 4, 2013

SPARKLE N SPRINKLE DECEMBER MYSTERY PARTY WINNERS

Hi!  Thanks to everyone who played in Sparkle N Sprinkle's recent "Beautiful Geraniums" Mystery Party. We enjoyed making the new projects, and hope you enjoyed browsing. 

April Williams was our Mystery Designer for the contest. With 22 comments left on April's blog, Mr. Random.org was used to generate our Commenting Winner - . Jean Bullock!


Here is another card that I made, while playing with this beautiful new set 519: Geraniums:


I used the same floral frame that I had used in my first card (scroll down to last post to see). I used the two-step stamping technique, stamping the silhouette geranium on watercolor paper with the stamp colored with crayon and misted with water. Then went over the top of the image with the detail stamp. I love the soft look it gives.

I took some of the 2 1/2" Tear-ific Tape and stuck it down to white cardstock. I then cut out some little flowers  and a base for my sentiment and after removing the protective backing, covered them with Bubblegum Glitter.  I fussy cut one of the flowers from the stamped image to go along with my other two little flowers.

The background is the silhouette geranium stamped randomly over white cardstock and then heat embossed with Clear Detail Powder. I ran Memento Angel Pink ink over the top to achieve the resist technique.  

Full instructions for making this card can by found here:


Hope you've enjoyed your little visit with me today!

See you again soon, off to continue with some Christmas cards now!

Hugs,

Shona

Friday, June 24, 2011

Two Passions in One

Well I came down and looked out the kitchen window this morning.  The deer have been in last night and had themselves quite the gourmet meal!  I now have a sinking feeling in my tummy!  Well, I'll just have to get out the nasty smelling spray, it's raining, so we won't be eating out on the porch today anyway.  As you know, if you've already read my profile, gardening and stamping are two of my favorite passions.  That's why I was furious this morning!  I love taking pictures of my yard, as each new plant comes into bloom (of course, I'll have to wait a couple of weeks now, 'till they come back), but there is usually something new every week.  Today, I want to show how I put the two passions together in my latest card.

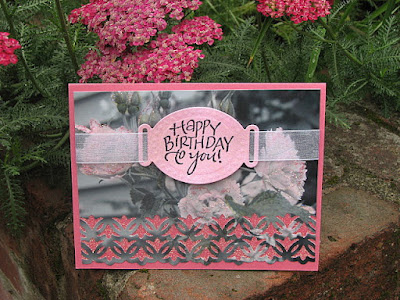
Our challenge for this month with Sparkle N Sprinkle, was to create a card using at least one glittery product and a greeting.  I had done a Scrapbooking Convention with Margaret, about a month ago, and we demonstrated on how to add "bling" to photos.  So I decided to go that route for my glittery card.

I took a photo out in my yard and sent it down to Costco, but had it developed in black and white, instead of color.  I took four Copic markers: two pink, RV02 Sugar Almond Pink and RV42 Salmon Pink, 0 the Colorless Blender and G99 Olive and put color back into the photo.


Next I punched the bottom of the photo with the Tulip punch from EK Success.                           


Sparkle N Sprinkle has started to carry this great 2 1/2" tear-ific tape (SAT11).  It is wonderful for making all kinds of backgrounds - just apply it to card stock and remove the protective backing and apply glitter, flocking, tinsel, even beads - it is very sticky and everything sticks to it!  I took this tape and stuck it behind the punched area of the  photo.  I then applied Cyclamen Glitter (G1090) which stuck to the open areas of the punch.


Cut the photo down to 4" x 5 1/4" at this point, so it will fit nicely on to your finished card.  Then using the Quickie Glue Pen draw around the petals and leaves of the roses and add different glitters (one at a time).  For my card, I used Cyclamen (G1090), Bubblegum (G1088) and my all-time favorite SNS Glitter Sparkling Snow (G1003).  When you want some bling, but don't need color - then he's your man!  Put the photo aside at this point to dry (although it only takes five minutes).  Meanwhile make the label for the card.

Take a piece of pink card and stamp your sentiment in Staz-On ink.  I used the saying Happy Birthday to You from the new  Happy Birthday Set 416  from Sparkle N Sprinkle.  A very versatile set, full of great sayings for every birthday occasion!            

Cut and emboss the saying with Spellbinder's Ribbon Tag Trio Two.  Then take a Versamark pad and cover the entire label with the ink.  Heat emboss with the "one and only" Sparkle Embossing Powder.  It gives a lovely sparkly, intensified color to the label.


Thread a piece of white organdy ribbon through the label as shown and using dimensionals attach it to the front of the card.

Tape the ribbon down on the back of the photo with Tear-ific tape and then remove the protective backing of the 2 1/2" tape then you can go ahead and stick it down to your card front.

Here is the finished card:

I hope you have enjoyed making this card with me.  I also hope that you will see the endless possibilities you have with your very own black and white photos.   Have fun!