Showing posts with label Stamp Platform. Show all posts

Thursday, August 30, 2018

Birds of a Feather

Hi there,

Thanks for stopping by today. I'd like to share with you my last August Reveal card, using the adorable little Feathered Friends Stamp Set 909.


Going along with the wreath image from the stamp set, I decided to make a telescopic card, combining the Spellbinders Wreath die set. First, I backed some designer paper with Super Adhesive Sheet. I then ran the two wreath dies through the Tangerine.


The wreaths were each centered on to black cardstock circles, cut from the Spellbinders Grand Circles die set, using the Tangerine. The wreath image was stamped on white cardstock in Nuvo Clear Mark Ink, using the Stamp Platform and then being heat embossed with Black Detail.


Using the Stamp Platform I positioned the sentiment in the middle of the stamped wreath again in Black Detail. The wreath was then colored with Nuvo Aquaflow pens. I made a little palette using an acrylic block and applied the color with a Nuvo Water Brush.


This front panel was then die cut with one of the smaller circle dies with the Tangerine and layered on to the smallest of the black circles (attached with a black brad) with a little piece of white ribbon as a pull at the top. Nuvo Crystal drops Morning Dew were applied to the flowers for dimension.


The middle panel was created by stamping the three birds in Hybrid Black Shadow on top of the scrap piece of the designer paper from one of the wreath cuts and then die cutting the one bird with the circle die.


This was then covered with Nuvo Clear Mark ink and then heat embossed with Clear Detail. This was then layered on to the middle-sized circle.


For the base panel, white cardstock was cut using the inside of the larger wreath die. The birds and the second sentiment were then positioned on the area using the Stamp Platform.


The birds were watercolored using the same palette as before and inserted inside the wreath on the base circle. Nuvo Glitter Drops Sherbert Shimmer were added to the bottom.


The card was assembled bottom to top. Here is the base:


The three panels were then attached with black brads, so that they turn round to close over each other. Here is the entire project closed:


I hope you have enjoyed my share today. Below are the products used in my project and you will receive an extra 10% of your SNS order if you enter the code ShonaDT10 at checkout!

Feathered Friends Stamp Set 909
Spellbinders Wreath Die Set
Spellbinders Grand Circles Die Set
Two Black Brads
White Ribbon
Freebie Designer Paper from Magazine

I'd like to join in the following challenges with my card today:

World Wide Open Design Team Challenge #8: Anything Goes
Scrapy Land Challenge #96: Anything Goes - Use dies
Crafty Creations Challenge #373: Anything Goes
Crafty Gals Corner Challenge #173: Anything Goes

Thanks again for stopping by. Have a great day!

Shona

Thursday, August 16, 2018

Pear-fect Pair!

Hi there,

Thanks for stopping by! Today I'd like to share my first Sparkle N Sprinkle August Reveal card, using the gorgeous Sketched Pear Set 905 and featuring the Nuvo Shimmer Powders.


I began by stamping the image using the stamp platform on watercolor paper with Clear Mark ink and then heat embossing with White Detail. This was then placed on my Tonic Easy Clean Mat and misted with water using the Nuvo Light Mist Sprayer.


The shimmer powders were applied sparingly and moved around with a little paint brush (I could have also used a water brush).


Solar Flare, Cherry Bomb, Catherine Wheel, Storm Cloud, Blue Blitz and Green Parade were used to color in the image.


After dusting the piece with the anti-static bag, I stamped "bartlett pear" sporadically around the image in Clear Mark ink and again heat embossed with White Detail.


I stamped the same image again on watercolor paper in Black Shadow Hybrid ink. This was fussy cut with the 5" mini scissors to be used as a mask.


Next I applied Custard Cream embellishment mousse through the Tim Holtz Speckles stencil.


When it was dry, it was framed with black cardstock and placed back in the stamp platform so that I could correctly position the sentiment at the bottom left corner.


I then took my "splattered" mask and colored it with the shimmer powders and a water brush.


The frame was edged with the same Custard Cream embellishment mouse, giving the frame a chalky look. This was then layered to a white card base.


The colored "mask" was then mounted to the bottom right to finish off my card.


Below is a list of the products that I used on my project. Also if you are going to purchase anything at the Sparkle N Sprinkle store you can get an extra 10% off your order by using this code at the check out: ShonaDT10.

Sketched Pear 905
Tim Holtz Speckles Stencil
Mounting Tape

I do hope you have enjoyed my share today.

I'd like to join in the following challenges:
Classic Design Team Open Challenge #8: Anything Goes
World Wide Open Design Team Challenge # 08: Anything Goes
Craft Stamper Take It Make it Challenge August: Anything Goes
Happy Little Stampers August Challenge: Watercolours

Thanks again for stopping by,

Shona

Thursday, July 26, 2018

Lovely Thoughts of You

Hi there,

Today I'd like to share my last July Reveal card. This time I am using the lovely Sketched Pear Blossom Set 904.


I began, using the Stamp Platform, stamping the image on white cardstock in Clear Mark and heat embossing with White Detail. Then I made a paint palette with an acrylic block and dropped a few Aquaflow marker colors on the block. The image was colored in with a water brush, picking up the colors from the block.


I stamped the image again with Clear Mark and heat embossed with White Detail,
this time on Kraft cardstock.


The color was bleached out of the image, using an aqua brush that was filled
with bleach.


The colored version was fussy cut, using the mini 5" scissors, into little half inch
squares. They were then popped up, with foam pads to their matching places
on top of the bleached version.


I made a frame from the Kraft cardstock with the Sizzix Dotted Oval die and cut
out the same frame from a piece of foam, using the Tangerine machine. These
were adhered together. Then I ran the Copic marker around the edges.


The frame was then sprayed with Antique Gold Mica Mist.


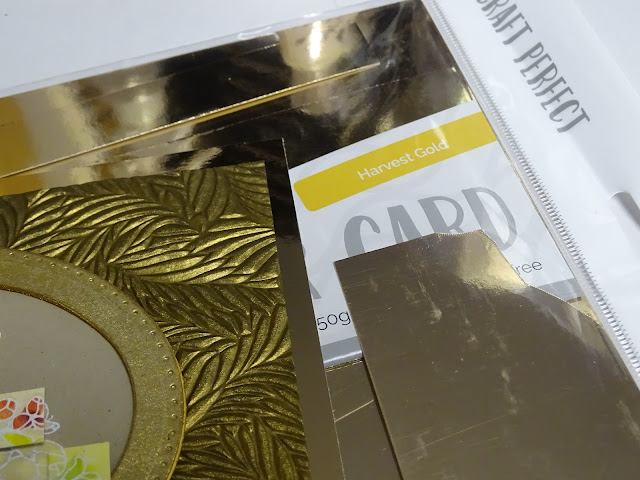
A piece of Copper Feathers Specialty Cardstock was cut in the Tonic Guillotine. The guillotine cuts through the fabric papers beautifully.


A few flowers were then sprayed with the same Antique Gold Mica Mist.


The sentiment from the set was stamped in the Stamp Platform on Kraft cardstock with Clear Mark and heat set with Gold Detail.

This was then die cut with a smaller oval from the Sizzix set and some Indian Gold Embellishment Mousse was sponged around the edges.


I dipped 4 large brads into my Versamark pad and dipped them in Halo embossing powder. Holding the brads with tweezers, I heat embossed them to give them some gold sparkle. A hole was punched in the tag and one of the brads was put through the sentiment and one of the flowers. The other three were for the three flowers.


The card was assembled at this point with the frame being attached to the specialty paper square. The flowers were attached with tape and foam pads around the frame and the brad for the sentiment was put through to the back of the specialty paper. The specialty paper was then attached to Harvest Gold Mirror Cardstock.


A few drops of Honey Gold Glitter drops were added around the card and on top of the flowers to simulate dew drops.


That finished off my card for today. Hope you've enjoyed my share? Below is a list of the products that I used:

Sketched  Pear Blossoms 904
White Detail (EP298), Halo (EP253), Gold Detail (EP168)
Sizzix Dotted Ovals Die
Craft Foam
4 Large brads
Copic E35

I'd like to enter in the following challenges:
Scrapy Land Challenge #94: Anything Goes
World Wide Open Design Team Challenge #7: Anything Goes
Classic Design Team Challenge #27: Anything Goes
Morgan's Artworld Open Challenge #7: Anything Goes

Till next time,

Shona
Wednesday, June 27, 2018

Discover Beauty Everyday!

Hello there,

Today, I'd like to share with you my last June Reveal card, showcasing the lovely Colorful Cosmos Set 899.


I started by stamping the image, using the Stamp Platform, with Hybrid Black Shadow ink.


I then made a little palette, with an acrylic block, for the Nuvo Aquaflow markers, and applied them to the image using a waterbrush.


Once this was colored, the self adhesive Tonic balloon shaker die case was placed over the top of the image, with some "relic" Suzie Weinberger's Mini Mosaics placed inside.


I made the frame by die cutting on the Tangerine a piece of self-adhesive craft foam and a piece of the Ivory Bouquet Craft Perfect Specialty paper, using the Sizzix Dotted Ovals dies. I then sponged on a little Custard Cream embellishment mousse.


The sentiment was stamped in Black Shadow ink and was die cut with the same dotted ovals die along with another piece of the craft foam, which cut beautifully with the Tangerine.


I stamped three single flowers directly on to the foam sheet using the Hybrid Diamond ink Rubber Duck from the Tropical Fruit set. These were then fussy cut using the 5" mini scissors and were then sponged with the Custard Cream embellishment mousse.


Nuvo deluxe adhesive was applied to the flower centers and Butterscotch glitter was added.


I stamped some stems at the bottom of the easel card base with Lime Burst from the same Hybrid ink set.


The card was then assembled using Craft Perfect foam pads. Some Key Lime Jewel drops and Yellow bird Glitter drops were then added.


Here is my finished easel card.


Below is a list of products that I used in my card.

Nuvo Hybrid Black Shadow Ink
Stamp Platform
Tangerine
Nuvo Aquaflow Pens Lemon Zest, Spiced Ginger,
Fresh Green
White Foam Sheets
Sizzix Dotted Ovals Die
Suzie Weinberg’s Mini Mosaics - Cracked Corn

I hope I've inspired you to pick up some of these fun products. If I have then please stop over at the SNS Creative Challenge. All you need to do is use a Sparkle N Sprinkle stamp in your creation (don't have any stamps? No problem - you can pick up one of the free digis to use!) The challenge is open until July 25th and the winners will be announced at the beginning of August. Can't wait to see your creations!

Thanks for stopping by,
Shona