Showing posts with label Stamping Platform. Show all posts

Thursday, March 1, 2018

Balloon Birthday Wishes

Hi there,

Thanks for stopping by today. I'd like to share another February Reveal card using the fun Balloon Bunch Stamp Set 887.


When I saw this set I knew that I was going to use it along with the Sizzix Balloon Step Up die. Sparkle N Sprinkle recently brought out some fabulous new colors in microfine glitters, a few of them were purplish hues, Hyacinth, Caspia Sea, and Purple Fig, so I decided to go with a pink and purple theme. I began by cutting out the card base with my Tangerine and stamping the balloon image twice with StazOn Black, using the Tonic Stamp Platform, so that I could overstamp to ensure a crisp image.


I made a little paint palette with an acrylic block and a couple of Aqua Flow Pens and used a Water Brush to color in my balloons. I fussy cut the balloons using my Tonic 5" mini scissors.


Using the Versamarker Pen I "colored" the background balloons and then covered them with Clear Detail embossing powder. This was then heat embossed. I then applied the Versamark ink again to a couple of the balloons and this time heat embossed with Super Thick Clear, from the bottom. This gave the balloons all different looks.


A scrap of Super Adhesive Sheet was layered to a scrap of white cardstock and then I applied Cloud Nine to the sticky surface after removing the protective backing. The balloon image was stamped directly on top of the glittered surface with StazOn Black and the front balloon was fussy cut and popped up on top of the other balloons.


Some purple and white bakers twine was attached to the back of the balloons with 1/4" Tear-ific Tape. Scraps of Super Adhesive Sheets were stuck down to scraps of purple cardstock and then run through the Tangerine with the balloon dies from the die set.


The protective layer was removed and then Hyacinth, Caspia Sea, Purple Fig and Cloud Nine were used to color the balloons and their strings.


The happy birthday (also part of the die set) was die cut on the Tangerine from a piece of pale purple cardstock layered with the Super Adhesive Sheet, to which Hyacinth Glitter was applied.


Then it was time to assemble the card. A piece of Super Adhesive sheet was die cut with the front panel die and then the balloons and the sentiment were attached to the sticky surface and then Cloud Nine was applied to the remaining adhesive. This was then attached to the front of the card base, after which I ran purple STA metallic pen around the outside of the white panel.


The other balloons were attached to the card base with mounting tape and a piece of card with Happy Everything was attached to the inside of the card to finish it off.


This finishes my card for today. Here's a side view:


Hope you've enjoyed my share today. Below are the list of products that I used, most of which can be found over on the SNS website:

Memento Grape Jelly
STA Purple Metallic Pen
Mounting Tape
Sizzix 660024 Balloon Step-Ups
Purple Bakers Twine

I'd like to play along in the following challenges:
Crafting with Dragonflies Challenge Blog #98: Special Folds
Crafty Creations Challenge #361: Anything Goes
Scrapy Land Challenge # 84: Anything Goes
City Crafter Challenge Blog Challenge #401: Die Cuts
Allsorts Challenge Blog Week 456: "B": Birthday Balloons
World Wide Open Design Team Challenge #2: anything Goes
Classic Design Team Challenge #23: Anything Goes

Thanks for stopping by!

Shona

Thursday, February 1, 2018

Foxy and Fabulous!

Hi there,

So glad you stopped by today, where I have another card from the SNS January Reveal Sets, this time using the Hello Foxy Set 882 from the January Reveal. I have also incorporated some images from the three silhouette sets: Wetlands 1 Set 790, Wetlands 2 Set 791 and Right Beside You Set 812.


I made my background by sponging Memento inks Summer Sky, Dandelion and Cantaloupe to glossy white cardstock, using the Jumbo Daubers. Once the ink was dry, I applied the anti-static bag to avoid getting any embossing powder specks where I didn't want them, and the background images were positioned in the Stamping Platform (this way the scene was created and stamped in a oner!). They were inked with Nuvo Clear Mark and were then heat embossed with Black Detail.


I went back and added another of the grasses and then trimmed the panel in the Tonic Guillotine.


Mr. Fox was stamped in Acorn Brown ink on Kraft paper and was colored with the Copics. After he was colored, he was fussy cut using the Tonic 5" Mini Scissors and then Snow White flocking was applied to his tail, ears and chest with Brushable Glue.


Here you can see the fuzziness of the flocking. Nuvo Crystal Drops Morning Dew was also applied to his eyes and nose.


A scrap strip of Super Adhesive Sheet was attached to piece of white cardstock and then run through the Tangerine with a couple of the Tonic Layered Clouds dies. The protective backing was removed and Twinkling Clouds Sparkle N Soft was applied to the exposed adhesive.


The sentiment was stamped in Nuvo Clear Mark and was heat embossed with the detailed embossing powder Sienna. I ran a copic marker around the Spellbinders Framed One Tags. This was attached by a brad over the bird, so that it could move. The panel was layered to glossy white and then to a black card base. The fox and cloud were attached with Wobbles, to finish off my moving parts card today.


Listed below are the products I used to make my card. Click on the product to go directly to the Sparkle N Sprinkle website.

Black Detail EP (EP171)
Wobbles
Jumbo Daubers
Tonic Layered Clouds dies
Copics
Memento Inks
Spellbinders Framed One Tags
Blue Brad

I'd like to play along in the following challenges with my card:
Crafty Gals Corner Challenge #158: Anything Goes
Crafty Creations Challenge #359: Anything Goes
Inspiration Destination Challenge Blog #143: Anything Goes
Crafty Sentiments Design Challenge Blog: Anything Goes
2 Crafty Critter Crazies Challenge #11: Include a critter

Hope you've enjoyed my share today,

Warm hugs,

Shona


Thursday, December 14, 2017

You're the Cat's Meow!

Hi there,

Today I'd like to share a fuzzy, embossed card using one of the Sparkle N Sprinkle November Reveal sets, the Cat's Meow #870 and another of the Craft Perfect Embossed Papers, Blush Heartbeat.


This little cat is just full of himself, and with the heart paper it called out fuzzy warm Valentine wishes! So I layered a piece of Super Adhesive Sheet to white cardstock and cut out the Spellbinders 3 different sized Scalloped Hearts.


The sentiment was stamped on to a little piece of embossable acetate in Nuvo Clear Mark, after swiping the acetate well with the anti-static bag, to keep off stray powder specks. This was then heat embossed with Bronze Rose. I used the Tonic Stamping Platform to do this for even stamping.


After taking off the protective layer of the Super Adhesive sheet, I applied Buff Flocking to the sticky surface. The acetate sentiment and two pieces of the Blush Heartbeat Specialty paper were placed behind the scalloped hearts.


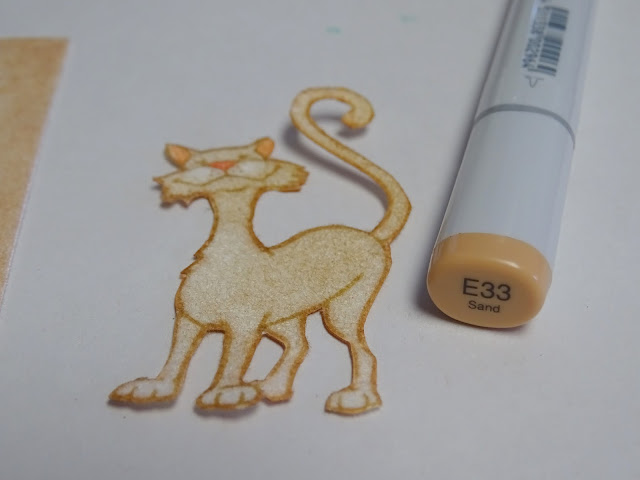
A scrap of Super Adhesive Sheet was layered to white cardstock and then Snow White flocking was burnished onto the exposed sticky surface, after the protective backing was removed. This was then placed in the Tonic Stamping Platform and the cat was stamped in Acorn Brown directly on top of the white flocking. I stamped it twice to give a crisp impression on top of the uneven flocking.


Acorn Brown was then sponged on top of the white flocking and Copic R02 and R22 marker were used to color the ears and nose. Just touch the flocking with the side of the Copic to color. The little cat was then fussy cut with Tonic Mini 5" scissors.


I then went around the outline with Copic E33 to reinstate the outline where it may have been cut into.


The white card base was edged with Nuvo Clear Mark ink and then heat embossed with Bronze Rose. Three heart shaped brads were dipped in Versamark and also heat embossed with the Bronze Rose.


The heart brads were placed on the card front and the panel was layered on to the edged card base. The little cat was popped up on the front with mounting tape and that finished off my project for the day. Here you can see the detail of the Bronze Rose embossing powder and the soft fuzziness of the Buff flocking.


Hope you've enjoyed my share. Below you will find links over at the store for most of the products that I used today:

Spellbinders Classic Scalloped Hearts
Copics

I'd like to join in the following challenges with my card:
2 Crafty Critters Crazies #9: Anything Goes with a Critter

Thanks for stopping by today. Hope you'll come back soon. Till then, warm, fuzzy hugs from a rather chilly New Jersey,

Shona