Showing posts with label Nuvo Glue Pens. Show all posts

Thursday, April 20, 2017

Christmas Holly Blessings

Hi there, 
Today I'd like to share with you a card made using the pretty Christmas Holly Blessings Set 841 from the April Reveal..
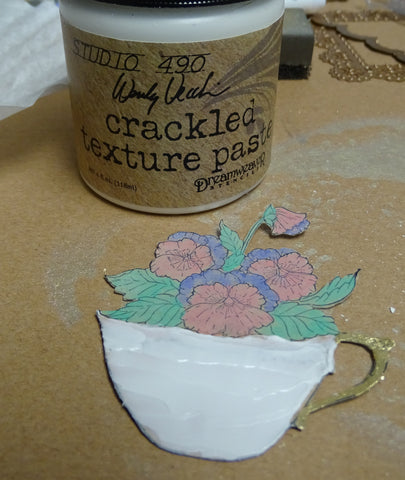
I began by stamping the image on white cardstock with Memento Olive Grove. I fussy cut around the vase and die cut the piece with Memory Box Cross Stitched Frame Borders, using the out of the box technique (placing the edge of the vase over the top of the frame so it doesn't get cut off).
 
Next I colored the vase with the Nuvo Fine and Medium Tip Glue Pens and left it till it got tacky, then I applied Nuvo Gilding FlakesRadiant Gold to the vase for a lovely shiny appearance.
The image was colored with Copics: BG93, YG03, G99, R29 and then I began going over the berries with the Nuvo Red Berry Crystal Drops. It is best to apply the drops a little at a time, leaving space around them and letting them dry before going in and applying more, otherwise they will run in to one another and become one big blob.
At this point I made my background, which was a white piece of cardstock, run through a Cardmaker Magazine Holly Embossing Folder. This was then daubed with Spring Green Nuvo Embellishment Mousse.
The berries were also applied to the border in stages, like the image. Sentiment, from the set was stamped in Versamark and heat embossed with Gold Detail. This was cut out from one of the smaller dies from the MB die set and was sponged with Lady Bug Memento ink before the die was removed. Three little Red Berry drops were added to the sentiment and then both the image and sentiment were popped up with mounting tape onto the background , which had been previously layered to red cardstock with 1/4" Tear-ific Tape.
That finishes off my card for today. Hope you've enjoyed my share? 
I'd like to play in the following challenges with my card:
Christmas at Sweet Stamping: April - Anything Christmas
Holly and the Ivy Challenge: Anything Christmas
Make My Monday: Challenge #44: Embossing Heat or Dry
Here is a list of the products used in my project. Click on the product and it will take you directly to the SNS store, where they can be purchased.
Thanks for stopping by today,
Hugs,
Shona

Thursday, April 6, 2017

Every Flower

Hi there,

Today I'd like to share another card using both the rubber stamp Corner Garden Stamp Set 842, together with the Digi Bundle Corner Garden #842. I'm having so much fun with this digi bundle!
For my card today I ran off the the framed colored version of the image on to white cardstock. The joy of this digi set - there are black and white images to color yourself or you can take the pre-colored digis, where the work is already done for you! That's what I did here. 
I fussy cut the flowers and leaves and then thought to have them trailing over a trellis. I cut out Spellbinders Basic Lattice die from black cardstock and then daubed it with Nuvo Embellishment Mousse Mother of Pearl. This gave the trellis a wrought iron look. The vines were "placed" temporarily, which I decided my next step.
Sentiment was stamped in Versamark and heat embossed with Black Detail. This was then cut out with Spellbinders Standard Circles and some Peony Pink Embellishment Mousse was applied to the edge.
The trellis was backed with a piece of Super Adhesive Sheet, mounted to white cardstock and then pieces of mounting  tape were added to the vines to have them pop up.
Cloud Nine was applied to the sticky areas of the trellis. I edged white cardstock base with Nuvo Embellishment Mousses Lilac Lavender and Peony Pink.
Decided it needed more, so stuck down two doilies to the top left and bottom right corners of the edged card with 3/4" Tear-ific Tape behind them. The over lapping edges were trimmed, then I layered the card front  on top of the  base. The sticky areas of the doilies were also applied with Cloud NineSparkling Snow was applied to the flowers and leaves of the vines using the Nuvo Fine Tipped Glue Pen.
I then stamped the little butterflies and two little additional flowers from the Stamp Set in Memento Tuxedo Black and colored them with Copics. They were then added to the gaps around the trellis with Mounting Tape. I added a little copper wire to the butterflies before sticking them down and that finished my card for today.

I'd like to enter my card in the following challenges:
Crafty Gals Corner Challenge 117: 3 layers or more
Stinkin' Inkers Challenge #1: showers of Flowers
World Wide Open Design Team: March 15th 2017 Challenge: Anything Goes
Scrapy Land Challenge #63: anything Goes
Ike's World Challenges #85: In the Garden
 
Product List:
Spellbinders Standard Circles
Spellbinders Basic Lattice
Copper Wire
2 Doilies
Thanks so much for stopping by today. Hope this has inspired you to try the combination of the digi and rubber stamp sets. I'm really liking the flexibility it offers.
Big hugs,
Shona

Thursday, February 9, 2017

Teacup Pansies

Hi there,

Today, I'd like to share another card with you from the fabulous February Reveal. Today I chose to use the New Pansies in Teacup Set 833.
I decided to take a shot at watercoloring with the Distress Crayons on Kraft cardstock. As I would be working with water with the crayons, I began with stamping the image on the Kraft cardstock with StazOn Jet Black ink.
I used a Waterbrush to "paint" the crayon onto the image.
The handle of the Teacup and the little line was applied with glue, using the Nuvo Fine Tip Pen, this was left to dry till tacky and then I applied Nuvo Radiant Gold Gilding Flakes. OK, now what? Let's antique that teacup, shall we? Using a spatula, I put a nice thick layer of the crackled Texture Paste over the whole cup - yes I even covered up the Gold Flakes! Though I did leave the handle as it was.
Now to bring those dull flowers back to life! I applied Brushable Glue to the leaves, Dimensional Glue to the flowers and Nuvo Sea Breeze Jewel Drops to the darker parts of the petals. Here is everything before it was left to dry overnight! A big messy blob!
Eight hours later: E voila!
Some Memento Desert Sand was sponged over the cracks of the cup before the cup was applied with Versamark, which was then applied with a coating of Clear Detail and heat set. But the magic happens after another application of Versamark and the Thick Clear Enamel! Ta Da!
OK, I think I'm happy with my focal image now! How about a background? In-keeping with the old and crackled look I decided to make a background using the Crackle Background Stamp Set 609, which was stamped onto Kraft cardstock in Versamark and heat embossed with Clear Detail
I then took a piece of black cardstock and die cut the Spellbinders Nestabilities Decorative Curved Square. But it needed some antiquing too! So I daubed on some Nuvo Mother of Pearl Embellishment Mousse - a recipe that you will see being repeated!!!
Loving my home-made wrought iron! Here is a look at what the other Embellishment Mousses do on black cardstock:
I found that dabbing the sponge on rather than rubbing it on, gave a nice mottled appearance which I liked. Now I have a whole new cardstock wardrobe!! A little of the mousse goes a long way too!
OK, so I digressed, but I really wanted to share my little metallic discovery! So let's put this card together, shall we?
So the crackle background was layered to the black card base with the wrought iron square taped down on top of that. A strip of cream pearled lace was placed underneath the wrought iron square, and simply snipped at the edges. The sentiment from the same Teacup Pansies Set was stamped in Versamark and heat embossed with Clear Detail. I just fussy cut that it - wanted the focus to be on the teacup. The sentiment was then popped up with mounting foam. It gave everything a pretty vintage look, I thought.
... and that finishes my card for today!
I'd like to enter this card in the following challenges:
Scrapy Land challenge # 59: Using a die that Scrapy Land carries
HeARTful Stamping: Feb 5th to 12th: For a Special Someone and a stamped image
Hope you've enjoyed my share with you today? Let me know in the comment section down below!
Big Hugs,
Shona