Showing posts with label Clear Detail EP. Show all posts

Thursday, September 21, 2017

Magnolia Birthday

Hi there,

Back today with a quick little card from the latest SNS Reveal, starring the Lovely Magnolia Set #853. This is a very versatile set and as you can see from my card I didn't even use the big flower from the set. I chose to make a little shaker card, so the little magnolias worked better.


I die cut the Tonic Happy Birthday from the middle of the white card front.


I then stamped the little magnolia around the die cut seven times in Black StazOn ink, as I was going to use the Nuvo Aqua Flow markers for the coloring.


I used only two Aqua Flow pens on an acrylic block and used that as a little paint palette. These markers really blend well and the tips go into the little spaces, so work well for corners and tight spaces.


After coloring, I made the shaker part of my card. I used mounting tape to make the well, using a piece of tulle instead of acetate. Some Shaved Ice was then put into the well before being covered with black cardstock.


So back now to the front! Nuvo Morning Dew Crystal Drops were added to the orange centers of the flowers. Then Dandelion Yellow, Honey Gold, Banana Split and Orange Marmalade were added around the rest of the card front.


The butterfly die, Little B Butterfly, was cut out and colored with the same Spiced Ginger Aqua flow marker.


This was then applied with Versamark and heat embossed with Clear Detail.


It gave the butterfly a lovely shine. The card front was attached to a black layer and then to the white card base. The little butterfly was attached with a couple of cut up pop dots.


Hope you've enjoyed my share today?

Here are the products that were used in making this card, that can be found on the SNS website:

Versamark, StazOn
Nuvo Jewel Drops Orange Marmalade

I'd like to enter my card in the following challenges:
Cards und More Challenge #193: Flower Power
2 Crafty Critter Crazies Challenge #6: Use a critter
World Wide Open Design Team Challenge #26: anything Goes
Classic Design Team Challenge #17: Anything Goes

Thanks for stopping by! Hope you'll stop back soon,

Shona

Thursday, August 24, 2017

Grateful to have a Friend Like You!

Hi there,
Back today to share a card using the lovely Basket of Hope Set 866 from the August Reveal.
I started by placing the image on my new stamp platform and inking it up with Memento Potters Clay. This was stamped onto a piece of cream cardstock.
I then took the lid (with my stamp) off the platform and colored the image with colored pencils. 
I reattached the lid and stamped it. I removed the lid again and colored in the image with pencils. Not having the lid in the way means you can move the base around as needed to get to different areas of the image.
The stamp was cleaned with a cloth and then reinked with Versamark. The lid was put back on the base and then closed to put a film of Versamark over the Potters Clay outline.
The image was then covered with Clear Detail embossing powder and heat set. It picks up the Potter's Clay ink and gives a nice raised image.
I went ahead and gave the piece a coat of sealer, so that the colors from the pencils wouldn't smudge.
This was put aside to dry while I die cut and colored the leaves. The leaves are from the Sizzix Fall Foliage die run through my embossing machine from cream colored cardstock. 
 
The sentiment, from the same stamp set  was stamped on cream cardstock in Versamark and heat embossed with Copper. It was cut out using with the Spellbinders Media Mixage dies and was sponged with some of the Coral Calypso Mousse before removing the die.
 
So on to assembling the card. I had some jute backed cardstock from which I made a frame and tied a little red and white gingham ribbon around the base, giving the table cloth addition! The jute frame was attached with Tear-ific Tape to cream and then to the kraft card base. The leaves were then added to the base of the card using the Nuvo Deluxe Adhesive.
The sentiment was added with mounting tape to the opposite corner as the ribbon to finish off the card.
This finished my card for today. Hope you've enjoyed my share. Here are the supplies that I used today and that you will find on the SNS website for sale:
I'd like to enter this card in the following challenge:
Till next time,
Shona

Thursday, May 4, 2017

Glow in the Dark Graduation Bear and Bulb

Good Morning,
Today I'd like to share my second card of the May Reveal using the fun Final Roll Call Set 849, which is just in time for all those graduation cards you will be needing! I used some Glow in the Dark products, both embossing powder and the new Nuvo Glow Drops on the light bulb and I also colored with Copics on top of Buff Flocking to make my cuddly, fuzzy bear! Here is my little fuzzy bear with his light bulb balloon!
I started with my little bear. Placing a piece of 2 1/2" Tear-ific Tape to white cardstock and removing the protective backing, Buff Flocking was burnished into the sticky surface with my finger, until I had a nice fuzzy covering. I then stamped directly on top of the flocked piece with Memento Tuxedo Black ink.
 
I took my Copic B39 and tapped gently with the side of the marker to the areas that I wanted to be blue.
After he was colored, he was then fussy cut. His hat and bow tie were stamped on blue card in Memento Tuxedo Black and were then covered with Versamark and heat set with Clear Detail. I did this process twice in order to make the pieces nice and sturdy.
The background was yellow cardstock run through my machine with the Darice Congrats Collage embossing folder, which I then sponged with some of the Nuvo Cornflower Blue embellishment Mousse.
I stamped the bulb with Memento Tuxedo Black and colored with Copics. After it was colored I used the Versamarker Pen to apply Versamark to the lit bulb area and then heat embossed with Glow in the Dark.
The cap was stamped, fussy cut and colored with the blue Copic I had used for the bear. It was also given two coats of the Clear Detail Embossing Powder. Then I added 4 little drops of Nuvo Banana Split Glow Drops to the filament of the bulb. Dimensional Glue was used to attach the caps, bow tie and eyes.
Here is a close up of my fuzzy bear:
... and of the light bulb:
Blue and white and yellow and white thread was used as the tie for the balloon and I punched a small hole in the hand of the bear. The sentiment was stamped on Glossy card stock in Versamark and heat embossed with Cerulean Blue. A little drop of the Banana Split dotted the "i" in "bright". The embossed panel was layered to blue and then to a white card base and then everything was attached with Mounting Tape.
Here it is in the dark. Of course, it is difficult to get a great picture in the dark, but it really does look neat in person.
Hope you've enjoyed my share for today. 
Here is a list of the products I've used, click on product and it will take you straight to the store:
Embossing Powders: Clear Detail (EP280)Cerulean (EP421), Glow in the Dark (EP392)
Thanks for joining my here today,
Warm hugs, 
Shona

Thursday, April 13, 2017

Friend Slider Card

Hi there,
I'm here with you today to share my last card of the April Reveal which uses both the digi bundle and the rubber stamps of Corner Garden Set 842. This one is an interactive slider card. The three little butterflies go flying around the circle! Such fun!
First, I printed out two sheets of the orange version of the designer background paper that came in the digi bundle. Then I put one of the sheets back in the printer so that I could print on top of it, and this I did, in the "Vogue" style of the flower frame which was one of the options that my computer gave me! Who knew! Of course, I'm having trouble replicating what I did. Hoping to work more on that at the weekend. You all know I'm a bit of a newbie when it comes to digis!
This focal piece was then layered on black cardstock, which was layered to the second piece of background paper. I then took the spellbinders Standard Circles and die cut two of the circles from the center of the image:
Here is the back side:
Turning it back over, we now have all the pieces cut out. The sentiment from the stamp set was stamped in Versamark on white glossy cardstock and was heat embossed with Black Detail. This was then cut out with the smaller of the two rings. 
The card front was then layered to a piece of glossy white card base with Mounting Tape, and a little Brushable Glue was put on the underside of the floral ring, which was then stuck down onto the white base beneath, keeping the pattern of the flowered frame intact. Using the glue instead of tape allowed me to move it slightly to get the lines to match up. This was done without the sentiment there (I neglected to take a photo of that stage), which made it easier. The sentiment was then popped up on top of the black circle, which brought it to the same level as the outer ring.
Next I stamped the three butterflies in Memento Tuxedo Black from the left-over piece of the background paper, I then highlighted certain areas of the butterflies with Copics and fussy cut them.
The three colored butterflies were then given two coats of Versamark and Clear Detail embossing powder, heat setting between each application. The two coats of the embossing powder made them more sturdy, as those are the pieces which will be handled.
Next a piece of mounting tape was attached to each of three pennies, the Anti-Static Bag was pounced all over the back of the coins to make sure none of the tape was still sticky. 
The protective backing was removed from the tape and a butterfly was stuck down on each coin. The coin was then slipped under the outer ring and the sentiment, and should move with ease around the indented ring. This was repeated with the other two butterflies and the pennies.
Now the three shiny butterflies can flutter around the sentiment! Three drops of transparent Nuvo Jewel Drops "Grey Mist" were added to each corner of the card front to finish off my card for today.
I'd like to play along in the following challenges:
Whoopsi Daisy Challenge (April): Spring Sings in Flowers
Crafts and Me April Challenge: Things with Wings
Here is a list of the products I've used today, which are linked over to the Sparkle N Sprinkle store, for your convenience.
Hope you've enjoyed my combination of digi and rubber stamping today?
Warm Spring hugs,
Shona

Thursday, February 9, 2017

Teacup Pansies

Hi there,

Today, I'd like to share another card with you from the fabulous February Reveal. Today I chose to use the New Pansies in Teacup Set 833.
I decided to take a shot at watercoloring with the Distress Crayons on Kraft cardstock. As I would be working with water with the crayons, I began with stamping the image on the Kraft cardstock with StazOn Jet Black ink.
I used a Waterbrush to "paint" the crayon onto the image.
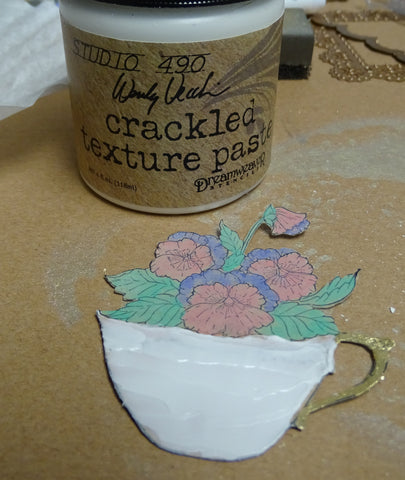
The handle of the Teacup and the little line was applied with glue, using the Nuvo Fine Tip Pen, this was left to dry till tacky and then I applied Nuvo Radiant Gold Gilding Flakes. OK, now what? Let's antique that teacup, shall we? Using a spatula, I put a nice thick layer of the crackled Texture Paste over the whole cup - yes I even covered up the Gold Flakes! Though I did leave the handle as it was.
Now to bring those dull flowers back to life! I applied Brushable Glue to the leaves, Dimensional Glue to the flowers and Nuvo Sea Breeze Jewel Drops to the darker parts of the petals. Here is everything before it was left to dry overnight! A big messy blob!
Eight hours later: E voila!
Some Memento Desert Sand was sponged over the cracks of the cup before the cup was applied with Versamark, which was then applied with a coating of Clear Detail and heat set. But the magic happens after another application of Versamark and the Thick Clear Enamel! Ta Da!
OK, I think I'm happy with my focal image now! How about a background? In-keeping with the old and crackled look I decided to make a background using the Crackle Background Stamp Set 609, which was stamped onto Kraft cardstock in Versamark and heat embossed with Clear Detail
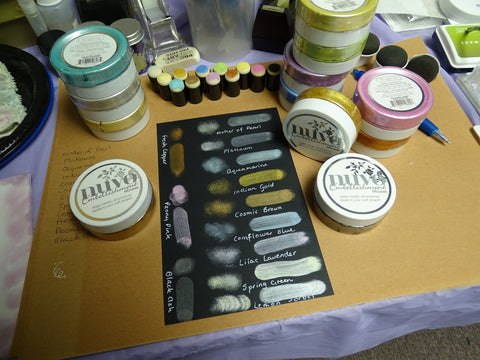
I then took a piece of black cardstock and die cut the Spellbinders Nestabilities Decorative Curved Square. But it needed some antiquing too! So I daubed on some Nuvo Mother of Pearl Embellishment Mousse - a recipe that you will see being repeated!!!
Loving my home-made wrought iron! Here is a look at what the other Embellishment Mousses do on black cardstock:
I found that dabbing the sponge on rather than rubbing it on, gave a nice mottled appearance which I liked. Now I have a whole new cardstock wardrobe!! A little of the mousse goes a long way too!
OK, so I digressed, but I really wanted to share my little metallic discovery! So let's put this card together, shall we?
So the crackle background was layered to the black card base with the wrought iron square taped down on top of that. A strip of cream pearled lace was placed underneath the wrought iron square, and simply snipped at the edges. The sentiment from the same Teacup Pansies Set was stamped in Versamark and heat embossed with Clear Detail. I just fussy cut that it - wanted the focus to be on the teacup. The sentiment was then popped up with mounting foam. It gave everything a pretty vintage look, I thought.
... and that finishes my card for today!
I'd like to enter this card in the following challenges:
Scrapy Land challenge # 59: Using a die that Scrapy Land carries
HeARTful Stamping: Feb 5th to 12th: For a Special Someone and a stamped image
Hope you've enjoyed my share with you today? Let me know in the comment section down below!
Big Hugs,
Shona