Showing posts with label Nuvo Gilding Flakes. Show all posts

Thursday, March 22, 2018

Clunker Birthday Wishes

Hi there,

So glad you dropped by today. We've got another snow day, so what better way to spend it than in the craft room! Here is my second March Reveal card. I just love this stamp set - I Love Old Trucks set 890 - perfect for all the men in your life! Some Copper Gilding Flakes, bleach and  Nuvo embellishment mousse covered gears for this make today:


So to begin I stamped the truck using the Stamp Platform onto black cardstock with Nuvo Clear Mark ink. Stickum embossing powder was applied to the ink and heat embossed till it became tacky.


The Gilding Flakes were pressed on to the tacky embossing powder and excess flakes were brushed away with the Texture Brush.


I "colored" my truck with bleach in a Water Brush. This gave an old worn-out look. I then die cut the image using Memory Box Cross Stitched Frame Borders using the Tangerine Machine.


For my background I ran the Darice Steam Punk embossing folder and rust cardstock through the Tangerine. I used the Nuvo Large Glue Pen to run over the raised gears and when it dried enough to tacky, I applied the Sunkissed Copper Gilding Flakes, taking off the extra with the Texture Brush.


I then ran this piece through the Tangerine again - this time with the Cuttlebug Diamond Plate and then this time I applied some Fresh Copper embellishment Mousse over the entire piece using a Jumbo Dauber.


The Want 2 Scrap paper gears were embellished using some Fresh Copper, Indian Gold, and Black Ash embellishment Mousses using the Jumbo Dauber.


The Happy Birthday Banner was cut out of both black cardstock and rust cardstock. I then lay 1/2" Tear-ific Tape behind the negative space and inserted the black sentiment. Autumn Frost glitter was then burnished into the open sticky areas.


The card was put together with mounting tape and pop dots. The gears were added with brads and pop dots, with Autumn Frost being added to the sticky centers of the gears (from the pop dot).


Hope you've enjoyed my share today?


Below are the products I used to create my card this week, most of which can be found on the SNS website.

I love Old Trucks Set 890
Tonic Stamp Platform
Bleach in Water Brush
Copic Marker E08
Memory Box Cross Stitched Frame Borders
Want 2 Scrap Paper Gears
Cuttlebug Embossing Folder Diamond Plate
Darise Embossing Folder Steam Punk
Copper brads

Large round pop dots

We're trying something new this month instead of our traditional Blog Hop. Now you have to leave a comment both here on my personal blog and then head over to the SNS blog post and leave a comment there as well for your chance to win a $20 gift card to SNS! One lucky winner will be chosen from one of the Designers' posts on the last day of each month. A comment must be left on both the SNS Blog and the Designer's post in order to qualify. The winner will be announced on the 3rd of the following month, both on the SNS Blog and on the SNS Facebook page. Thanks for leaving us some love and good luck!

I'd like to join in the following challenges with my card today:

Watercooler Wednesday #162 Charlotte's Masculine: Anything Goes
Challenge 4 Guys Challenge #190: Things with Tails (Tail lights!)
World Wide Open Design Team Challenge #3: Anything Goes
Classic Design Team Open Challenge #23: Anything Goes


Thanks again for stopping by,
Warm hugs,

Shona

Thursday, February 9, 2017

Teacup Pansies

Hi there,

Today, I'd like to share another card with you from the fabulous February Reveal. Today I chose to use the New Pansies in Teacup Set 833.
I decided to take a shot at watercoloring with the Distress Crayons on Kraft cardstock. As I would be working with water with the crayons, I began with stamping the image on the Kraft cardstock with StazOn Jet Black ink.
I used a Waterbrush to "paint" the crayon onto the image.
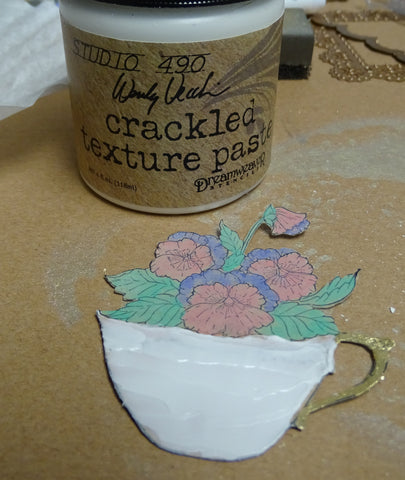
The handle of the Teacup and the little line was applied with glue, using the Nuvo Fine Tip Pen, this was left to dry till tacky and then I applied Nuvo Radiant Gold Gilding Flakes. OK, now what? Let's antique that teacup, shall we? Using a spatula, I put a nice thick layer of the crackled Texture Paste over the whole cup - yes I even covered up the Gold Flakes! Though I did leave the handle as it was.
Now to bring those dull flowers back to life! I applied Brushable Glue to the leaves, Dimensional Glue to the flowers and Nuvo Sea Breeze Jewel Drops to the darker parts of the petals. Here is everything before it was left to dry overnight! A big messy blob!
Eight hours later: E voila!
Some Memento Desert Sand was sponged over the cracks of the cup before the cup was applied with Versamark, which was then applied with a coating of Clear Detail and heat set. But the magic happens after another application of Versamark and the Thick Clear Enamel! Ta Da!
OK, I think I'm happy with my focal image now! How about a background? In-keeping with the old and crackled look I decided to make a background using the Crackle Background Stamp Set 609, which was stamped onto Kraft cardstock in Versamark and heat embossed with Clear Detail
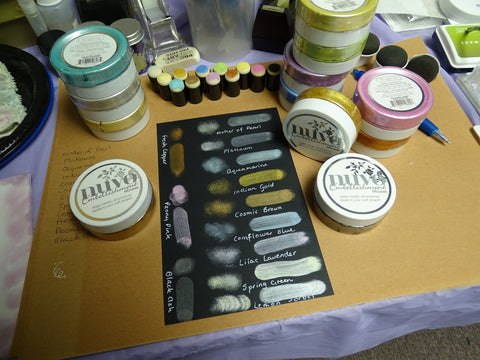
I then took a piece of black cardstock and die cut the Spellbinders Nestabilities Decorative Curved Square. But it needed some antiquing too! So I daubed on some Nuvo Mother of Pearl Embellishment Mousse - a recipe that you will see being repeated!!!
Loving my home-made wrought iron! Here is a look at what the other Embellishment Mousses do on black cardstock:
I found that dabbing the sponge on rather than rubbing it on, gave a nice mottled appearance which I liked. Now I have a whole new cardstock wardrobe!! A little of the mousse goes a long way too!
OK, so I digressed, but I really wanted to share my little metallic discovery! So let's put this card together, shall we?
So the crackle background was layered to the black card base with the wrought iron square taped down on top of that. A strip of cream pearled lace was placed underneath the wrought iron square, and simply snipped at the edges. The sentiment from the same Teacup Pansies Set was stamped in Versamark and heat embossed with Clear Detail. I just fussy cut that it - wanted the focus to be on the teacup. The sentiment was then popped up with mounting foam. It gave everything a pretty vintage look, I thought.
... and that finishes my card for today!
I'd like to enter this card in the following challenges:
Scrapy Land challenge # 59: Using a die that Scrapy Land carries
HeARTful Stamping: Feb 5th to 12th: For a Special Someone and a stamped image
Hope you've enjoyed my share with you today? Let me know in the comment section down below!
Big Hugs,
Shona

Thursday, November 17, 2016

FESTIVE LANTERN

Hi there,

Today I'm posting this from sunny Sanibel Island in Florida! I'm down here for a few days visiting a girl friend and have been on the go constantly, thus the reason I'm a little late with my regular Thursday posting! Anyway, I'd like to share a card using another of the November Reveal Sets, Festive Lantern Set 808 together with a few of the new Nuvo products.


I used the large Nuvo Glue pen to stamp my image on white cardstock, letting it dry first before applying the Sunkissed Copper Gilding Flakes


I stamped the poinsettias three times in Versamark and heat embossed with Copper Dreams. These were then fussy cut and both the lantern and flowers were colored with the following Copics: Y17, YR16, R22, R29, E13, E19, YG25, YG67, B60.


The lantern was die cut with Spellbinders Classic Scalloped Ovals Large and before removing the dye I sponged on some Memento Dandelion ink.


I ran a piece of red cardstock through a freebie embossing folder with poinsettias that came with a UK stamping magazine. Fresh Copper Nuvo embellishment mousse was daubed to bring out the raised pattern.


White Blizzard Glitter Drops were applied to the candle. Moonstone Glimmer Paste was applied to the raised middle poinsettia and Dandelion Yellow Crystal Drops were applied to the center of the top poinsettia too.


The sentiment from the Holiday Foliage Set 475 was stamped in Versamark on white cardstock and heat embossed with Copper Dreams. It was die cut with Spellbinders Ribbon Tag Trio Two. This was threaded with copper organdy ribbon and attached to the base of the card with foam squares. This was then layered to a piece of white cardstock edged with 1/4" Tear-ific Tape, onto which I burnished the Copper Gilding Flakes again.


The lantern and poinsettias were connected with tape and foam squares and were layered on to the card front.


... and that completed my card for today.


Hope you've enjoyed my share today! I'll be back next Thursday with my final November reveal card.

Hugs,

Shona