Showing posts with label Cerulean EP. Show all posts

Thursday, July 13, 2017

Classic Birthday Wishes!


Hi there, today I'd like to share a card idea using a couple of the older sets - the Classic Cars Set 599 along with a sentiment from the Wetlands 1 Set 790.
I stamped the car in Memento Tuxedo Black ink and colored using three Copics. I then cut it out using the Memory Box Cross Stitched Borders die. Before removing the die, I sponged on a little Summer Sky and London Fog. The other layers behind were cut from designer paper and a blue cardstock using the same stitched borders die. I cut out the Spellbinders Ribbon Banner from the middle of the piece of blue cardstock. 
The sentiment was stamped in Versamark and then heat set with Cerulean embossing powder and was popped up under the image with Mounting Foam.
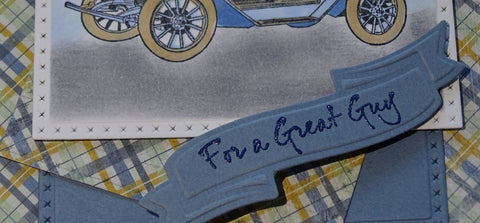
I wanted to add just a little pizzazz! So I took three diamond pop dots and colored the sides with two of the Copics that I had used in the image. The blue is B34. I then took off one of the protective backings and applied it with Cobalt Glaze Velvet Glitter. 
Then I did the same with Copic Marker E31 and Golden Wheat Velvet Glitter.
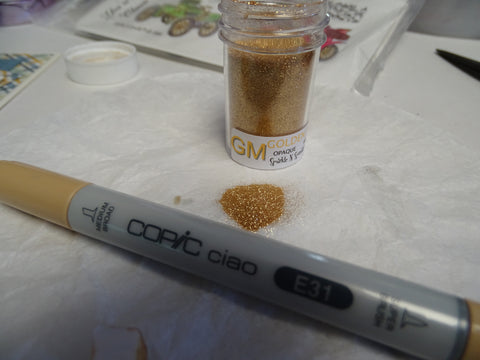
The other protective backing was peeled off and then the diamonds were stuck to the top of the image.
That finished up my card for today. Today I'd like to join in the following two challenges:
Scrapyland Challenge 69: Anything goes using die brands that Scrapyland sells.

Crafty Gals Corner Challenge 131: Do it for the Dudes

Here is a list of the supplies used from the Sparkle N Sprinkle store:
Cobalt Glaze (GM2015), Golden Wheat (GM2026)

Thursday, May 25, 2017

Scenic Masculine Silhouette Card

Hi there,

Today I'd like to share a card with you using some of the older sets from Sparkle N Sprinkle - in fact three! Right Beside You Set 812,  Wetlands 1 Set 790Wetlands 2 Set 791, along with some of the Nuvo Embellishment Mousses.
To begin with, I set up my scene on my stamping platform. You can also use the Tim Holtz Stamping Platform.
I stamped the entire scene in Versamark onto  a piece of Watercolor cardstock  5 1/2" x 5 1/2". It was then heat embossed with Cerulean. I used different elements from the three stamp sets, to make up my scene.  
Next I just took the Nuvo Embellishment MoussesCornflower BluePeony Pink and Indian Gold with my water brush filled with water and painted them over the scene, blending them in to one another as I went. The embossing powder resisted the paint for the most part and I used a paper towel to take of any puddling on top of the embossing powder. 
Then I looked at my scene and saw that two of my ducks were flying upside down!! So how to remedy that little scenario? Let's cover them up with some sentiments!
I stamped the sentiments in Versamark and heat embossed with Cerulean on the watercolor cardstock. They were fussy cut into banners and a little blue background was added to each of them and then they were popped up on mounting tape. Now I had three normal ducks!
This was layered to a piece of blue cardstock and then to the white card base. Here is the version I did for my Dad (with all the ducks in the the correct direction). I think this would also work well as a Father's Day card. It goes together quickly too!


Here is a list of products used in this project:
Embossing Powders: Cerulean (EP421)
Hope you liked my share today? Thanks for stopping by today,
Shona

Thursday, May 4, 2017

Glow in the Dark Graduation Bear and Bulb

Good Morning,
Today I'd like to share my second card of the May Reveal using the fun Final Roll Call Set 849, which is just in time for all those graduation cards you will be needing! I used some Glow in the Dark products, both embossing powder and the new Nuvo Glow Drops on the light bulb and I also colored with Copics on top of Buff Flocking to make my cuddly, fuzzy bear! Here is my little fuzzy bear with his light bulb balloon!
I started with my little bear. Placing a piece of 2 1/2" Tear-ific Tape to white cardstock and removing the protective backing, Buff Flocking was burnished into the sticky surface with my finger, until I had a nice fuzzy covering. I then stamped directly on top of the flocked piece with Memento Tuxedo Black ink.
 
I took my Copic B39 and tapped gently with the side of the marker to the areas that I wanted to be blue.
After he was colored, he was then fussy cut. His hat and bow tie were stamped on blue card in Memento Tuxedo Black and were then covered with Versamark and heat set with Clear Detail. I did this process twice in order to make the pieces nice and sturdy.
The background was yellow cardstock run through my machine with the Darice Congrats Collage embossing folder, which I then sponged with some of the Nuvo Cornflower Blue embellishment Mousse.
I stamped the bulb with Memento Tuxedo Black and colored with Copics. After it was colored I used the Versamarker Pen to apply Versamark to the lit bulb area and then heat embossed with Glow in the Dark.
The cap was stamped, fussy cut and colored with the blue Copic I had used for the bear. It was also given two coats of the Clear Detail Embossing Powder. Then I added 4 little drops of Nuvo Banana Split Glow Drops to the filament of the bulb. Dimensional Glue was used to attach the caps, bow tie and eyes.
Here is a close up of my fuzzy bear:
... and of the light bulb:
Blue and white and yellow and white thread was used as the tie for the balloon and I punched a small hole in the hand of the bear. The sentiment was stamped on Glossy card stock in Versamark and heat embossed with Cerulean Blue. A little drop of the Banana Split dotted the "i" in "bright". The embossed panel was layered to blue and then to a white card base and then everything was attached with Mounting Tape.
Here it is in the dark. Of course, it is difficult to get a great picture in the dark, but it really does look neat in person.
Hope you've enjoyed my share for today. 
Here is a list of the products I've used, click on product and it will take you straight to the store:
Embossing Powders: Clear Detail (EP280)Cerulean (EP421), Glow in the Dark (EP392)
Thanks for joining my here today,
Warm hugs, 
Shona

Friday, July 8, 2016

CONGRATS. GRAD!

Hi there,

Well I'm back from a whirlwind visit to Scotland, Italy and back to Scotland. My eldest son Struan, graduated from St. Andrews University, so the family went over to attend the ceremony.


While we were there, we had also organized a family reunion the Sunday after we arrived on the Saturday. We got a great turnout - 56, including my parents, my three brothers, all my aunts and uncles, cousins, nephew's and nieces and one fourth generation baby! There were also 6 close family friends.

After the Graduation on the Tuesday, David, Calum and I took a week's vacation to Rome, Italy. We had a wonderful time, staying with my first landlady and landlord, visiting old friends (new for Calum), lying on the beach, checking out some old haunts and restaurants. Rome has been cleaned up considerably from when I worked there 30 years ago. It was also while some of the Euro soccer games were being played, so Calum got to watch a few games with real Italians, which was a real treat for him!

We then came back through Scotland for a few days, to pick up bags that Struan had accumulated over the four years, and flew back on the 4th of July. Mum and Dad will come out to us on the 21st of July, so it wasn't too hard to leave this time.

So that's the last three weeks in a nutshell, now back to reality! For my card today, I'd like to share what I made for Struan's Graduation.


I created the background, the St. Andrew's Cross, the Saltire, the national Scottish flag by adhering a piece of Super Adhesive Tape to white cardstock. After removing the protective backing, I lay 3/4" Tear-ific Tape down from corner to corner and applied Cobalt Glaze to the remaining sticky areas.


The backing was then removed from the two strips (I cut the backing of the top strip where it crossed over the bottom strip using an exacto blade). Then Cloud Nine was applied to the cross. This piece was layered to a blue layer, before the glossy white card base.


I used the Impression Obsession Die (DIE296-T) to cut out the graduates from black cardstock, I then covered the piece with Versamark and heat embossed with Black Detail, to give them a shinier appearance. They were attached with foam squares for dimension. The sentiment and scroll (from Graduation Set 435) were stamped together on white glossy cardstock with Versamark and then this was heat embossed with Cerulean (one of the detailed Tuscany colors, which work really well on script and detailed images).


I then cut this out as a banner and added to the finished card with Foam Squares again for dimension.


 ... and that finished off my card for my graduated boy! Here he is on graduation day:


I'd like to join in the following challenges with this card:
The Sister Hood of Crafters: Create your own background
Dream Valley Challenges: The color of your flag (Scotland)

Hope you've enjoyed my share today! Will be back again soon, have a lot of catching up to do!

Hugs,

Shona

CONGRATS. GRAD!

Hi there,

Well I'm back from a whirlwind visit to Scotland, Italy and back to Scotland. My eldest son Struan, graduated from St. Andrews University, so the family went over to attend the ceremony. While we were there, we had also organized a family reunion the Sunday after we arrived on the Saturday. We got a great turnout - 56, including my parents, my three brothers, all my aunts and uncles, cousins, nephew's and nieces and one fourth generation baby! There were also 6 close family friends.

After the Graduation on the Tuesday, David, Calum and I took a week's vacation to Rome, Italy. We had a wonderful time, staying with my first landlady and landlord, visiting old friends (new for Calum), lying on the beach, checking out some old haunts and restaurants. Rome has been cleaned up considerably from when I worked there 30 years ago. It was also while some of the Euro soccer games were being played, so Calum got to watch a few games with real Italians, which was a real treat for him!

We then came back through Scotland for a few days, to pick up bags that Struan had accumulated over the four years, and flew back on the 4th of July. Mum and Dad will come out to us on the 21st of July, so it wasn't too hard to leave this time.

So that's the last three weeks in a nutshell, now back to reality! For my card today, I'd like to share what I made for Struan's Graduation.


I created the background, the St. Andrew's Cross, the Saltire, the national Scottish flag by adhering a piece of Super Adhesive Tape to white cardstock. After removing the protective backing, I lay 3/4" Tear-ific Tape down from corner to corner and applied Cobalt Glaze to the remaining sticky areas.


The backing was then removed from the two strips (I cut the backing of the top strip where it crossed over the bottom strip using an exacto blade). Then Cloud Nine was applied to the cross. This piece was layered to a blue layer, before the glossy white card base.


I used the Impression Obsession Die (DIE296-T) to cut out the graduates from black cardstock, I then covered the piece with Versamark and heat embossed with Black Detail, to give them a shinier appearance. They were attached with foam squares for dimension. The sentiment and scroll (from Graduation Set 435) were stamped together on white glossy cardstock with Versamark and then this was heat embossed with Cerulean (one of the detailed Tuscany colors, which work really well on script and detailed images).


I then cut this out as a banner and added to the finished card with Foam Squares again for dimension.


 ... and that finished off my card for my graduated boy! Here he is on graduation day:


I'd like to join in the following challenges with this card:
The Sister Hood of Crafters: Create your own background
Dream Valley Challenges: The color of your flag (Scotland)

Hope you've enjoyed my share today! Will be back again soon, have a lot of catching up to do!

Hugs,

Shona