Showing posts with label Dry Embossing. Show all posts

Tuesday, November 9, 2021

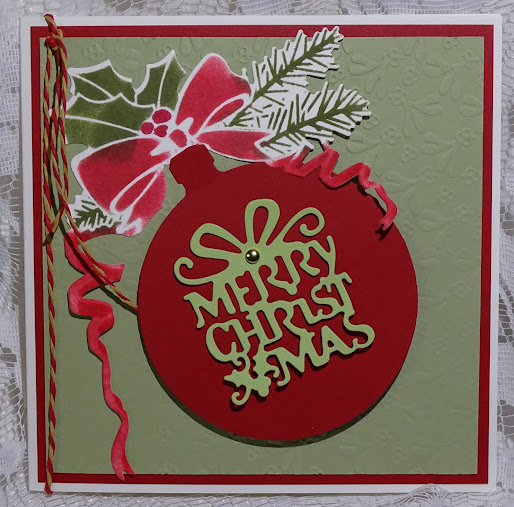
Merry Christmas Bauble

 Hi there and welcome back to my blog. My November header was taken at the New York Botanical Garden last week, when a few of my Master Gardener buddies and I took a trip there. I believe it is a Catbird enjoying the berries of the Callacarpa. We had a beautiful, though brisk, day taking in the Fall foliage!

My card today is for the Holly and Ivy Christmas Challenge, which is always an anything goes challenge. I hope you will join in the fun, while adding to your Christmas card stash! You know it will be here before we know it! 


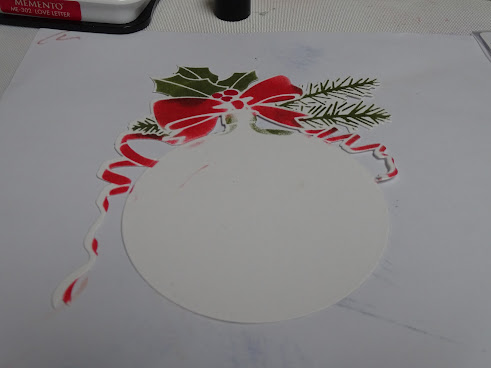
I had recently been "enabled" into acquiring the Sweet Poppy Christmas Snowflake Bauble stencil and die set. This was the first time I had played with it. I will be definitely be getting this back out to play around with.

Using the stencil on white cardstock and a piece of scrap paper to try to mask off areas not to be inked (not terribly successful on that, I may add), I used Memento inks Olive Grove and Love letter with a finger dauber to color in the ribbon and the greenery sprigs.


A red Copic marker was used for the berries.


After die cutting, not terribly straight, I inked up the entire ribbons.


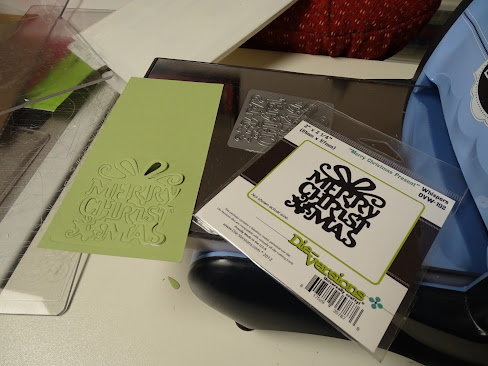
I die cut the bauble from red cardstock and the Die-versions Merry Christmas Present die from green cardstock. 


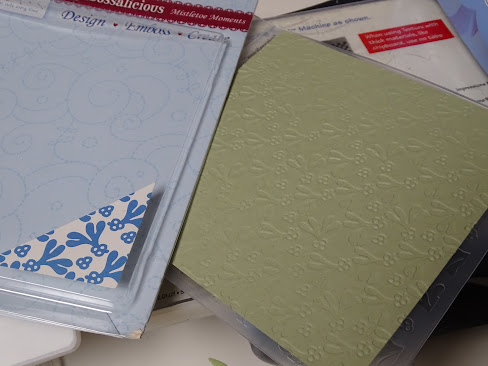
The sentiment was attached to the bauble with a gold eyelet. The Mistletoe Moments embossing folder was run through the machine using the same cardstock as sentiment. 


This was layered on to red carstock, then layered to a white card base. The bauble was attached with tape and mounting foam.


A piece of red and beige bakers twine was tied around the spine to finish off the card for today.

Below, you will find the products used on my card today:

Sweet Poppy Christmas Snowflake Bauble

  Stencil and Die

Memento Inks: Olive Grove and Love Letter

Finger Daubers

Red Copic

Die’sire Embossalicious Mistletoe Moments embossing folder

Die-Versions Merry Christmas Present die

Gold Eyelet

Red and brown bakers twine


Please take a look over on the Holly and the Ivy Challenge blog and see the other design team members' inspirations. We look forward to seeing your entries!

Till next time,

Shona

Friday, December 7, 2012

Playful Pandas

Hi there,

Just a quick post this morning, with another Asian card.  I decided to use the cute Panda stamp from Sparkle N Sprinkle, to make a masculine birthday card for an "older" Gentleman!  I recently picked up the Darice Bamboo embossing folder, which I love.  So that is what I used for my background.

I also used Sparkle N Sprinkle's Cloud Nine (Velvet Glitter) for the panda's white fur.  Unfortunately you can't feel it through the computer, but it is glitter with a fuzzy feel.  It's so versatile - check out the Tips and Techniques Section of Sparkle N Sprinkle, scroll down to Glitter - Velvet, to see some of the ways the designers have used it!

Here's the card, and the link to my gallery, if you need full directions:


Hope you're having a good day.  I'm off to hopefully put a dent in my Christmas cards!

Monday, October 22, 2012

Sparkle N Sprinkle has got some new sets!

Good morning!  We've got a beautiful fall morning here in New Jersey!  Just the right inspiration needed for some fall-themed stamping.  This morning, I'd like to share a couple of cards with you that I made from Sparkle N Sprinkle's new Fall Harvest set. Also, if you scroll down under the set, you will see many samples by some of the other Design Team Members.

I know I will be using this set over and over again!

The background for this first card is actually a photo of my backyard from last fall, and I printed it on to cream cardstock before running it through the Autumn Words embossing folder  I then sanded it to highlight the words.


I dipped three Versamarked gold brads in three different autumnal embossing powders to bring out the yellow, red and green tones of the watercolored apples.  Here are the full instructions for the card.

Still in autumn mode, I used the pumpkin image from the set for my second card:


For this background I used the edge of the watercolor crayons and applied yellow, pale orange, orange and red scribbled across watercolor paper, then I used a water color brush to blend the colors together. After die cutting the circle and dry embossing it (with brown dye ink applied to the inside of the folder), I covered the entire piece with Versamark and heat embossed with clear, to give it a shine.

The pumpkin image is colored with watercolor crayons applied with a waterbrush.  Full instructions for this card can be found right here.

Hope you've enjoyed your visit today.  I'll be back soon, to show you what I did with the new Christmas Set!  'Till then - Happy Fall!


Tuesday, March 29, 2011

My Mother's Day Card

Welcome back, after all the excitement of last week's Blog Hop!  After making several more cards, I decided to stick with this one for my Mum.  She loves all flowers, whether in the garden or in a vase.  I embossed the frame by using the Oval die cut from Spellbinders.  The vase stamp is from Sparkle N Sprinkle Vase Set 265 which I stamped with Memento Tuxedo black ink and colored in with Copics.  The blue background paper is just blue cardstock with Versamark applied to the edges and then heat embossed with Sparkle Embossing Powder.  I make my own glittery backgrounds with this Embossing Powder all the time - It just adds so much bling!  I added a little Stickles to the flowers and wrapped a little, blue, squiggly, sparkly ribbon around the bottom!  Ok, got to get it to the post office, so that it'll arrive in time - Catch you later!

Thursday, March 24, 2011

SNS UNTRADITIONAL MOTHER'S DAY BLOG HOP

Well a warm hello from a finally unfrozen NJ - hope you're all enjoying the first signs of Spring (no need to rub it in, you Floridians!).  If you have hopped over from Patti White's blog, then you are on the right bunny trail.  If, however, you have "hopped" over a few, might I suggest that you turn around and take your cute little cotton tail back to the beginning, http://sparklensprinkle.com/blog/ so you won't miss a hare!!

Here is a photo of my token crocus clump that comes up annually, despite the New Jersey deer which only ate them down to the roots once this year (I covered them in human hair, so that I could take the photo!).  They always signify the start of Spring for my family!  "Mummy, the crocuses are back!!"

So here I am getting ready for my first Blog Hop - hope you are all as excited as I am.  I know, you're all saying, "What's the big deal?  It's only a Blog Hop."  Remember - I'm not even on Facebook yet!!! (LOL)  Maybe soon.  OK, so now on to business.

For this Blog Hop, we are doing an untraditional Mother's Day theme.  So right there, I didn't listen.  My three MD cards are all quite traditional.  Not sure which one my "Mum" is getting, but since Mothering Sunday is on April 3rd in the UK this year I had better decide quickly - don't you think?  And no she doesn't blog either - so we're OK - she's in the UK! 

Anyway, on to the Blog Hop.  Did you know that Sparkle N Sprinkle is now a preferred partner with Spellbinders?  That means some of our new sets, are made to fit very nicely into some of the Spellbinders die sets.   For the Mother's Day Blog Hop, I chose to use one of those such Combo Sets.  It's set 429 the Blossoms - Nestibilities Combo.  Oh how easy (not to mention fun!) is this going to be!!

So here we go with my first card: Happy Mother's Day Blossoms


So, this is my most "untraditional" card.  Not sure why I did this, maybe because I thought it sounded untraditional for a flowery card, but I decided to start with a black and white background.  I made masks of the three flowers I was going to use, and covered the black cardstock with flowers embossed with White Detail Embossing Powder.  Actually, it looked really pretty just like that, but, of course, I couldn't stop there!  I stamped the flowers in Memento Black Ink and colored them in with Copic markers.  Still not bold enough!  So after cutting them out, I covered the flowers with Versamark Ink and heat embossed with Clear powder - twice!!  You'll find the complete instructions here.

Now on to the more feminine side of me.  Next is my Stripes and Blossoms card:

For this card, I decided to go mono-chromatic, so I used double-sided cardstock.  It was a two-tone pink cardstock.  For the card's background, I made my own glitter paper - I covered strips of both colors of the cardstock with Super Adhesive Sheets.  I took off the protective backing and applied Sparkling Snow Glitter to the entire piece.

I just love the way it twinkles - don't you?  I love this technique, because when you need some pizzazz , but want to stay in the same color family - it's a no-brainer!  I made my flowers out of white, and the two tone pink cardstock, and embossed them with Petal Pink EP and Melon Twist EP. 

Here is a more detailed shot of the dimensions on the card, which I achieved by using different height dimensionals.  Complete details for this card are right here.

Hope you're enjoying being with me on my first Blog Hop (actually I'm enjoying doing this way more than I imagined I would).  So I'll just keep going!! - I see that little Energizer Bunny is still hopping! - but at least he's going in the right direction this time!


... And now on to my final card - Mother's Day Jar. While at Stamp Fest (right before going on the cruise) I was looking around the booth and for some reason one of our other new sets Fill the Jar just jumped out at me and "screamed" to be filled with flowers!!  I think this may be my favorite of the three (maybe my Mum's MD card too - what do you think?).

So I decided to take the Large Jar from the Fill the Jar set and take it to another level!  I suppose after you're finished with your dryer sheets, you clean off the lint screen and throw it in the garbage?  Well don't do that anymore!  You need to give it a quick iron (oh, do stop complaining - the effect you get is way worth it!).  Stamp the Large Jar and Happy Mother's Day in Memento Ink then cover in a piece of the Super Adhesive Sheets.  Stick down the dryer sheet and apply Sparkling Snow glitter to the surface and burnish it in with your finger.  Cut out - now you have a frosted jar! Isn't that cool!


The flowers were stamped on white cardstock with Versamark and then heat embossed with Melon Twist, Morning Glory, Petal Pink and Princess Rose Embossing Powders.  I used green raffia for the stems.  Here is a close-up photo to show how, by using different heights of dimensionals, the flowers take on the look of a real posie popping out of the jar.  For the complete directions on how to make a Mother's Day Jar, just click here! 
I'm so glad you took the time to be part of my first Blog Hop.  I hope you have enjoyed seeing my projects, along with all the other beautiful cards presented by my fellow Sparkle Team designers.  So for now, I bid you a fond farewell and hope to see you back real soon!  After leaving a comment on my blog, hop on over to the blog of the last, but certainly not least - the one and only - Donna Ellis, to see what lovely creation she has to s(hare) with you. Here is the address to her burrow!  http://creativesmiles2.blogspot.com/   With all those lucky rabbit feet out there - I wonder who will win the prize!  Good luck!