Showing posts with label Peruvian Lily Glitter. Show all posts

Monday, August 31, 2015

SPARKLE N SPRINKLE'S SEPTEMBER 1ST REVEAL

Hi there, and welcome to the Sparkle N Sprinkle September Reveal!

I'm the last Designer for the hop this month. To be eligible for the awesome prizes you should have arrived here by way of Belinda.   This month we are doing something a little different.  Instead of releasing new stamp sets, we decided to do a themed reveal.  Our theme is "Beach/Water" related, so you will see lots of different stamp sets used by our Designers.   Any "beach themed" set will be 20% off until Sept 3.  So once you finish the blog hop, head on over to the store and start shopping.  All of the sets are available on cling mounted rubber or as a digital image.  

Big Day 749 
is the stamp set featured with this month's Technique Video Kit. For my card today, I decided to use the Silhouette Set 493 along with a painted background using several embossing powders.


Here are a few other Beach themed sets being used this month:

Tropical 158 (digi version DIGI158)
Ocean Treasures 560 (digi version DIGI560jj)
Sea Lady 735 (digi version DIGI735)
Mermaid Kisses 529 (rubber only)
Surf's Up 455  (digi version DIGI455)
Beach Babes 473 (digi version DIGI473m)


On Sept 3, one GRAND PRIZE WINNER will be selected from the comments left on the Designers' blogs.  Please leave a comment with each Designer in order to be eligible for the Grand Prize.  You never know who the Mystery Designer will be that has the winning comment.  

The winner will get to choose FOUR beach/water themed stamp sets of his/her choice (or the digi version, if preferred).

The Grand Prize Winner will be announced on Sept 3 on the SNS Facebook page, the Designer's blogs, and here on the SNS Blog.  

In addition to our regular Designers, two of our 2015 Guest Designers this month, Ani and Chris are with us again this month.

The Blog Hop order this month is:

(*Tip: if you have difficulty with a particular link, try clicking on the Designer's blog title to send you to their Home page.)

We love reading your comments and hope that we have inspired you as well.  If you can not leave a comment for some reason, please email icinganne@yahoo.com with your comment and the name of the blog or the Designer you are commenting about.


The Sparkle N Sprinkle Creative Challenge also begins today.  There are lots of prizes and recognition badges.  Come check out how you can become a SNS Featured Artist as well.  The theme is always Anything Goes using Loose Glitter, Embossing Powder, and/or Flock.


I love any silhouette stamps and this one is no exception. I thought it would be fun to create a dreamy beach, waves and sky as the backdrop for this pretty stamp. To do this, I took a piece of white cardstock and covered the entire piece with Versamark ink. Starting at the top of the piece of card, I applied the embossing powders one at a time, pouring the excess back in their jars between applications.


Ice Rink was first, followed by Arctic. I left little patches of open spaces, so that I could put in a little Belgian Cream for the clouds! Moving down, I continued with Skylight, before reaching the sand with Hit the Beach. Once all the embossing powders are on, then you heat set.


Next, you need to apply the anti static bag liberally to the background before inking up the main stamp with Versamark. I only inked inside the lines of the stamp as I didn't want the frame to show. I also stamped the two other little grass stamps from the set. Teddy Brown was applied to the Versamark and heat set. The birds were done the same way.


The sentiment is from the Ocean Treasures set 560 and is stamped on to Kraft cardstock in Versamark and heat embossed with Black Detail. It was cut and embossed with Spellbinders Labels Nine with a little Memento Desert Sand ink sponged on top before removing the die.


Peruvian Lily velvet glitter was applied on top of the sand with Dimensional Glue, as were the five little shells.


The sentiment was attached with Dimensional Foam after wrapping the thread around the card front. I layered this on to two pieces of kraft and then to the light blue card base.

I hope the team and I have inspired you this month. I'm the last of the blog hop, so remember to leave me a comment below to be in the running for four of the beach sets.

Thanks for joining our September blog hop and good luck!

Shona

Wednesday, February 4, 2015

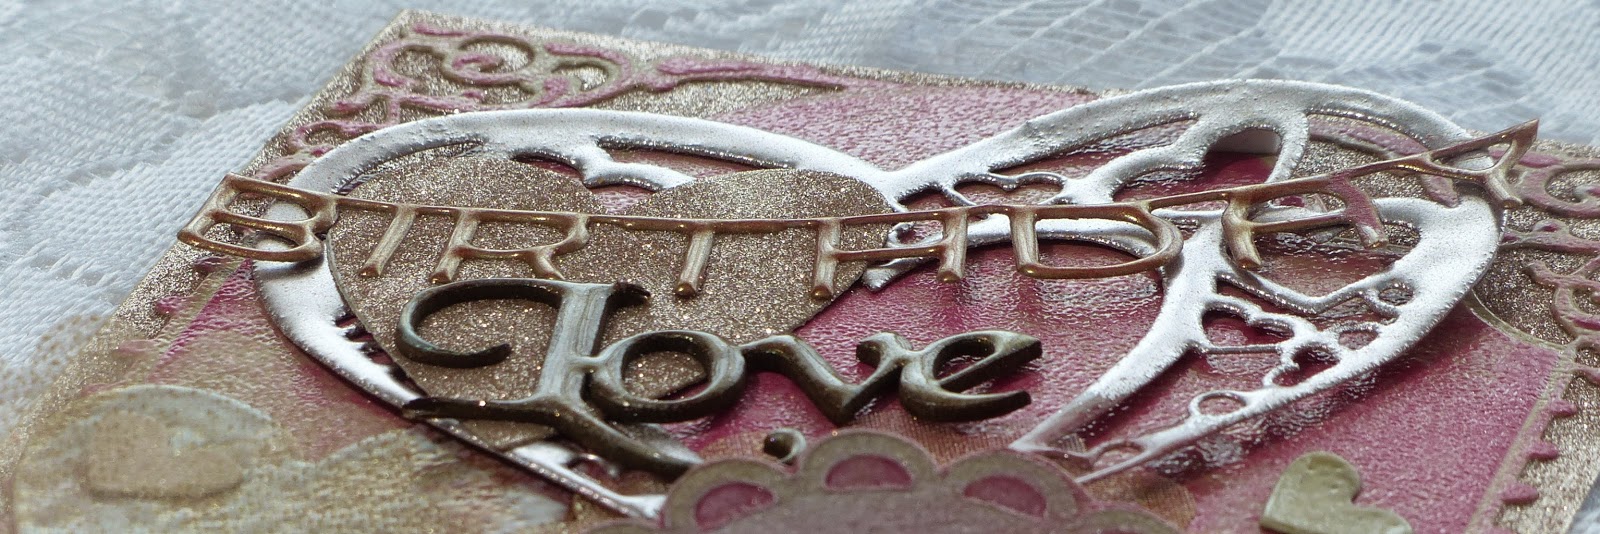
VALENTINE BIRTHDAY LOVE!

Hi there,

I spent most of the morning playing in my stamping room with a couple of goodies that I had received on Monday as part of blog candy that I won from Carolina Cards. One was a Darice embossing folder Valentine Hearts and the other was the Spellbinder's 5 x 7 Enchanted Labels 28. Thank you so much Mary! Here is what I ended up with:


I started with the embossing folder. I inked up a piece of Kraft cardstock with Memento Angel Pink and then added some Rosebud. I then ran it through the embossing machine and sanded the raised pattern to remove the ink (sounds counterproductive - but the colors stay in the recessed areas). After fussy cutting the heart, I dabbed some Moonlight White Brilliance ink over the piece and heat embossed with Clear Detail.  


Next, I cut and embossed the largest frame from the Enchanted Labels 28 and inked it up with the same two pink as before. I applied Versamark to the entire piece and heat embossed with Clear Detail again.

I lay two strips of 2 1/2" Tear-ific Tape side by side on a piece of 5" x 7" Kraft cardstock. After removing the protective backing the frame was centered on top. Peruvian Lily Velvet Glitter was then applied to the remaining sticky areas.


I then die cut the Cheery Lynn DL 178 Heart Within my Heart from Kraft cardstock and after putting the little heart inserts aside (to reuse later) I applied Versamark and heat embossed with Bronze Rose.


Three of the little hearts were used. One was inked with Rosebud, then applied with Versamark and Magic Speckle. Another was inked with Versamark and heat embossed with Clear Detail, the third was heat embossed with Vintage.  

The big heart insert from the Cheery Lynn die was inked with the two pink inks first and then applied with Versamark. Vintage was then added and then Magic Speckle to achieve the lovely mottled look.


The Die-Versions Birthday die cut was inked heavily with Rosebud before I covered it in Versamark and then heat embossed with Vintage (Vintage is "near transparent" so that is why you see some of the pink showing through). I love using this embossing powder on any vintage/shabby chic project.


The "Love" chipboard was applied with Rosebud ink before being heat embossed with Vintage. 

A new technique for me today was to emboss a piece of tulle! But first I die cut it! So after cutting it with the Spellbinders Classic Scalloped Hearts (which it cut through very well, I may add!) I covered it in Versamark and then holding it with tweezers from the bottom of the heart I heat embossed with Vintage again. Loved the subtle look it gave. You can see it peeking out from behind the Darice heart.


So then to put it all together. The dilemna was to get everything to stick and stay put.

I figured if I stuck the words to Super Adhesive Tape then they weren't going anywhere - so that is what I did! I ran the Cheery Lynn die cut through the machine with a piece of Tear-ific Tape that was attached to a piece of Kraft that was big enough to hold the bigger heart from inside the die cut. I then removed the protective backing and attached both the "birthday" die cut and the "Love" chipboard to the surface, before applying Peruvian Lily glitter to the remaining sticky surface.


Tear-ific tape was used to adhere the hearts down, with some Dimensional Dots for dimension! Then the little hearts were adhered with Dimensional Glue. 

A look at the finished project once more:


I'd like to enter this card in the following challenges:

Sweet Stamps: Love is in the Air
Crafty Sentiment Designs: Include a Heart
Scrapy Land Challenge 11: Use a Die that Scrapy Land Carries
 (Spellbinders, Die-Versions, Cherry Lynn)

Thanks for stopping by today! 

Hugs,

Shona

Saturday, January 31, 2015

SPARKLE N SPRINKLE'S FEBRUARY 1ST REVEAL

Hi there and welcome to the Sparkle N Sprinkle February 1st Reveal!

I noticed on backing out of the garage at 6.30am yesterday morning, to take my youngest to the bus stop, that I could see the bottom of the driveway!  This means that the mornings are getting lighter, earlier!!! Spring is on it's way! Well OK, that may be a wee bit of an exaggeration, but I'm optimistic!
I normally enjoy January and February, although cold, they are my catch up and organization months. I like being organized, but somehow January fled by too quickly, and I'm not there yet with either catching up OR the organization! Good news though - I still have February! 


For my Reveal card this month I chose to use the Iris Garden Set 687. It's so appropriate for this reveal being the birth flower for February! This month FOUR new rubber stamp sets and two new digi-only sets are being introduced.   These sets are 20% off their regular price, until Feb. 3rd.  All the new reveal sets are available on Cling Mounted Rubber and as a digital image.  Iris Garden #687 is also the stamp set featured in  This Month's Technique Video.

The sets are:


Seasonal Trees #680   (digi version DIGI680)
Sleep Over #686   (digi version DIGI686)
Iris Garden #687  (digi version DIGI687)
Berry Sundae #688   (digi version DIGI688)
Wild About You #DIGI692 (digi only)
Stanley Valentine #DIGI693 (digi only)


On Feb 3rd,  one Grand Prize Winner will be selected from the comments left on the designers' blogs listed below.  The Grand Prize Winner will receive
all FOUR of the new rubber stamp sets (or digi sets, if you prefer)

The new SNS Creative Challenges also begins today, with lots of prizes and recognition badges. 

The winner of the blog hop will be announced on February 3rd on Facebook, the SNS blog, and on our blogs.  This month's Blog Hop order is:

Belinda Shupe
Anita Scroggins
April Williams
Shona Erlenborn (you are here)
Eret Pank
Anne Temple
Marie Berquist

(Tip: if you have a problem with a particular link, try clicking on the person's blog title to send you to their Home page.)

Don't forget to leave a comment with each Designer to be eligible for the Grand Prize.  We love reading your comments and hope we have inspired you as well.  If you absolutely can not leave a comment for some reason, please email icinganne@yahoo.com with your comment and the name of the blog or Designer you are commenting about.

We hope you enjoy the new reveals as much as we do!

Last month the winner came from Anne's Blog. I wonder which Designer has the Grand Prize winner this month?


I had been thinking about trying a coloring technique that I hadn't used in a while and that was Perfect Pearls on top of dark cardstock. After I stamped my Irises in Versamark and heat embossed them with Belgian Cream, I used a black Perfect Medium Brush to apply Interference Green and Interference Violet Perfect Pearls to the leaves and flowers. It gave a lovely shimmery shine to the image.


So now my little flowers needed a frame. Oh, I know - I have just the thing! I had received a Die-sire Create-A-Card Christmas Present Die from a dear friend, Donna, when I had visited Florida last month. I was excited to use it and I although it was a "Christmas" die, it didn't need to be used just for Christmas cards. You know me - always trying to repurpose! So I cut and embossed the die from black cardstock and decided it needed highlighting on the raised areas. I took a Brilliance Moonlight White Pigment ink pad and swiped it lightly over the embossed cardstock. Clear Detail embossing powder was then applied and heated to achieve a rather distressed chalkboard look.


I covered a white 6" x 6" card base with Super Adhesive Sheet, removed the protective backing and centered the framed Irises piece on top before applying Peruvian Lily Velvet Glitter to the exposed adhesive. This is how it looked at that stage:


I liked the texture I had achieved but felt that it needed some more depth, so I decided to make another frame and pop it up on top with Dimensional Dots. I liked this much more:


The little single iris from the set was prepared the same way as the group of Iris and then I fussy cut it, to be tucked behind the sentiment tag. The sentiment, from Religious Sympathy Set 383,  was stamped in Versamark and heat embossed with Belgian White. I used one of the Spellbinders Fancy Tags to cut and emboss and then "scuffed" it up with a little more of the Moonlight White ink with some Clear Detail embossing powder. 


The white organdy ribbon was tied in a bow around the popped up frame - but it looked too new! So I took the heat gun to it and crinkled it to age it a little! Little self adhesive pearls were then added to the centers of the Irises and below the sentiment to complete my card.


I hope you've enjoyed my share today. Here is a sneak preview of some of the cards I've done with one of the other sets we are revealing this month,  Seasonal Trees; Hope you'll stop by again soon to check them out.


Remember to leave a comment for me and the rest of the Designers to be in the running to win all these sets that we've shared with you today! Next stop is the talented Eret.

Hugs,

Shona

Tuesday, September 17, 2013

ANOTHER ROUND OF GOLF!

Hi there, and thanks for stopping by!  Today I'm sharing another card that I made from the new Golf Set 509.  I needed a birthday card for a golfer, so this is what resulted:


Although I needed the card to be masculine, so not all glitzy and glamorous, I still wanted to add a little shine and pizzaz.  So using some Gold Detail embossing powder to "distress" the image panel and to edge the card, I was able to add some masculine bling! 

There's also some Peruvian Lily Velvet Glitter applied with a glue pen to the Celebrate embossed border!  You know a card's not complete without some glitter! Oh, and do you see that sparkle on the golf ball - it was embossed with Sparkle embossing powder.


I'm not sure, if in the last month I have not used Sparkle embossing powder somewhere on every card?  Every card "needs" sparkle - if there is one "go-to" embossing powder - then this is your man!  

Here is the end result - shiny AND masculine!


Hope you've enjoyed your "round of golf" with me today!  

Have a wonderful day and remember to take time to "Sparkle"!

Friday, September 13, 2013

FALL IS AROUND THE CORNER

I picked up a leaf yesterday from the driveway which had caught my eye, thinking that I would do something with it stamping wise. This morning, I was reading Judy Rozema's blog and I was inspired to try something with that leaf!  On my way over to the stamping room, I picked up another brightly colored leaf along with a clump of oak leaves with some acorns still attached. 

I dried the leaves off and applied Versamark directly to them and heat embossed them with Sparkle and Tuscan Star embossing powders from Sparkle N Sprinkle. I used an embossing pen to apply the ink to the acorns and then heat embossed them with Cappuccino Star.

I made the background panel from Kraft cardstock and added Sparkle and Tuscan Star randomly over the piece. 


The leaves were stuck to the panel with Tear-ific Tape and dimensionals. I edged the card base with Peruvian Lily velvet glitter which gave the card a frame.


Then came the hardest part, taking a photo!!  I was in my stamping room, outside in the back yard, in the front yard and in the kitchen, looking for the best lighting to capture the sparkle and shine. I finally got a close-to-real image when I propped it up it on the piano music stand with the piano light on it. Perhaps it was the black background that helped.  Not sure, but maybe I've just found my new light tent!


So that's it for today.  

Hope to see you back soon.

Shona