Showing posts with label SAS. Show all posts

Wednesday, April 14, 2021

Flocked Season's Greetings

 Hi there and thanks for stopping by my blog today! My April header is of my Star Magnolia tree. Although still small and fenced-off, so that the deer don't get to it - it is covered in these beautiful blooms. Can't wait till it reaches a height where it will be safe from those rats with antlers! 

Today I have a card for the Design Team of Christmas Craft Creations and this month the challenge is "No Stamping"!  So come on ladies - get out those dies and stencils and join in the fun. It is CCC's one year birthday this month, so there are a few prizes up for grabs!! I hope you will join in the fun?


I'm afraid I didn't have my camera up in the stamping room when I made my card, as it was raining torrentially and I didn't want to go over to get it!! So this will be a photoless post!

I began by die cutting the Tutti Designs Holly Panel from green cardstock layered with double stick adhesive. The cardstock side was taped down to the red cardstock, around the edges and under some of the leaves to keep it flat. I removed the protective backing from the die cut and applied Grass Green Flocking.

In hindsight, I should have attached the berries (red rhinestones) before putting down the flocking as the self-adhesive on some of the rhinestones was not terribly sticky!!

I die cut the Impression Obsession Christmas Stitched Words from the same green cardstock and put double sided tape behind, so that the Cherry Sparkle Flocking would adhere to the letters. These were then attached to the panel with mounting tape. The rhinestones were added now, but as I said it would have been easier had I done that before the flocking!

The front panel was attached to a white card base and that finished off my card for today! Please join in the fun. It's our birthday month, so several prizes are going to be up for grabs!


Here is a list of the products that I used:

Tutti Designs Holly Panel 

Impression Obsession Christmas Stitched Words

Grass Green Flocking

Cherry Sparkle Flocking

Self-Adhesive red pearls

Double Stick Tapes

I'd like to join in the following challenges with my card:

The Holly and Ivy Christmas Challenge #92: Anything Goes

Happy Little Stampers - April: Anything Goes with Dies

Merry Little Christmas Challenge #33: Anything Christmas Goes

World Wide Open Design Team Challenge #4: Anything Goes

Till next time, stay safe,


Shona


Thursday, September 20, 2018

Skating Penguin!

Hi there,

I'd like to share my last September 2018 Reveal card. Today I am using the cute Dancing Penguin Stamp Set 913.


I made the background by sticking a piece of Super Adhesive Sheet to the back of the designer paper.


The igloo was created by cutting a piece of a circle out of watercolor paper using a Grand Circle die in the Tangerine and then dry embossing with the Darice Brick Pattern embossing folder.


The snow drifts were made in the same way with Impression Obsession Hills die and then dry embossed with Crafts Too Polka Dots embossing folder. The hills and the igloo were then applied with Moonstone Glimmer Paste. These were set aside to dry while I worked on the Penguin.


The Penguin was stamped in the Stamp Platform in Black Shadow Hybrid Ink. I then removed the top of the Stamp Platform, so I could work on my coloring desk while leaving the image in the same spot on the platform.


I used Aquaflow Watercolors and Nuvo Alcohol Markers with a Blending Pen to color the penguin. The Hybrid ink allows both mediums to be used! Once colored I put the stamp platform back together again and then stamped with Clear Mark ink and heat embossed with Clear Detail over the top of the image. He was then fussy cut with the 5" Mini Scissors.


Brushable Glue and Snow White Flocking was applied to the belly and hat trim.


Nuvo Crystal Drops Morning Dew were applied to the beak, bell and feet for a glossy effect.


I cut out a window for the slider on the designer paper panel.


This was then mounted onto Cobalt Blue Mirror cardstock, leaving a space on the right side where the pull tab will move in and out.


The hills and igloo were mounted on to the card front. A strip of white cardstock was slipped into the slider space. The penguin was attached with mounting tape to the left hand side and a balsa wood arrow was covered with Clear Mark Ink and heat set with Cerulean. The arrow was attached with Nuvo Deluxe Adhesive.


The sentiments for the stamp set were stamped in the Stamp Platform with Empire Blue Hybrid Ink. They were then die cut with Memory Box Cross Stitched Frame Borders. The "Sending you" sentiment was layered on to the Cobalt Blue Mirror cardstock.


Snowflakes from the set were stamped in Clear Mark and embossed in White Detail on a strip of the Mirror Cardstock which would then be attached as the base of the easel card with the second sentiment centered on top.


The card base was made and then the card assembled. Here is the card before the penguin emerges!


... and here he is "sliding on by!"


Dancing Penguin Stamp Set 913
Nuvo Deluxe Adhesive
Crafts T00 Polka Dots embossing folder
Darice Brick Pattern embossing folder
Mounting Tape
IO 343-T die: Hills
Memory Box Cross Stitched Frame Borders die
Balsa wood arrow

I'd like to play along in the following challenges:
World Wide Open Design Team Challenge #09: Anything Goes
Classic Design Team Open Challenge September #9: anything Goes
Morgan's ArtWorld Open Challenge #9: anything Goes
2 Crafty Critter Crazies Challenge #18: Include a critter
Craft Stamper Take it Make it Challenge September: Anything Goes

Thanks so much for stopping by today, hope you've enjoyed my share?

Shona

Wednesday, February 21, 2018

Whispers of Comfort

Hi there,

Glad you stopped by today! I'd like to share a card I made using the Whispers of Comfort - Hydrangea Set 883, the little flower from the Happiness Greetings Set 886, both sets from the Sparkle N Sprinkle February Reveal. I also used a sentiment from an older Sympathy Set 382.


To begin with I stamped white card with the Nuvo Clear Mark ink and heat embossed with White Detail. Then I took the Distress Oxide Faded Jeans ink pad and swiped the pad over the entire image. The white embossing powder resists the blue ink.


I then took the Nuvo Water Brush and removed the ink from the image, it didn't take out all of the ink, but it took out the majority of the color. I also sprayed water, using the Nuvo Light Mist Sprayer, over the entire image, which gave the background a lovely mottled look.


Then I made my palette of water colors on my acrylic block. I used Aqua flow Pens Spiced Ginger, Lilac Blossom, Indigo Dawn and Fresh green.


The image was colored in - mixing water from the Nuvo Water Brush with the ink from the palette.


After the image was colored I made the frame using the three outside dies of the Tonic Topnote Trellis Layering Die. I cut this in my Tangerine out of the Craft Perfect Ivory Bouquet paper. Look at the detail of this gorgeous paper!


I then used the same two outline dies to cut out a piece of white card, layered with Super Adhesive Sheet.


The protective layer was removed and then the Ivory Bouquet die cut was placed on top, and the new Microfine Ocean Breeze Glitter was applied to the sticky surface.


When I put the colored image behind the frame, I didn't like the way the white lines showed at some spots, so I applied some Ocean Breeze glitter over the white line using the Nuvo Medium tip pen to give a glitter distressed look. Bubblegum glitter was also added to the flowers using the finer tipped Sakura Quickie Glue Pen.


Lemonade glitter was then applied to the butterfly using the Quickie Glue Pen.


The sentiment was stamped in Nuvo Clear Mark and heat embossed with Cerulean. This was then edged with some of the Distress Oxide Ink, Faded Jeans.


The white flowers were sprayed with water using the Nuvo Light Mist Sprayer then I touched the petals with the purple ink from my palette and allowed the ink to bleed into the petals.


When they were dry, I applied Bubblegum Glitter using the Nuvo Medium Glue Pen.


The easel card base was cut using the outside of the Tonic Topnote Trellis Layering Die.


The base was applied with the Oxide Distress Faded Jeans ink. Then the sentiment and flower were stamped in Clear Mark ink on to a piece of pink cardstock, that matched the outside sentiment. I used the Tonic Stamp Platform for this, swiping first with the Anti-Static Bag, to avoid any stray specks of the Cerulean embossing powder.


After assembling the card, I decided to add a few little Wedgewood Blue Nuvo Crystal Drops.


... and those drops finished off my card for today.


I hope you have enjoyed your visit today. Below is a list of the materials that I used in my project today, most of which can be found on the Sparkle N Sprinkle Website.

Sympathy Set 382
Nuvo Clear Mark, Distress Oxide Faded Jeans
Aqua Flow Pens: Spiced Ginger, Lilac Blossom,
Indigo Dawn, Fresh Green
3 white flowers
Mounting Tape

I'd like to play along in the following challenges:
Crafty Creations Challenge #360: Anything Goes
Frilly and Funkie: Dare to Resist
Scrapy Land Challenge #84: Anything Goes
Cards 4 Galz Challenge #65: Stamping
World Wide Open Design Team Challenge #2: Anything Goes
Classic Design Team Open Challenge #22: Anything Goes

Hope to see you back again soon!

Shona

Thursday, February 1, 2018

Foxy and Fabulous!

Hi there,

So glad you stopped by today, where I have another card from the SNS January Reveal Sets, this time using the Hello Foxy Set 882 from the January Reveal. I have also incorporated some images from the three silhouette sets: Wetlands 1 Set 790, Wetlands 2 Set 791 and Right Beside You Set 812.


I made my background by sponging Memento inks Summer Sky, Dandelion and Cantaloupe to glossy white cardstock, using the Jumbo Daubers. Once the ink was dry, I applied the anti-static bag to avoid getting any embossing powder specks where I didn't want them, and the background images were positioned in the Stamping Platform (this way the scene was created and stamped in a oner!). They were inked with Nuvo Clear Mark and were then heat embossed with Black Detail.


I went back and added another of the grasses and then trimmed the panel in the Tonic Guillotine.


Mr. Fox was stamped in Acorn Brown ink on Kraft paper and was colored with the Copics. After he was colored, he was fussy cut using the Tonic 5" Mini Scissors and then Snow White flocking was applied to his tail, ears and chest with Brushable Glue.


Here you can see the fuzziness of the flocking. Nuvo Crystal Drops Morning Dew was also applied to his eyes and nose.


A scrap strip of Super Adhesive Sheet was attached to piece of white cardstock and then run through the Tangerine with a couple of the Tonic Layered Clouds dies. The protective backing was removed and Twinkling Clouds Sparkle N Soft was applied to the exposed adhesive.


The sentiment was stamped in Nuvo Clear Mark and was heat embossed with the detailed embossing powder Sienna. I ran a copic marker around the Spellbinders Framed One Tags. This was attached by a brad over the bird, so that it could move. The panel was layered to glossy white and then to a black card base. The fox and cloud were attached with Wobbles, to finish off my moving parts card today.


Listed below are the products I used to make my card. Click on the product to go directly to the Sparkle N Sprinkle website.

Black Detail EP (EP171)
Wobbles
Jumbo Daubers
Tonic Layered Clouds dies
Copics
Memento Inks
Spellbinders Framed One Tags
Blue Brad

I'd like to play along in the following challenges with my card:
Crafty Gals Corner Challenge #158: Anything Goes
Crafty Creations Challenge #359: Anything Goes
Inspiration Destination Challenge Blog #143: Anything Goes
Crafty Sentiments Design Challenge Blog: Anything Goes
2 Crafty Critter Crazies Challenge #11: Include a critter

Hope you've enjoyed my share today,

Warm hugs,

Shona


Thursday, December 14, 2017

You're the Cat's Meow!

Hi there,

Today I'd like to share a fuzzy, embossed card using one of the Sparkle N Sprinkle November Reveal sets, the Cat's Meow #870 and another of the Craft Perfect Embossed Papers, Blush Heartbeat.


This little cat is just full of himself, and with the heart paper it called out fuzzy warm Valentine wishes! So I layered a piece of Super Adhesive Sheet to white cardstock and cut out the Spellbinders 3 different sized Scalloped Hearts.


The sentiment was stamped on to a little piece of embossable acetate in Nuvo Clear Mark, after swiping the acetate well with the anti-static bag, to keep off stray powder specks. This was then heat embossed with Bronze Rose. I used the Tonic Stamping Platform to do this for even stamping.


After taking off the protective layer of the Super Adhesive sheet, I applied Buff Flocking to the sticky surface. The acetate sentiment and two pieces of the Blush Heartbeat Specialty paper were placed behind the scalloped hearts.


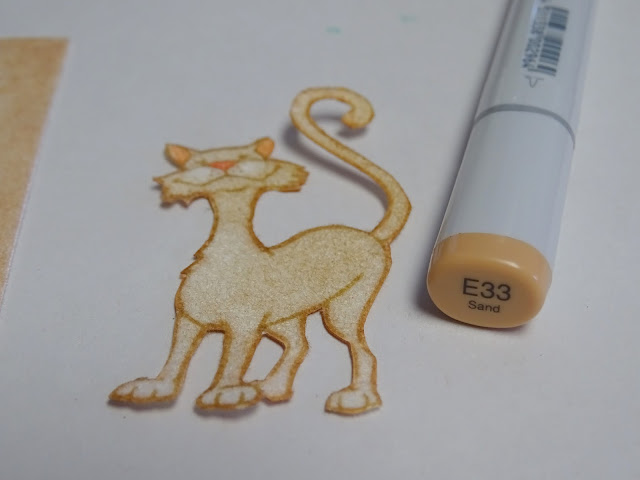
A scrap of Super Adhesive Sheet was layered to white cardstock and then Snow White flocking was burnished onto the exposed sticky surface, after the protective backing was removed. This was then placed in the Tonic Stamping Platform and the cat was stamped in Acorn Brown directly on top of the white flocking. I stamped it twice to give a crisp impression on top of the uneven flocking.


Acorn Brown was then sponged on top of the white flocking and Copic R02 and R22 marker were used to color the ears and nose. Just touch the flocking with the side of the Copic to color. The little cat was then fussy cut with Tonic Mini 5" scissors.


I then went around the outline with Copic E33 to reinstate the outline where it may have been cut into.


The white card base was edged with Nuvo Clear Mark ink and then heat embossed with Bronze Rose. Three heart shaped brads were dipped in Versamark and also heat embossed with the Bronze Rose.


The heart brads were placed on the card front and the panel was layered on to the edged card base. The little cat was popped up on the front with mounting tape and that finished off my project for the day. Here you can see the detail of the Bronze Rose embossing powder and the soft fuzziness of the Buff flocking.


Hope you've enjoyed my share. Below you will find links over at the store for most of the products that I used today:

Spellbinders Classic Scalloped Hearts
Copics

I'd like to join in the following challenges with my card:
2 Crafty Critters Crazies #9: Anything Goes with a Critter

Thanks for stopping by today. Hope you'll come back soon. Till then, warm, fuzzy hugs from a rather chilly New Jersey,

Shona