Showing posts with label Cyclamen Glitter. Show all posts

Sunday, April 30, 2017

SPARKLE N SPRINKLE'S MAY 1ST REVEAL

Hello and Welcome to the Sparkle N Sprinkle
 May Reveal Blog Hop!


NEW STORE - NEW BLOG - NEW PRODUCT LINES!
There are EIGHT new rubber stamp sets being released this month, plus a new Digi Papers set, and two huge Digi Bundles.

The sets are:

840 - Happy Flowers  
(digi version DIGI840FS - see below)

844 - True Beauty  
(digi version DIGI844B)
(digi version DIGI845BG)
(digi version DIGI846BG)


847 - Kaitlyn Mermaid  
(digi version DIGI847LS)

848 - Rory Batter Up  
(digi version DIGI848LS)
(digi version Digi849-850B - see below)
(digi version  Digi849-850B - see below)


Digi849-850B - Graduation Bundle (combines both sets plus includes additional images)

Digi840FS - Happy Flowers Bundle (includes additional images, decoupage sheets, digi papers)

Digi4004FS - Rainbow of Pastels Patterned Paper Pack (Digi Papers)


The new sets are 20% off until May 3, 2017, so after the blog hop, hop on over to the NEW STORE and have fun shopping - be sure to check out the OTHER amazing new products as well! 


Be sure to check out the new SNS Blog, which can be found here!


On May 3, ONE GRAND PRIZE WINNER will be selected from the comments left on all the Designers' blogs listed below.  Please leave a comment with each designer to be eligible for the Grand Prize (checked for compliance).  The Grand Prize Winner will be announced on the SNS Facebook page and the SNS New Blog.  


Also, when you purchase the digi versions of any of the SNS rubber sets, you are getting lots of extras that aren't available otherwise.  These extras include additional images not available with the rubber version, digi papers (in some cases), and now a cut file to use with your electronic cutting machines will also be included with all digi images purchased!

You're definitely going to want both the rubber versions as well as the digi versions of all our new releases.


The new sets are 20% off until May 3, 2017.  So once you finish the blog hop, head on over to the New Store and start shopping.

On May 3rd, ONE GRAND PRIZE WINNER will be selected from the comments left on the Designers' blogs listed below. Please leave a comment with each Designer in order to be eligible for the Grand Prize.  You never know who the Mystery Designer will be that has the winning comment.

The Grand Prize Winner, which will be announced on the SNS Facebook page and the SNS New Blog, will receive ALL of the new rubber stamp sets revealed this month.


The Blog Hop Order this month is:
(*Tip: if you have difficulty with a particular link, try clicking on the Designer's blog title to send you to their Home page.)


We hope you enjoy the New Reveal Blog Hop as much as we do.  Thanks for joining us and remember to comment on each of the Designers' blogs to be eligible for the Grand Prize.  
 Wonder who the Mystery Host will be this month????


Have you checked out the SNS YouTube Channel featuring Demo Donna?  If not, then you are in for a real treat.  Subscribe today to get all the latest Demo Donna tips and techniques!


I decided to use the Happy Flowers Set 840. I really love this little set with the fun sentiments and the pretty flowers. This time I chose to do my flowers in a row and use the embossing resist technique. Hope you enjoy my share today.


I began by embossing the sentiment in Versamark and heat setting in Black Detail, the flower image was then stamped to the left and right of the sentiment in Versamark and heat embossed this time with White Detail.


After the image and sentiment were heat set, I stamped two of my new inks, Oxide Distress: Peeled Paint and Broken China, onto my craft sheet and then with a water brush, simply brushed the "paint" over the top of the embossing, which resisted the inks perfectly.


Next I started to "paint" with my new Aqua Flow Markers. I used Soft Rose, Fresh Green (Spring Meadow collection) and Aqua Splash (Summer Holiday Collection) and a little Evergreen Fern (Autumn Woodland Collection) to go over the top of the Distress Inks. The markers painted beautifully. They have a very pointed tip that allows you to get in to the tiniest spaces.


I went over the flowers a couple of times, until I was happy with the coverage. Using the Nuvo Fine Tip Glue Pen I applied Cyclamen (G1090) and Spirited Green (G1070) to the flowers and the leaves.


A lovely sparkly effect. Along with the new Aqua Flow Markers, I also used the new Nuvo Glow Drops. I added Banana Split to the centers of the flowers, some Apple Sour to the Grass and then Blue Crush to the sky.


Here (the card on the bottom) is how it looks without the light on it:


... and here it is in the darkness:


I'll be using these Glow Drops in my next two cards coming up this month. Here is a list of the products that you can purchase over on the SNS website.

Versamark, Distress Oxide: Peeled Paint, Broken China
Cyclamen (G1090), Spirited Green (G1070)
Nuvo Glow Drops: Apple Sour, Blue Crush, Banana Split

Hope you've enjoyed your visit today. Now you need to stop over to the amazing Donna's blog. She is sure to have a show stopper to share with you.

Hugs,

Shona

Saturday, November 30, 2013

SPARKLE N SPRINKLE'S DECEMBER REVEAL - GERANIUMS ABOUND

Hi there and welcome to the latest Sparkle N Sprinkle Reveal where we are featuring the beautiful Geranium set 519 by Beccy Muir: 


I love that this set has a silhouette stamp in it.  Great for two step-stamping (remember back when that was all the rage?).  Let's take a trip down memory lane, shall we? ..... 

... and in-keeping with a vintage, romantic look, here's what I came up with:


The ribbon was given to me by a neighbor after her mother-in-law passed away. She has no idea how old it is, but given the dates on some of the items that I was given, it's at least 10 years old. Anyone remember using or wearing it? 

To make things look uniformly "vintage" I went with a lace background, using Champagne and Cyclamen glitters, then continued with the Floral Ovals frames from Spellbinders.

I stamped the outline of the geranium in StazOn black on watercolor paper and then came back with the silhouette stamp, to which I had directly applied the pinks and green watercolor crayons, misted them with water and stamped on top of the detailed image.  I love the outside-the-line look that gets achieved with this method of stamping.  I then went in with the glue pen and added some more Cyclamen glitter to the petals along with brass brad centers.

I'm kind of wishing I had used the cracked ice technique on the image, but was happy the way the Antiquities floral frame came out? So delicate and pretty.  You'll find complete instructions right here, if needed. Here she is - one more time - in all her glory!:


Would you like to get in the running to win some of these products?  If so, it's really easy, you have 5 chances to win:
the first chance is in our "Beautiful Geraniums" Release Contest
 and
four more chances with the SNS monthly challenge where the monthly theme is always "Anything Goes with Glitter, Embossing Powder and/or Flocking."

The Geranium stamp set is available on line or is included in Jazzy Jill's Technique Video for the month.


The Geraniums stamp set, one glitter and one EP will be awarded to one commenter.
To win, just come to our Mystery Designer Party!


How the Mystery Party works:

On one of the participating blogs below, a Commenter will be selected to receive the prize
No one knows who the Mystery Designer is, so you may wish to visit each blog to leave a comment.

The winner will be announced on December 3 on Facebook, the SNS blog, and on our blogs:

Shona Erlenborn (that's me)

The beautiful Geraniums set is available at 20% off 
as part of our December specials. 
Just use the code DEC20 in the COMMENTS SECTION 
when checking out in the SNS on-line store 
to receive these brand new sets at 20% off.
Promotion valid through December 3.(sorry, credit card customers only. Total will be manually adjusted. Or phone the SNS shoppe on Wednesday and ask them to manually adjust the charge on the phone for you).


So pop on over and check out the other blogs to be in the running for some awesome prizes and have a look at the other Design Team Member's takes on the new Geranium set.

Thanks for stopping by,

Shona

Friday, June 24, 2011

Two Passions in One

Well I came down and looked out the kitchen window this morning.  The deer have been in last night and had themselves quite the gourmet meal!  I now have a sinking feeling in my tummy!  Well, I'll just have to get out the nasty smelling spray, it's raining, so we won't be eating out on the porch today anyway.  As you know, if you've already read my profile, gardening and stamping are two of my favorite passions.  That's why I was furious this morning!  I love taking pictures of my yard, as each new plant comes into bloom (of course, I'll have to wait a couple of weeks now, 'till they come back), but there is usually something new every week.  Today, I want to show how I put the two passions together in my latest card.

Our challenge for this month with Sparkle N Sprinkle, was to create a card using at least one glittery product and a greeting.  I had done a Scrapbooking Convention with Margaret, about a month ago, and we demonstrated on how to add "bling" to photos.  So I decided to go that route for my glittery card.

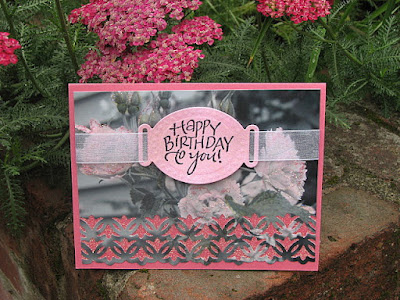
I took a photo out in my yard and sent it down to Costco, but had it developed in black and white, instead of color.  I took four Copic markers: two pink, RV02 Sugar Almond Pink and RV42 Salmon Pink, 0 the Colorless Blender and G99 Olive and put color back into the photo.


Next I punched the bottom of the photo with the Tulip punch from EK Success.                           


Sparkle N Sprinkle has started to carry this great 2 1/2" tear-ific tape (SAT11).  It is wonderful for making all kinds of backgrounds - just apply it to card stock and remove the protective backing and apply glitter, flocking, tinsel, even beads - it is very sticky and everything sticks to it!  I took this tape and stuck it behind the punched area of the  photo.  I then applied Cyclamen Glitter (G1090) which stuck to the open areas of the punch.


Cut the photo down to 4" x 5 1/4" at this point, so it will fit nicely on to your finished card.  Then using the Quickie Glue Pen draw around the petals and leaves of the roses and add different glitters (one at a time).  For my card, I used Cyclamen (G1090), Bubblegum (G1088) and my all-time favorite SNS Glitter Sparkling Snow (G1003).  When you want some bling, but don't need color - then he's your man!  Put the photo aside at this point to dry (although it only takes five minutes).  Meanwhile make the label for the card.

Take a piece of pink card and stamp your sentiment in Staz-On ink.  I used the saying Happy Birthday to You from the new  Happy Birthday Set 416  from Sparkle N Sprinkle.  A very versatile set, full of great sayings for every birthday occasion!            

Cut and emboss the saying with Spellbinder's Ribbon Tag Trio Two.  Then take a Versamark pad and cover the entire label with the ink.  Heat emboss with the "one and only" Sparkle Embossing Powder.  It gives a lovely sparkly, intensified color to the label.


Thread a piece of white organdy ribbon through the label as shown and using dimensionals attach it to the front of the card.

Tape the ribbon down on the back of the photo with Tear-ific tape and then remove the protective backing of the 2 1/2" tape then you can go ahead and stick it down to your card front.

Here is the finished card:

I hope you have enjoyed making this card with me.  I also hope that you will see the endless possibilities you have with your very own black and white photos.   Have fun!