Showing posts with label Gold Detail EP. Show all posts

Wednesday, March 10, 2021

Pink Poinsettias

 Hi folks and welcome to March! We're expecting to get up in the 60's this week.  Since it is so warm my bees are out and about and are already bringing in some light colored pollen!  After scouring the yard for what it might be that they are finding, I was thrilled to see them foraging on a big clump of heather in the front yard. My March header is one of these busy girls!


With Spring just around the corner, we often think flowers, and it just so happens that the theme over at Christmas Craft Creations for the month of March is also flowers - Christmas flowers! 


I chose to feature the Poinsettia! I began with stamping the Stampendous Poinsettia Background in Versamark and heat embossing with Gold Detail. 


I colored in the poinsettia flowers with Worn Lipstick Distress Oxide ink with a small blender.


I cut the white border off and layered to pink cardstock before layering to a white cardbase. The poinsettia from the Recollections Stamp and Die Set (which happens to be this month's prize over on the Challenge) was also stamped in Versamark and heat embossed with gold detail.


The flower was also inked with the Worn Lipstick.


The flower portion was then die cut.


I inked, heat embossed and colored the petals a third time and the smaller inside petals were then fussy cut.


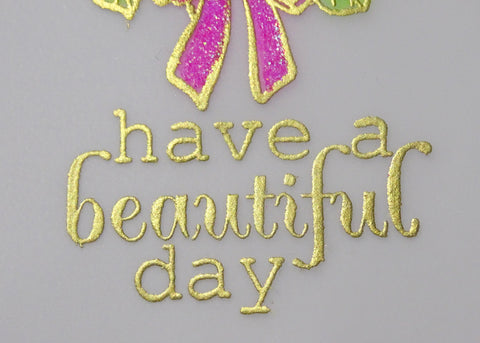
I then attached the three-layered poinsettia to the prepared card front with mounting tape. Nuvo Crystal Drops Dandelion Yellow were added to the centers of all the flowers. The sentiment from Sparkle N Sprinkle set Nesties Xmas Trees was stamped on pink card with Versamark and also heat embossed in Gold Detail. I hand cut a little banner and attached the sentiment also with mounting tape.


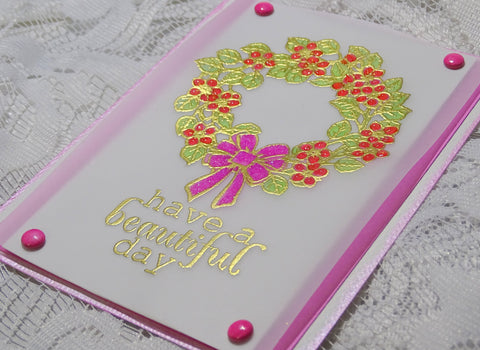
Gold baker's twine was wrapped around the spine of the card to finish off my project for today. Taken from this angle, you lose the sparkle of the embossing powder, but you can see how detailed the embossing is.


I hope I have inspired you to join in along with the challenge and have a chance at winning the Recollections Stamp and Die set. Below is a list of all the products that I used.

Stampendous Poinsettia Background

Sparkle N Sprinkle Nesties Xmas Trees

Recollections Stamp and Die Set 529319

Versamark Ink

Gold Detail embossing powder

Distress Oxide Ink Worn Lipstick

Dauber

Nuvo Crystal Drops Dandelion Yellow

Gold bakers twine

Mounting Tape


I'd like to join in the following challenges with my card:

Christmas Crafts all Year 'Round: March Challenge: Something that starts with E or F (Embossing (heat) and Flowers)

The Holly and Ivy Challenge #90: Anything Goes

MLCCB #32: March: Anything Goes


Take care until next time!

Shona

Thursday, September 28, 2017

Delight in the Beauty!

Hi there,

Today I'd like to share a card which uses the new Lovely Magnolia Set 853 from the September Reveal. Such a pretty and versatile set.


To make the background I cut the Spellbinders Tropical Paradise die from black cardstock. This was layered on to a piece of Super Adhesive Sheet, after removing the protective backing and the new Microfine 24kt Gold glitter was burnished into the exposed adhesive.


The background was layered on to a cream cardbase. Then it was on to the flowers. The small flower was stamped six times onto cream cardstock in Versamark and was then heat embossed with Gold Detail. The large flower was stamped and embossed in Gold Detail once on cream cardstock and then again onto Kraft. The leaves and stem were cut off the cream version using the 5" Mini Scissors. They are so good for fussy cutting! All the little flowers were also fussy cut.


All the flowers were colored with the three Aqua Flow Watercolor Markers: Lemon Zest, Fresh Green and Spiced Ginger. These are wonderful to use for watercoloring, they blend really nicely.


A little Green Iris glitter was applied with the Quickie Glue Pen to the centers of the flowers.


Lemonade glitter was applied to the petals of the flowers again with the glue pen.


The big colored flower was attached to the Kraft version with foam mounting tape. A little of the Nuvo Mother of Pearl Embellishment Mousse was added to the leaves.


The sentiment was stamped in Versamark on cream cardstock and was heat embossed with Gold Detail again. This was die cut with the Sizzix Thinlits Dotted Ovals, the next larger die was used to cut the larger oval and these two pieces were sponged with a little Nuvo Mother of Pearl Embellishment Mousse. A little gold thread bow was threaded through a couple of the dots before being layered with Mounting Tape.


The card was then put together as shown using Tear-ific Tape and Mounting Tape.


Here is a list of the products used to make the card, most of which can be found in the SNS store.

Embossing Powders: Gold Detail (EP168)
Inks: Versamark
Nuvo Aquaflow Pens: Lemon Zest, Fresh Green, Spiced Ginger
Spellbinders Tropical Paradise
Sizzix Thinlits Dotted Ovals

I'd like to play along in the following challenges:
Crafty Gals Corner Challenge #142: Anything Goes
Double D Challenges: Sentiment/Quotes
Stampavie and More Challenge #290: Lots of Flowers
World Wide Open Design Team Challenge #26: Anything Goes


Hope you've enjoyed my share today? Hope to see you back again soon!

Hugs,

Shona

Thursday, August 31, 2017

Golden Dream Catcher

Hi there, 

Today I'd like to share another card from the August Reveal using the Dream Catcher Maiden Set 865


I began by making the background for my maiden. I applied Nuvo Golden Crystal Glimmer Paste through the Dreamweaver Petit Fern stencil onto Kraft cardstock. This was set aside to dry.
The maiden image was stamped on to vellum with Versamark and then heat embossed with Gold Detail.
The image was colored with Copics from the back - this never looks very good! 
But when it is turned over to the front the colors are nice and muted. The image was then stuck down to a piece of sticker paper.
I fussy cut around the feathers at the bottom with my Tonic Mini Scissors and then used the Spellbinders Decagons die and had the feathers come over the bottom of the die.
The sentiment was stamped in Versamark and it was also embossed with Gold Detail. This was then cut out using Spellbinders Framed Tags One.
Indian Gold Embellishment Mousse was sponged on the background piece and around the edges of the sentiment.
To assemble the card I popped up the maiden on mounting tape. a piece of gold ribbon was attached to the sentiment and was wrapped around the back of the card front, leaving some of the feathers on top of the ribbon. The cardfront was layered to cream and then to a Kraft card base. Some Nuvo Golden Sunset Glitter Drops were added to the sentiment and beaded areas on the dream catcher.
 
... and that finished up my card for today. Hope you've enjoyed my share? The photo below shows the various dimensions of the different products.
Here is a list of the products used that you will find in the store:
I'd like to join in the following challenges with my card today:
Cardz 4 Galz: Get Krafty - Challenge 55: Use Kraft cardstock
Scrapy Land (Challenge 72): Using any die cut that Scrapy Land Sells
Thanks so much for stopping by!
Shona

Friday, July 14, 2017

SPARKLE N SPRINKLE'S JULY REVEAL

           Welcome to the Sparkle N Sprinkle
 Christmas In July ðŸŽ„🎅🤶 New Reveal Blog Hop!
(where apparently, I'm dreaming of a white and gold one!)


We have six new Christmas themed rubber stamp sets plus two huge digi bundles being revealed this month. 

The sets are:


(Digital Version DIGI855FS
(Digital Version DIGI858BG)


  (Digital Version DIGI860SG)
(Digital Version DIGI861SG)
(Digital Version DIGI862B - huge digi bundle)

(Digital Version DIGI868FS)

DIGI4005FS - Winter Greetings digi papers


When you purchase the digi versions of any of the SNS rubber sets, you are getting lots of extras that aren't available otherwise.  These extras include additional images not available with the rubber version, digi papers (in some cases), and now a cut file to use with your electronic cutting machines will also be included with all digi images purchased!

You're definitely going to want both the rubber versions as well as the digi versions of all our new releases.

The new sets are 20% off until July 20, 2017.  So once you finish the blog hop, head on over to the New Store and start shopping.

On July 18th, ONE GRAND PRIZE WINNER will be selected from the comments left on the Designers' blogs listed below. Please leave a comment with each Designer in order to be eligible for the Grand Prize.  You never know who the Mystery Designer will be that has the winning comment.

The Grand Prize Winner, which will be announced on the SNS Facebook page and the SNS Blog, will receive ALL of the new rubber stamp sets revealed this month.

The Blog Hop Order this month is:


(*Tip: if you have difficulty with a particular link, try clicking on the Designer's blog title to send you to their Home page.)


We hope you enjoy the New Reveal Blog Hop as much as we do.  Thanks for joining us and remember to comment on each of the Designers' blogs to be eligible for the Grand Prize.  

 Wonder who the Mystery Host will be this month????


Have you checked out the SNS YouTube Channel featuring Demo Donna?  If not, then you are in for a real treat.  Subscribe today to get all the latest Demo Donna tips and techniques!


We are very happy to announce the new and improved SNS Creative Challenge is now being held on Facebook. 

 Head on over to the Sparkle N Sprinkle Creative Challenge group and ask to join today.  This is a closed group, but we want anyone who wants to participate to join (just trying to keep out spammers 😀).  You can join today!

 The new challenge began July 1 and will run from the 1st - 25th of each month.  Be sure to read the Challenge Rules before adding a photo.  A SNS image (either rubber or digi) needs to be used.  If you don't have any yet, no worries, there are some Freebies located on the new website.  They are located on the Home page, just scroll down a bit to see them:

The Winner and Top Three will be posted on the last day of each month.  The Winner will receive a $15 Gift Certificate to the new on-line store.  Please review all the Challenge Rules before submitting your photo.

We hope to see you soon in our new Facebook Group!


So, on with my card. First I stamped the sentiment from the new Spirit of Christmas Poinsettias Set 862 in Versamark and then heat embossed with Gold Detail embossing powder. This is a lovely fine powder and it is great for detailed stamps.


Then I stamped the larger image three times in Versamark and heat embossed again with the Gold Detail


I then fussy cut the actual Poinsettia flowers with my Tonic 5" Mini snips. These scissors cut beautifully and they don't get gunky with adhesive which is their best attribute!


I cut the sentiment with the Spellbinders Classic Scalloped Circles and then started to arrange the flowers above and below the sentiment, some attaching with 1/4" Tear-ific Tape and others with Mounting Foam, to give it more dimension.


I used a freebie Poinsettia embossing folder that I received with a magazine. After running the white cardstock through the machine, I sponged on some Indian Gold Nuvo Embellishment Mousse, just to give it some gold highlights.


This was then layered on to Gold Mirror Cardstock. This is difficult to photograph, but looks really nice in real life!


I scored around the edge of a white piece of card to which the Gold Mirror Cardstock was layered. Then the white layer was attached to a gold card base. I then added a few different sized Honey Gold Nuvo Glitter Drops around the card to finish it off.

Hope you liked my project and are enjoying seeing the team's creations with this month's fun sets. Next on the hop is our talented Jess.

Here is a shopping list of all the SNS products used in my card today:
Tonic 5” Mini Scissors

I'd like to join in the following challenges:
Cut it Up Challenge #126: Christmas in July, using a die cut (SB Classic Scalloped Circles)
Pause Dream Enjoy Challenge #181: Emboss it (wet or dry)
Aud Sentiments Challenge 184: Christmas in July + Sentiment
Sweet Stampin' Christmas: July: Anything Christmas Goes
Creative Moments Challenge 122: Anything Goes with a twist Christmas in July
Mod Squad Challenge: Make the sentiment the Focal Point
Classic Design Team Open Challenge Blog: Anything Goes - July

Thursday, April 20, 2017

Christmas Holly Blessings

Hi there, 
Today I'd like to share with you a card made using the pretty Christmas Holly Blessings Set 841 from the April Reveal..
I began by stamping the image on white cardstock with Memento Olive Grove. I fussy cut around the vase and die cut the piece with Memory Box Cross Stitched Frame Borders, using the out of the box technique (placing the edge of the vase over the top of the frame so it doesn't get cut off).
 
Next I colored the vase with the Nuvo Fine and Medium Tip Glue Pens and left it till it got tacky, then I applied Nuvo Gilding FlakesRadiant Gold to the vase for a lovely shiny appearance.
The image was colored with Copics: BG93, YG03, G99, R29 and then I began going over the berries with the Nuvo Red Berry Crystal Drops. It is best to apply the drops a little at a time, leaving space around them and letting them dry before going in and applying more, otherwise they will run in to one another and become one big blob.
At this point I made my background, which was a white piece of cardstock, run through a Cardmaker Magazine Holly Embossing Folder. This was then daubed with Spring Green Nuvo Embellishment Mousse.
The berries were also applied to the border in stages, like the image. Sentiment, from the set was stamped in Versamark and heat embossed with Gold Detail. This was cut out from one of the smaller dies from the MB die set and was sponged with Lady Bug Memento ink before the die was removed. Three little Red Berry drops were added to the sentiment and then both the image and sentiment were popped up with mounting tape onto the background , which had been previously layered to red cardstock with 1/4" Tear-ific Tape.
That finishes off my card for today. Hope you've enjoyed my share? 
I'd like to play in the following challenges with my card:
Christmas at Sweet Stamping: April - Anything Christmas
Holly and the Ivy Challenge: Anything Christmas
Make My Monday: Challenge #44: Embossing Heat or Dry
Here is a list of the products used in my project. Click on the product and it will take you directly to the SNS store, where they can be purchased.
Thanks for stopping by today,
Hugs,
Shona

Thursday, February 23, 2017

Leafy Flower Spring Wreath

Hi there, 
Today I'd like to share with you a card made with the February Reveal Set 815: Leafy Flower Spring Wreath.
 
I began by stamping on top of a piece of vellum in Versamark and heat embossed with Gold Detail. This fine grained powder is great for detailed stamps and sentiments. 
Turning the vellum over to the back, I colored in the image using Copics. The gold embossed lines hide any "coloring outside the lines". 
After I wiped the front of my vellum panel with the anti static bag, (to make sure there would be no unwanted strays) I stamped one of the sentiments from the same set below the wreath in Versamark and heat embossed again using the Gold Detail powder.
 
I took four pink brads and "blinged" them with Raspberry Tart. First dipping them in Versamark (alternatively you could just heat up the brad with your heating tool) and then dip in to your jar of embossing powder. Once heat set this gives a lovely shiny finish to your brads, in matching colors to your projects.
The vellum was attached by the brads to a piece of white glossy cardstock (this ensures a nice bright contrast). Drops of Nuvo Jewel Drops Strawberry Coulis were applied to the berries and left to dry. 
After they were dry (an hour at most), Mauvelous Semi Transparent Glitter was applied to the bow with the Nuvo Fine Tip  Pen.
The panel was then mounted with foam to a piece of pink cardstock slightly wider than the vellum. A piece of textured white cardstock was used as the card base, after being edged with Peony Pink Nuvo Embellishment Mousse.
Here you can see the dimension of the Jewel Drops and the Gold embossing.
I'd like to enter my card in the following challenges:
Aurora Wings Challenge #44: Anything goes with hand colored image
Crafting From the Heart #147: Anything goes
Hope you've enjoyed my share today?
Thanks for stopping by,
Big hugs,
Shona