Showing posts with label Velvet Glitter. Show all posts

Wednesday, February 7, 2018

On Your Special Day

Hi there, 

Today I'd like to share another card using the Ornate Greeting Set 880 from the January Reveal along with one of Tonic's beautiful dies, Floral Blooms


I started with making my base panel using the lovely Tonic die, Floral Blooms. I cut a piece of Rinea Glossy Gold Foil with the die. 


Cutting the die on the Tangerine gave a wonderfully detailed and clean cut.


A piece of Super Adhesive Sheet was then layered on top of Tonic Harvest Gold mirror cardstock.


The protective layer of the Super Adhesive Sheet was removed and then the foil die cut was placed on top of the adhesive and the new Butterscotch Microfine Glitter was burnished in.


The background was layered on to a cream card base. The sentiment from the Ornate Greetings
was applied with Nuvo Clear Mark ink to cream cardstock and then heat embossed with Gold Detail.
After die cutting with the Spellbinder's Mega Ovals, I sponged on some Nuvo Oyster Pearl embellishment mousse.


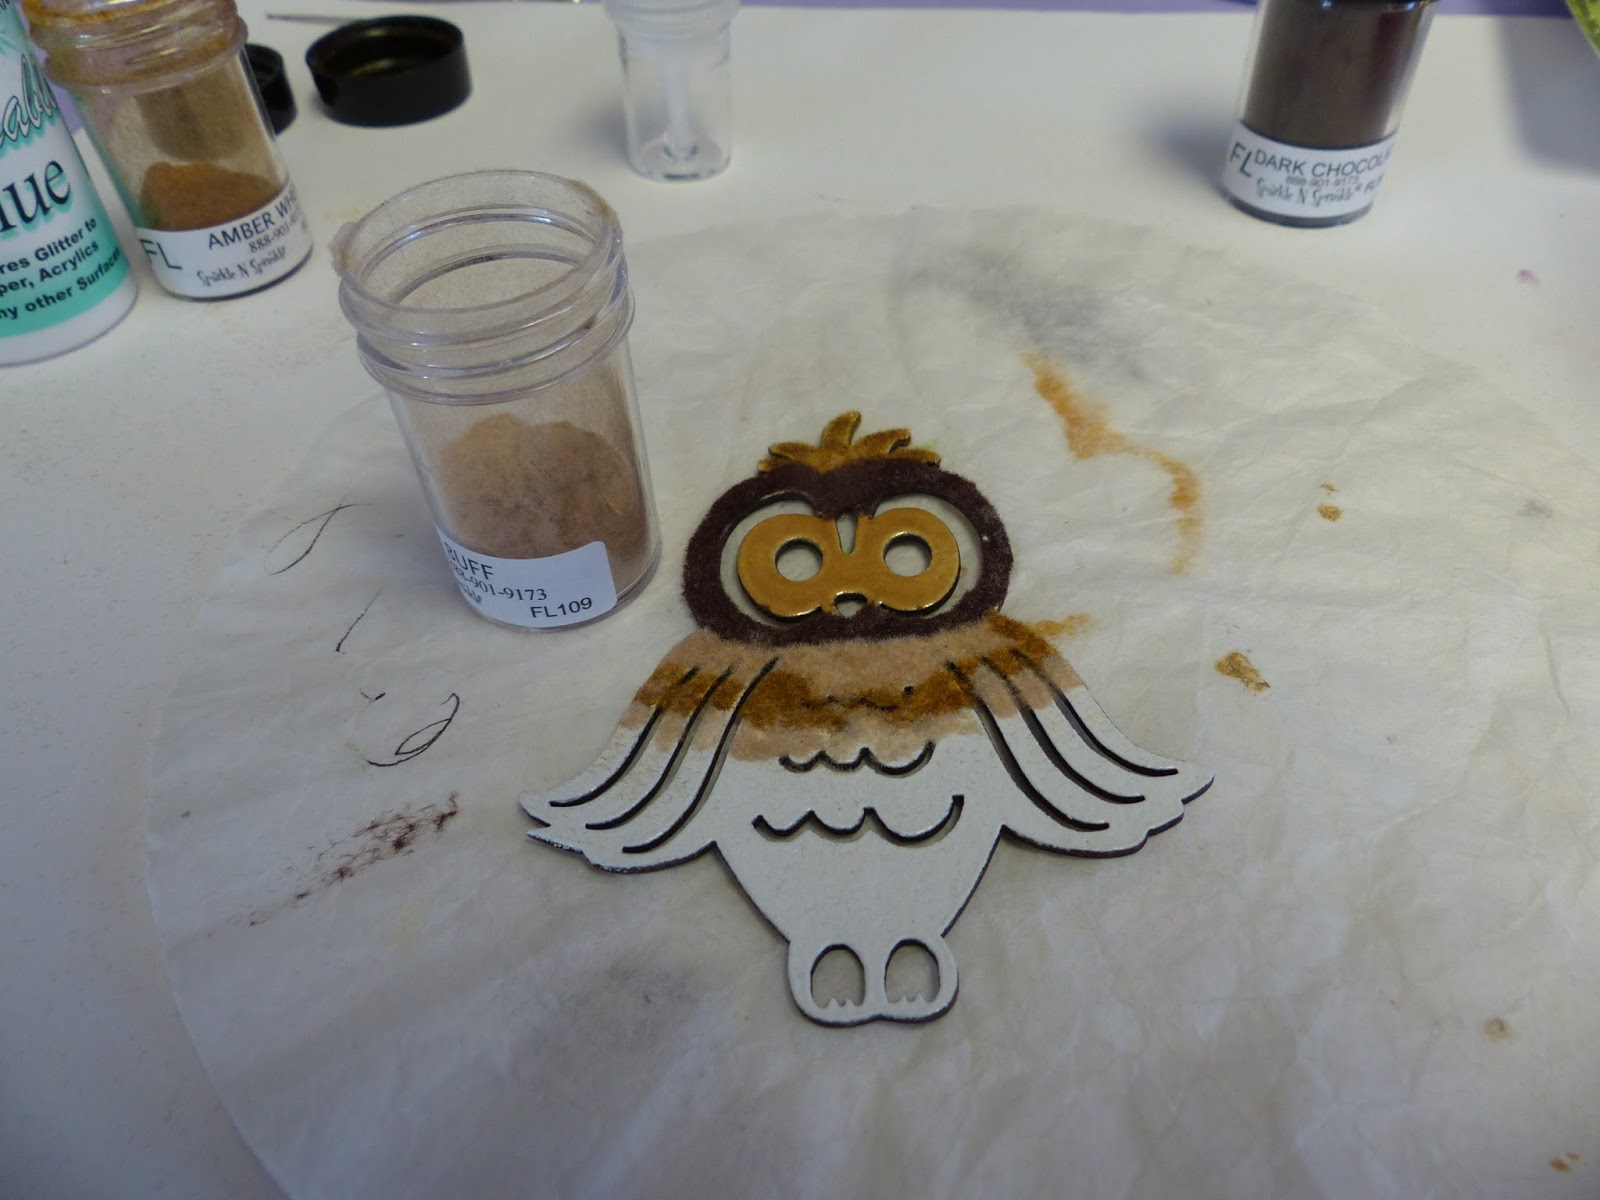
The bird chipboard piece was applied with an old Versamark ink pad that I keep specifically for chipboard. I gave the bird two coats of the Gold Detail embossing powder and before the second coat cooled I sprinkled on some Magic Speckle. I love the results that the Magic Speckle gives depending which other powder you add it to. This time it gave off a slightly bluish hue to it.


After attaching the bird to the sentiment with a thin strip of mounting tape, I added the sentiment panel
to the background with a little gold brad and gold thread. Three little Honey Gold Nuvo Glitter Drops
were then added to the base of the sentiment. This finished off my card for today.


Thanks for stopping by today. Below you'll find links to most of the products I used to make my card.

Gold Detail (EP168), Magic Speckle (EP175)
Rinea Glossy Gold Paper Foil
Spellbinders Mega Ovals Large
Recollections Bird Chipboard Piece
Gold Brad
Mounting Tape
Gold Thread

I'd also like to join in the following challenges with this card:
Scrapy Land Challenge #83: Anything Goes (use brand of die that they sell)

Warm Hugs,

Shona


Thursday, August 3, 2017

Robin Wreath Christmas Greetings

Hi there, 
I'm back today with another card from the SNS July Reveal using the cute Winter Greeting Bird and Wreath Set 855.
I ran the Sizzix Holly embossing folder with green cardstock through my embossing machine. Spring Green Nuvo Embellishment Mousse was then sponged on the piece.
The wreath image was stamped in Versamark on white cardstock and was heat embossed with Christmas Green. I fussy cut with my Tonic Mini Scissors then the holly leaves were colored with a Copic Green marker and then the Spring Green Mouse was sponged around the inner and outer edges.
The berries were colored with the Red Berry Nuvo Crystal Drops. I did this in stages so the drops would dry between applications, so that they didn't become one large berry! 
The robins were stamped with Memento Tuxedo Black and colored with Copic markers. I fussy cut them with my Tonic 5" Mini Scissors. I took a strand of 1/4" Tear-ific Tape and rolled it between my hands to make a little rope and then passed it through a "puddle" of Gypsy Red Velvet Glitter to make a sparkly little red rope!
I then took a silver brad and dipped it in the Versamark pad and heat set it with Red Apple. This was wrapped around the little rope bow and attached to the bottom of the wreath.
The wreath was then popped up on the embossed background and with mounting tape and the little birds were attached with tape and foam as shown. This was layered to red cardstock before being layered to a white card base. The sentiment was stamped on glossy white in Versamark and heat set with Christmas Green, was fussy cut and attached with mounting tape.
This finished up my card for today, Below are the products used on this card. Just click on the item to find them in the SNS store.
I'd like to play along in the following challenges:
Crafty Creations Challenges: Anything Goes
Sunny Day Crafting #46: E is for emboss
World Wide Open Design Team Challenge 24: Anything Goes
The Merry Christmas Challenge #28: Animals

Thanks so much for stopping by!

Shona

Thursday, July 27, 2017

Elf Peeker!

Hi there, 
Back with another design using one of the new July Sets, Elf Peeker #858
Such a fun little image, Elf Peeker, Set 858 and I wanted him to be appear peeking out from behind something, so decided to make a step card. To begin with I stamped this little guy in Memento Tuxedo Black and colored him with Copics and then fussy cut him out with the Tonic 5" Mini Scissors, leaving a piece to add him to the back of the card front.
You can see the little band of cardstock that I left on the picture below. Then it was time to embellish the little fellow! Nuvo Glitter Drops White Blizzard drops were added to his hat, bauble and bell!
So the background was embellished with Gypsy Red Velvet Glitter and scraps of Super Adhesive Sheets.
I continued with all the panel fronts putting on the adhesive scraps to each fold, then applying the Gypsy Red Glitter.
Our little elf was then decorated with Spirited Green Glitter applied with the Quickie Glue Pen.
 
Nuvo Morning Dew Crystal Drops were then applied to his eyes for some more dimension.
 
So here is our little man in all his glittery Christmas glory! The sentiment was punched out using a bubble speech punch, then applied with Versamark and heat embossed with Red Apple ( EP276). The sentiment was done the same way and just fussy cut out. They were all popped up on the card base.
Hope you've enjoyed your visit today? Leave a comment and let me know you did! 
Here are the products used for this card today. Click on the product to find the products in the SNS store:
Gypsy Red (GM2005)Spirited Green (G1070)
Tonic 5" Mini Scissors
Nuvo Crystal Drops Morning Dew
Hope to see you back here soon!
I'd like to enter my card in the following challenges:
Sweet Stampin' Christmas: Christmas Anything Goes
One Crazy Stamper: Anything Goes
Shona

Wednesday, April 20, 2016

HOPE YOUR BIRTHDAY'S A HOOT

Hi there,

I'm back today to share another card using the Want 2 Scrap Chipboard Embellishments, this cute little Owl and the DC Twin Trunk Tree. I have also used a Dreamweaver Stencil, some Gold Metallic Creative Medium and the new Nuvo Crystal drops!


I began my project with taping the Dreamweaver Spiral Dots Stencil to black cardstock, taping the top first, then the bottom and then the sides. After applying the Gold Metallic Creative Medium remove the tape in the reverse order, this will give you a nice clean, unsmudged result.


Set this aside to try. I left it overnight. For my little Want 2 Scrap owl, I applied two coats of White Detail embossing powder, as I wanted some white to show through when he was finished.


I went over the rings of his eyes with the Versamarker pen and heat embossed with Gold Coast.  


Then I began "coloring him in with Brushable Glue and three different Flockings, Dark Chocolate, Amber Wheat and Buff. I started at the top (with his crest) and worked my way down his body giving him uneven "stripes" of the different colors! I just brushed on another "stripe" of glue and applied another color of the Flocking, down the body until he was completely covered, with his little Dark Chocolate feet!


After he was colored in I covered a piece of black cardstock with Super Adhesive Sheet and cut it to the "approximate" shape of the owl. I removed the protective backing and placed the owl over the top.


I burnished Black Suede Velvet Glitter into all the nooks of the little owl. Yes, he looked a bit of a mess at this point!


But he cleaned up well with a couple of swipes of the chubby brush!


The sentiment shown above from the Owlettes Set 511, was stamped in Versamark and heat embossed in Teddy Brown and after it was die cut and embossed with Spellbinders Ribbon Tag Trio Two, it was highlighted around the edges with three of the new Nuvo Crystal Drops: Buttermilk, Dandelion Yellow and Copper Penny. 

Then on to his perch! Want 2 Scrap also carries these little paper silhouettes which is what this was. This one is the Twin Trunk Tree. After cutting one of trees away, I covered it in Versamark and heat embossed the branches with Sienna (which is one of the Tuscany Colors), I then chose Pebbled Copper for the "trunk". I did a couple of coats of each just to bulk it up a bit, as the silhouettes are much flimsier than the chipboard pieces. You will see in the photo below that there is a checkered finish to it too, after a couple of coats of embossing powder, the checks disappeared!


The tree was set sideways for his branch. The sentiment was attached with dimensional foam behind it and the ribbon threaded through it, which was attached to the back, before being layered on the mustard card base. I attached the owl to the branch with Tear-ific Tape and they were then attached with Dimensional Foam.


..... and that finished my project for today:


I'd like to join in the following challenges:

Fab 'n Funky Winged Things: Challenge # 301
Shopping our Stash # 248: Chip off the Old Block (Use Chipboard)
Critters and Creatures Linky Party No. 3
Love to Scrap Challenge Blog #76: Anything goes

Hope you've enjoyed your visit to my blog today. Please leave a comment to let me know you stopped by!.

Till next time,

Shona

Wednesday, January 6, 2016

WHY FIT IN WHEN YOU CAN STAND OUT!

Hi there,

If you missed my New Year's blog then a very Happy New Year to you!! Hope it is happy and healthy for us all!

Today, I wanted to share a card that I made with my Nuance powders (still just green and purple), but as I got the set for Christmas this will soon be changing! I had made several background pieces last year, so this one was made using white glossy cardstock. It gave a more "mottled" appearance than others, but to me it looked like a tree covered in blossom - so thought it would make a nice back drop for the Birds on a Wire Die.


Last month we had been given a surprise package from Sparkle N Sprinkle. I had one last bird to use from the Want to Scrap small bird flourishes chipboard set. I though it might work well with the Die-namites Birds on a Wire Die along with one of the sayings from the new Three Tenors set 767.

The Nuance purple and green powders were sprinkled on the white glossy cardstock and sprinkled with water to create the background. The Birds on a wire were die cut from a piece of 2 1/2" Tear-ific Tape. The protective backing was removed and it was stuck down on to the Nuance background. I removed the second protective layer and then applied Black Suede Velvet Glitter to the sticky adhesive to achieve the blackbirds. The card front was then layered to black and then on to a glossy white card base.


The sentiment was stamped in Versamark and heat embossed with Concord (one of the detailed Tuscany colors). These come in some lovely colors and look great when you want something other than black. It was then die cut and embossed with one of the Lifestyle Nesting Fames. Want to Scrap Self Adhesive purple bling was added to the top and bottom of the die cut, before it was attached with Dimensional Foam to the card front. 

The branch is an embellishment from a Want to Scrap set, as was the little bird. I covered both in Versamark - the bird was heat embossed with Fleur de Lis and the branch with Super Thick Black embossing powder.  A little Want to Scrap Self Adhesive black pearl was added for his eye.


I twisted 1/4" Tear-ific Tape and stuck it to the back of the branch to adhere to the card front. The Fleur de Lis bird was added with a pop up dimensional foam.
  

Hope you've enjoyed my first share of 2016. Here's a sneak peak of next week's project - I'm using some Art Anthology products for this one:


Hope you'll stop by next week to check this one out!

Till then,

Big warm hugs!

Shona

Tuesday, October 27, 2015

CHRISTMAS DOVE!

Hi there, and thanks for dropping by today! Today I'm sharing another card using the Sparkle N Sprinkle Super Adhesive Sheets, two die cuts and some glitter.


To begin with, I stuck a piece of Super Adhesive Sheet on to a piece of white cardstock.  I then took the Sizzix Delicate Wings die and placed it face down on top of the second adhesive backing. Then the Merry Christmas Elizabeth Craft Design Die was placed face down along side the Dove, but it wasn't going to fit lengthwise, so I put a folded piece of cardstock between the two words and then ran it through my embossing machine.


I then protected the Merry from being cut (by putting the folded cardstock under that) before running "Christmas" through the machine.


I know you can see a slight indentation of the letters after the Merry and in front of Christmas, but the glitter will cover that.

Next, I took out (using an Exacto knife) the protective backing of little inserts of the Dove and the Merry Christmas:


Velvet Glitter Golden Wheat was then burnished into the sticky areas:


Then I removed the Dove's body and Cobalt Glaze was applied.


Lastly, I removed the rest of the adhesive backing, and applied Sparkling Snow Glitter to the background. This piece was cut to 3 3/4" x 5 and was then layered to a piece of blue cardstock that coordinated with the Cobalt Glaze. This was then layered to a glossy white card base. A piece of gold ribbon was tied in a knot at the top of the card and I used a little 1/8" Tear-ific Tape to hold down the ends.


... and that finishes my share for today. Hope I've inspired you to get out your dies and try something new with them.

Hope to see you back on Sunday for the SNS November Reveal, when we will be show casing our newest sets, and some more of the new Chunky embossing powders.

Till then,

Hugs,

Shona


Friday, November 21, 2014

CHRISTMAS WOOFIE GONE BIRTHDAY!

Hi there,

I've been upstairs in my stamping room this morning and they are already starting to introduce those Christmas tunes into the radio playlist!  Yikes!  It's still too early for me and in an effort to slow the inevitable down a bit, I decided to repurpose a Christmas image to a birthday one - just because!

I got the idea from a Blog Challenge last week, and wanting to use one of the new Die-Version dies which SNS is now carrying, I decided to give Woofie a seasonal change. 


He comes like this in the Set:


... and I made him into this:


The inside is as much fun as the outside:


Sparkle N Sprinkle now offers many of the Die-Version dies. There are also these PopUp dies and CutOuts that are just so much fun. You can check them out here.

For my Woofie Birthday I stamped the Christmas image on to white cardstock and then colored the packages in birthday colored Copics (incorporating some of the colors from the printed cardstock). I then fussy cut and added dimensional glue to the packages to make them nice and bright.


Woofie was given a "coat" of Brushable Glue and was adorned then with Buff Flocking, to make him soft and fuzzy! The hat and balloons were stamped from another new stamp Set 673: Birthday Friends. They were stamped onto scraps of the patterned paper, fussy cut and then Versamark was applied to them before being heat embossed with Clear Detail.


I added a piece of the patterned paper to the card front and ran natural cardstock through the Cuttlebug Happy Birthday embossing folder. The embossed piece was torn and then inked directly with Memento Desert Sand. It went well with the Buff flocking.

I added a little sparkle with strips of 1/8" Tear-ific Tape applied with one of the Velvet Glitters: Peruvian Lily. This background was then layered to the card base. I cut and embossed the circle, from natural cardstock, using Spellbinders Classic Circles Large die and sponged the piece with Desert Sand, before removing the die.

The sentiment was stamped in Versamark and heat embossed with one of the Tuscany embossing powders, Sienna. I love using these embossing powders for sentiments, as they are very fine powders and are therefore great for detailed images as well as words.


I then hand cut the banner and sponged again with a little Desert Sand. The card was then put together with tape and some dimensional dots. 


I hope I have inspired you today to take another look at your Christmas stamps and see how else they can be put to use.

Since I missed the deadline for repurposing your stamps, I'd like to enter this card in the following challenge:

Love to Scrap Challenge Blog #42 - Say it in Color

Till next time,

Warm Hugs,

Shona