Showing posts with label Darice Embossing folder. Show all posts

Thursday, July 20, 2017

Flamingo Christmas!

Hi there, today I'd like to share a fun little Christmas card using two of the July Reveal sets, Winter Flamingos Sets 1 and 2!

I decided to play with these two fun little sets of flamingos and the sentiment. They are still celebrating Halloween, in purples and oranges and are caught off guard with Christmas coming so soon! Sounds like me most years! The images were stamped in Memento Tuxedo Black and then colored with different hues of purples and orange Copics.
They were then fussy cut, made easier with the Tonic 5" Mini Snips. Love these little scissors for getting into the detailed areas.
The orange flamingos' shoes and hats were decked out in Nuvo Purple Glitter Marker, while the purple flamingos are sporting the Nuvo Orange Glitter Marker!
The orange flamingoes got Nuvo Aqua Flow Markers orange scarves and the orange flamingos received purple ones!
 
Once they were all decked out in their finery, I gave googly eyes to the ones looking straight on and Nuvo Crystal Drops Morning Dew were applied to the other eyes.
For my background I ran a piece of glossy white cardstock through my machine with the Darice Snowflake background and then applied Nuvo embellishment Mousses Coral Calypso and Royal Aubergine (both from the new set of Mousses) with a large dauber, blending the colors in the middle.
Then I tore a scrap of Super Adhesive tape, so that it had a ragged edge and placed it along the base of the cardstock. Stampendous Royal Purple Crushed Glass Glitter was sprinkled over the sticky surface.
Then the new Creamsicle glitter was added to the remaining sticky surface. I burnished both glitters into the tape using the protective backing below my finger tool. 
My background was then layered onto glossy card edged with the Nuvo Coral Calypso Mousse and then the Royal Aubergine Mousse was used on the base card.
The sentiment was stamped on glossy cardstock with Versamark and was heat embossed with Concord embossing powder. It was cut out with the Lawn Fawn Stitched die and was attached to the front panel with purple and white baker's twine. My little flamingos were then arranged on top with Mounting Tape to finish off my card for today.
Here is a list of the supplies used in my card that are available in the SNS store:
5” Tonic Mini Scissors

I'd like to play along in the following challenges:
Crafty Gals Corner: Challenge 132 - Christmas in July
Sweet Stampin' Christmas July: Anything Goes Christmas
Unicorn Challenge Blog #23: Christmas in July
Classic Design Team Open Challenge #16: Anything Goes
World Wide Open Design Team Challenge #24: Anything Goes
Cardz for Guyz Challenge #174: Christmas in July
Win and Tonic Challenge Blog: July - Anything Goes

Thanks so much for stopping by today, I hope you've enjoyed your visit today?
Shona 

Wednesday, August 26, 2015

LIVING AND COPING WITH CANCER

Hi there,

I have to say this month has been a bit of an eye opener for me.  The whole team brought so many different cancers to light (most of which I didn't know existed). Instead of using pink, which I did three times already, I decided to look for something a little different. I found the Silver and Blue Ribbon, which signifies living and coping with Cancer.

Living and Coping with Cancer

So to begin with, I made my background paper by spraying the Perfect Pearl, a Perfect Pearls Mist, over a piece of white cardstock. I then applied Color Burst Ultramarine Blue, which "erupted" and resulted in a pretty silvery blue mottled look - the perfect stage for my silver and blue combination.  I ran the background through the Darice "Cross with Words" embossing folder and sanded the raised words - removing the ink and leaving the white words. You can see the embossed words more clearly here.

Living and Coping with Cancer

The sentiment, from the Survivor Set 713, was stamped in Versamark and then heat embossed with Mediterranean (one of the Tuscany embossing powders). I hand cut the banner and daubed the piece with a little Memento Teal Zeal ink. It was then layered to a slightly larger piece of Silver Metallic cardstock.

Living and Coping with Cancer

On to the ribbons!  I die cut the Survivor Ribbon (from the Die-Versions Awareness Ribbon Words die set) out of the background piece on the bottom right. I then die cut two Cancer ribbons, from the Silver Metallic cardstock.  I covered the cancer wording of one of them with a strip of the silver cardstock before layering the Survivor ribbon offset on top.  The background was layered to a silver metallic frame, so that the glossy white card base would show through the Survivor ribbon.  I re-inserted the Survivor ribbon in the space where it came from, so that the words from the cross still matched up and then attached the sentiment and the Cancer ribbon with Dimensional Foam.

Living and Coping with Cancer

Thanks for stopping by today!
Hugs,
Shona

Wednesday, July 15, 2015

MID MONTH MINI REVEAL

Hi there,

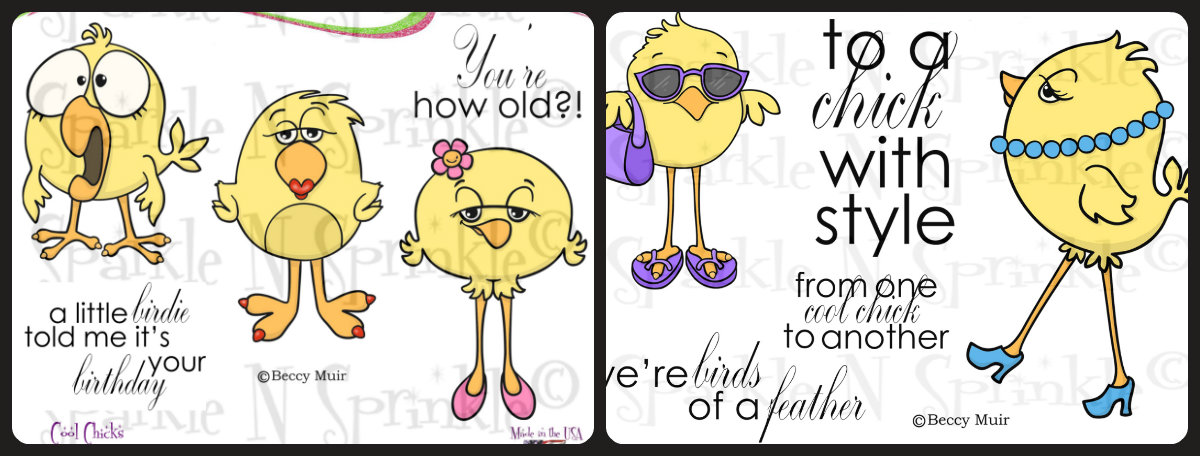
If you came here from Ashley's fun blog, then you have made it through the entire surprise SNS chick marathon! Wasn't that so much fun? If you just stopped by to see what I'm up to, then run back to the beginning of the blog hop with Irit, and leave a comment on each of the designers' blogs for a chance to win both these cute sets. Someone has to win - and it could be YOU!

I chose to highlight the totally surprised guy - who just can't believe how old you are!! Isn't he just the cutest?


These new sets are 20% off until July 18.  So once you finish the blog hop, head on over to the store and start shopping.  All of the new sets are available on cling mounted rubber or as a digital image.  

The sets are:

Cool Chicks 725   (digi version DIGI725B)
Birds of a Feather 726   (digi version DIGI726B)

A WINNER will be selected from the comments left on the Designers' blogs and will receive BOTH of these new sets.  Please leave a comment with each Designer in order to be eligible for this Prize.  You never know who the Mystery Designer will be that has the winning comment.  

The Grand Prize Winner, will be announced on July 19 on the SNS Facebook page and on the SNS Blog.


The Blog Hop order for our Mini Reveal is:

Irit
Chris
Diane
Marie
Jess
Ani
Eret
Anne
Ashley
Shona (that's me!)

(*Tip: if you have difficulty with a particular link, try clicking on the Designer's blog title to send you to their Home page.)

We hope you enjoy this surprise Mini Reveal as much as we have enjoyed creating new projects for it.  And hopefully, we have inspired you as well.  Look for more of these cute chicks in the future too :-).  Here's my creation for this fun hop:


I stamped the little guy (from Set 725: Cool Chicks) in black Memento ink, fussy cut and colored him with Copic markers Y13, YR04, YR68 and 100.  I then applied Dimensional Glue to his beak and set him aside to dry.  I used a Quickutz Speech Bubble for the sentiment to make it appear like he was screaming.  It was stamped in Versamark and heat embossed with Black Detail.

I decided to try a different card idea, so using a Sizzix Movers and Shapers, Square Stand Up die I cut the base out of orange cardstock.  I then ran a piece of white cardstock through and cut 1/8" off all the edges of each piece.  The square that the chick is mounted on was rubbed with Memento Inks Dandelion and Cantaloupe before I ran it through the Darice "Crackled" embossing folder.  I then ran the Desert Sand ink pad over the raised surface.

  
For the layer behind the square, I ran the white cardstock through the embossing folder and this time inked with Dandelion the debossed side, so that the white showed through as the cracks.


The base piece was done the same way, using Dandelion and Cantaloupe, then I covered the entire piece with Versamark and heat embossed with Sparkle.  The sentiment (from Innies and Outies Set 311) was stamped in Versamark and heat embossed with Black Detail.  Both panels were cut using Lifestyle Nesting Rectangles, I applied Dandelion ink with a dauber before removing the die.


The candle was made by taping a piece a scrap of Super Adhesive Sheet (you could also use Tear-ific Tape) to yellow cardstock, running it through a die cutting machine with the Elizabeth Craft Designs 732 die cut.  Use an exacto knife to remove the backing from the candle details and add glitter to the sticky surface.  I used Sunny Daze for the center of the flame and Flaming Orange for the candle I used on the card.

h

The ribbon is a piece of 1/2" Tear-ific Tape which is covered on both sides with Mimosa Sparkle N Soft.  Here is a tutorial on how to make ribbon with the Tear-ific Tapes and glitter!  After I made the ribbon, I ran a piece of 1/4" Tear-ific Tape along the base of the card and attached the ribbon, crimping as I went to achieve the ribbed look.

The chick and sentiment were attached with Dimensional Dots to complete the card.


I hope you have enjoyed your visit with me, the rest of the SNS Design Team and these two fun sets.  I'm the last blogger for this mini hop, so that's all for now.  Make sure you commented on each Designers' blog.  Remember - we need a winner for these two sets!

.... and a little sneak peak of my next "chick card".  So many possibilities!  Not nearly enough time! 


Thanks for visiting today, 

Shona

Thursday, January 8, 2015

WEDDING CONGRATULATIONS!

Hi there,

Hope the New Year is off to a good start for you. Today I'd like to share a card made from one of the other new December Reveal Sets. This time I chose to use the Love and Kisses Set 676. It was intended to be used as a Valentine card set, but I chose to change it up a little and make it into a fun engagement or wedding card.


I stamped the kissing couple in Memento Tuxedo Black ink on white cardstock and colored them with Copics B34, B66, B63, Y32, E31, YR00 and R00.  They were then fussy cut out. I applied a little Sparkling Snow glitter to the hearts on the girl's dress with a Sakura Glue pen.


I used the Die-Versions Congrats. Cut-Out at the base of a 5 1/2" x 5 1/2" piece of glossy cardstock. Then I ran the same piece of cardstock through the embossing machine with the Darice Fireworks embossing folder. Memento Rose Bud ink was applied directly to the white glossy cardstock, which made the fireworks pop!


A strip of 3/4" Tear-ific Tape was attached behind the Congrats. cut-out and the background was layered at this point to a red 6" x 6" card base. Cerise Glitter was then applied to the exposed sticky surface of the Congrats. background. Sparkling Snow was also applied to the firework lines with the Sakura Glue Pen.

The hearts were leftovers from a Cheery Lynn Doily Heart die cut, which were covered with Brushable Glue and then applied with Cerise Glitter.


The hearts and the couple were attached to the card front with Dimensional Dots to finish the card.

Hope I've inspired you to put a spin on your stamps. They don't always need to be used for what they were intended!


I'd like to enter this card in the Scrapy Land Challenge #9 - Anything goes using a brand of die that Scrapy Land carries (I used Die-Versions and Cheery Lynn)

Till next time,

Happy Stamping,

Shona

Tuesday, May 21, 2013

DID SOMEONE SAY CICADAS?

Well, we were warned they were coming!  I got back from taking Gillian up to the school bus this morning and came back and took a closer look!!!

"Yep, That's what I thought it was!"  YUCK!!!!!!


Oh sorry, what was that, ..... you want a closer look?  OK, here you go!


Look at the googly eyes!!

Now, have a look at that tree trunk!


.... and remember the Prom pictures are being taken in this yard in 10 more days!  

(Since posting this, I've had a few questions as to what they are.  If you want the quick synopsis, here it is.  They are the 17 year Cicadas.  Yes, the very same thing happened seventeen years ago.  My Dad will attest to that!  While we were building the patio out back they would land on his shoulders and "scream" in his ears!!  Fortunately, all they do is come out of the ground, crawl out of that shell thing and then find someone (another Cicada) to mate with.  Then they die!  What a life, right!)

Well, apart from making me feel a little bit grossed out and itchy, it did get me in the mood for making a "bug" card.

Now isn't this more acceptable?


OK, excuse me, I'm off to sweep thousands of carcasses from the driveway!

'Till next time,

Shona

Monday, April 1, 2013

SNS APRIL CREATIVE SKETCH CHALLENGE

Good Morning and welcome to a new month!  Where does the time go?  

With a new month comes a new SNS Sketch Challenge, and this month we were asked to use a Michelle Perkett digi.  This posed another new challenge to me!  Use a digi!!  I'm afraid I like my comfort zone, so look forward to when the great digi's that SNS carries, are "rubberized"!

Have to say though - the challenge ended up working in my favor, as the 5-a-side soccer team would have been quintets on my card had they been made from rubber!  Being able to make the digi's whatever size you want, is a definite advantage.   You can make them taller and skinnier, plumper and shorter and anything inbetween.  The only disadvantage I found was that the balls they were holding also got distorted, but nothing a teammate's elbow couldn't cover up!!

So here is my dream team of champions:


Next time, I might try to change the hair-do's, but for young boys I think you can get away with just changing the color!

I sponged the background with Memento inks and then ran it through a Darice Sports Phrases embossing folder.  If needed, the full directions can be found here in the SNS gallery.  

Hope you'll try the Challenge this month, there are many genres of digi's in the Michelle Perkett collection.  You don't have to wait for them to be mailed, another advantage to digi's.  So let's see what you can come up with.  To see what the other designers came up with - just click here - for more inspiration.

....... and we've got another Blog Hop coming up on Thursday and Friday, 4th and 5th.  This time the theme is "anything but a card"!  Please stop by to check it out and for a chance to win prizes along the way.

'till then - grab a digi - and send in a card!  Looking forward to seeing your creations!

Shona

Friday, December 7, 2012

Playful Pandas

Hi there,

Just a quick post this morning, with another Asian card.  I decided to use the cute Panda stamp from Sparkle N Sprinkle, to make a masculine birthday card for an "older" Gentleman!  I recently picked up the Darice Bamboo embossing folder, which I love.  So that is what I used for my background.

I also used Sparkle N Sprinkle's Cloud Nine (Velvet Glitter) for the panda's white fur.  Unfortunately you can't feel it through the computer, but it is glitter with a fuzzy feel.  It's so versatile - check out the Tips and Techniques Section of Sparkle N Sprinkle, scroll down to Glitter - Velvet, to see some of the ways the designers have used it!

Here's the card, and the link to my gallery, if you need full directions:


Hope you're having a good day.  I'm off to hopefully put a dent in my Christmas cards!