Showing posts with label stenciling. Show all posts

Wednesday, January 12, 2022

Eat, Drink and bee Merrry

Hi there and welcome back to my second blog of the new year! Today I am sharing the card I made for the January Christmas Craft Creations Challenge, where we have to include some stenciling. For my card I am using the cutest little Bee Merry set from Clearly Besotted. A "newbee" for me!!


I began by stamping the cute little stamps in Versafine Clair Nocturne ink and heat embossing them with Clear Detail.


The images were then colored with Copics and fussy cut.


I inked the honey comb background using one of the Recollections Stencil set and Distress Oxide Peeled Paint ink. 
 

The sentiment was die cut with an old Spellbinders Hexagon die to match the stenciled background. I added some of the Peeled Paint before removing the die.


Dimensional Glue was applied to the snow on top of the hive to which I added Diamond Dust Glitter. 


Sparkling Snow glitter was applied to the bauble using the same glue and Snow White Flocking to the Santa hat.


The glue was also applied on top of the colored lights. Everything was set aside to dry.


Here is a close-up of the finished card, once the pieces had been attached with foam pads to the stenciled card base. Hopefully, you can see the dimension of the different glitters and flocking.


A red and white bakers twine was tied around the side of the card to finish off.


Below, you can see the products that I used on my card today:


Clearly Besotted Bee Merry set

Recollections Stencils 658160

Distress Oxide Peeled Paint ink

Versafine Clair Nocturne ink

Clear embossing powder

Copics

Spellbinders Hexagons dies

Dimensional Glue

Diamond Dust Glitter

Sparkling Snow Glitter

Snow White Flocking

Foam pads

Red and white bakers twine


I hope I've inspired you to take a look at the rest of the Team members' cards. Please give the stenciling theme a try while adding  to your 2022 Christmas card stash!

I'd like to join in the following challenges with this one:
Dies R Us Challenge #184: Using a die that DRU carries
Peace on Earth Challenge #7: Anything Christmas Goes
Stamps & Fun = Creativity #401: Colors of Christmas
Critter Crazy Challenges #58: Anything Goes with critters

So that's it from me today! Hope to have you stop by soon! Till the next visit, stay safe and warm!

Cheerio for now from chilly New Jersey,

Shona

Wednesday, December 8, 2021

Scenic Bauble

 Hi there and welcome back to my blog. My header for December is one of my backyard bird boxes which during the Spring and Summer is home to families of bluebirds. A squirrel was enjoying breakfast on the bird house patio this morning! My card today is for the challenge over at Christmas Craft Creations


The Challenge for December is to make a scene!


I began with stamping the scene on glossy white cardstock with Versafine Clair Nocturne ink and heat embossing with Clear Detail.


The Sweet Poppy bauble stencil was placed over the scene and I applied Broken China ink to the bauble area. 


The inked scene was die cut and then spritzed with water. It gives a lovely mottled effect.


The stencil was placed on white glossy cardstock again and I colored the leaves with Peeled Paint and the ribbon with Iced Spruce. A red Copic marker was used for the berries.


The die cut bauble was then taped on top.


The panel was layered to a light blue mat and then layered onto a white card base to finish off my card for today.


Below you will find the products that I used for my card today:

Hero Arts Stamp K5524

Sweet Poppy Christmas Bauble Stencil and Die set

Distress Oxide inks: Broken China, Peeled Paint, Iced Spruce

Versafine Clair Nocturne

Clear Detail Embossing Powder

Mister

Red Copic

Silver Thread


I hope that I have inspired you to join in the Challenge over at Christmas Craft Creations

I'd like to join in the following challenges with my card:
Crafty Calendar Challenges - December - Christmas
Sweet Stampin' December - Anything Christmas
Winter Wonderland - Anything Christmas

Happy Holidays!

Shona


Tuesday, November 9, 2021

Merry Christmas Bauble

 Hi there and welcome back to my blog. My November header was taken at the New York Botanical Garden last week, when a few of my Master Gardener buddies and I took a trip there. I believe it is a Catbird enjoying the berries of the Callacarpa. We had a beautiful, though brisk, day taking in the Fall foliage!

My card today is for the Holly and Ivy Christmas Challenge, which is always an anything goes challenge. I hope you will join in the fun, while adding to your Christmas card stash! You know it will be here before we know it! 


I had recently been "enabled" into acquiring the Sweet Poppy Christmas Snowflake Bauble stencil and die set. This was the first time I had played with it. I will be definitely be getting this back out to play around with.

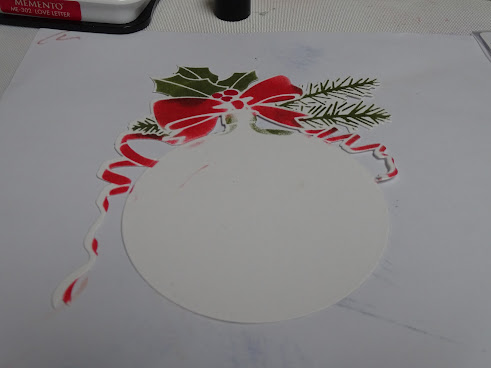
Using the stencil on white cardstock and a piece of scrap paper to try to mask off areas not to be inked (not terribly successful on that, I may add), I used Memento inks Olive Grove and Love letter with a finger dauber to color in the ribbon and the greenery sprigs.


A red Copic marker was used for the berries.


After die cutting, not terribly straight, I inked up the entire ribbons.


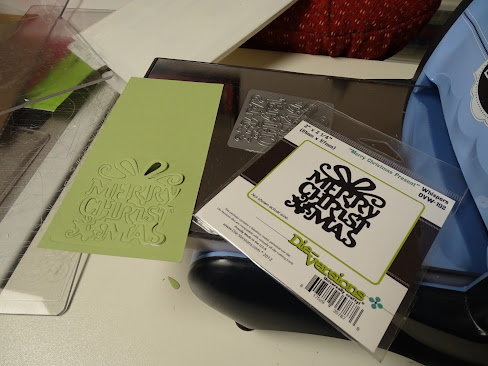
I die cut the bauble from red cardstock and the Die-versions Merry Christmas Present die from green cardstock. 


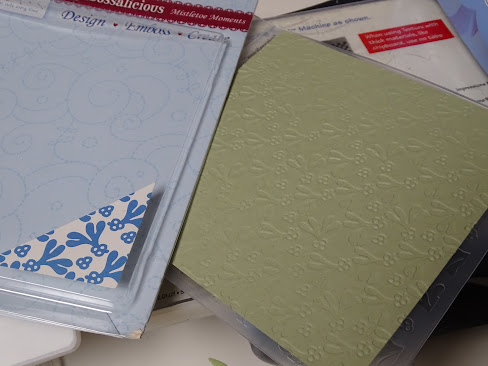
The sentiment was attached to the bauble with a gold eyelet. The Mistletoe Moments embossing folder was run through the machine using the same cardstock as sentiment. 


This was layered on to red carstock, then layered to a white card base. The bauble was attached with tape and mounting foam.


A piece of red and beige bakers twine was tied around the spine to finish off the card for today.

Below, you will find the products used on my card today:

Sweet Poppy Christmas Snowflake Bauble

  Stencil and Die

Memento Inks: Olive Grove and Love Letter

Finger Daubers

Red Copic

Die’sire Embossalicious Mistletoe Moments embossing folder

Die-Versions Merry Christmas Present die

Gold Eyelet

Red and brown bakers twine


Please take a look over on the Holly and the Ivy Challenge blog and see the other design team members' inspirations. We look forward to seeing your entries!

Till next time,

Shona

Wednesday, February 10, 2021

Let it Snow!

 Hi there and welcome to February! My header for this month is my two beehives in the snow. It was taken a couple of days after we received almost two feet of the white fluffy stuff! It was a bright, sunny day and although it was quite chilly, the bees were taking advantage of the sun and came out and took "cleansing flights". Bees won't poop inside the hive. If you look closely at the front of the hives, you can see several little black specks - those are a few of the bees out relieving themselves. A good sign for me that my bees are still alive! Just like us - they are eagerly awaiting the warmer days of Spring!

My card today for the Christmas Craft Creations design team is ironically "Let it Snow", made back in November, when we hadn't yet received the white stuff!!


The February Challenge theme is Blue and Silver.


I chose to paint with embossing powders this time! I ran the snowflake borders through my machine with a scrap piece of navy cardstock.


The two borders were stuck down along the top and bottom edges of a piece of white cardstock, to act as a stencil.


Versamark was then applied all over the cardstock. After applying the Versamark the "stencils" were removed. 7 different blue hues of embossing powders were ready for action!


I applied the different embossing powders one by one on to the Versamarked panel. I didn't bother to keep them separate, and now have a one of a kind embossing powder for another project!


Using my tweezers the panel was then heat embossed.


Silver Lightning embossing powder was then applied to a Versamarked Joy Crafts snowflake and was heat embossed.


The Tonic "Let it Snow" die was then die cut from silver cardstock.


The snowflake was attached to the embossed panel with a silver brad and the sentiment was attached with foam mounting strips. This was then layered to a piece of silver cardstock before being attached to a white card base.


Hope you have enjoyed my share with you today and that you will be inspired to join in with us over at Christmas Craft Creations with your own "blue and silver" project?

Below are the products that I used for my card today:

Snowflake Border die

Versamark

Background embossing powders: Carribean, By the Lake, 

  Pool side, Ice Rink, Bracing Blue, Blue Silver, Electric Blue

Snowflake die cut - Silver Lightning on top of Bracing Blue

Tonic Let it Snow die

Joy Crafts Snowflake die (6002/2020)

Silver Mirror Cardstock


I'd like to join in the following challenges with my project:

The Holly and the Ivy Challenge #87: Anything Goes

Dies R Us Challenge # 162: Use a company die that DRU carries

World Wide Open Design Team Challenge #01: Anything Goes

Christmas Crafts All Year Round February Challenge: Something that starts with C/and or D (Chilly Days)


Until next time stay warm and safe,

Shona

Sunday, August 19, 2012

Thank You, Thank You, Thank You .......

Gosh, this summer has been a complete whirlwind, hasn't it?  I love being able to "sleep-in" (past 5.30am) when the kids aren't needing to be pulled out of bed for school, but only two more weeks of that and we're back to the grind (after I get back from a week in Scotland, getting the eldest off to University).

Ten weeks, seemed like a lot of time, but we have had the busiest summer ever, which made it just fly by!  Among all the things going on, were several "big" birthdays, graduations, and anniversaries. All good, but I felt like my "relaxing" stamping time, was turned into a "sweat shop".  Struan's 18th birthday was on the 5th of August and he's just writing them now as I'm writing this!

Anyway, bottom line is, they had to be quick and easy, but I hate making something that looks like it took a minute to make! Already went that route with his Graduation Thank-You's.  that really did only take a minute!   So this time - I took 5!!!  I used a stamp from the Asian Set 304, and then a Thank You from Set 415.  I bought a few Dylusion paints lately, along with a stencil, thanks to some "stamping tool enablers", but I haven't used them yet, and thought I should at least put the stencil to use, until I have time to play!

Here is the end result using two dye-based inks sponged onto glossy cardstock with the stamped image embossed in black detail powder.  I used a dauber, with the same two inks, to color in the stenciled circles and then just stamped the saying into the bottom circle:


Thanks so much for stopping by!