Showing posts with label Nuvo Deluxe Adhesive. Show all posts

Thursday, June 14, 2018

Won't You come in to my Garden?

Hi there,

Today I'm here to share with you my first June Reveal card. I used the sentiment and rose from the My Wild Rose Set 898, along with a stencil and some of the new Nuvo Mica Mist Silver Smoke to create my card today.


I actually only used the sentiment and the single rose from the set as I wanted to try out the new Nuvo Mists with a stencil. I began with spraying the Silver Smoke Mica Mist through a stencil (TCW Mini Butterfly Meadow) on to white cardstock. These Mica Mists have a lovely pearly sheen to them.


I then tried it on black cardstock.


Since I couldn't decide which version I liked better, I decided to use both. I tore the white piece diagonally and attached it on top of the black version. I used 1/4" Tear-ific Tape around the edges and some Nuvo Deluxe Adhesive along the ripped edge to make sure it would lie flat and match up well.


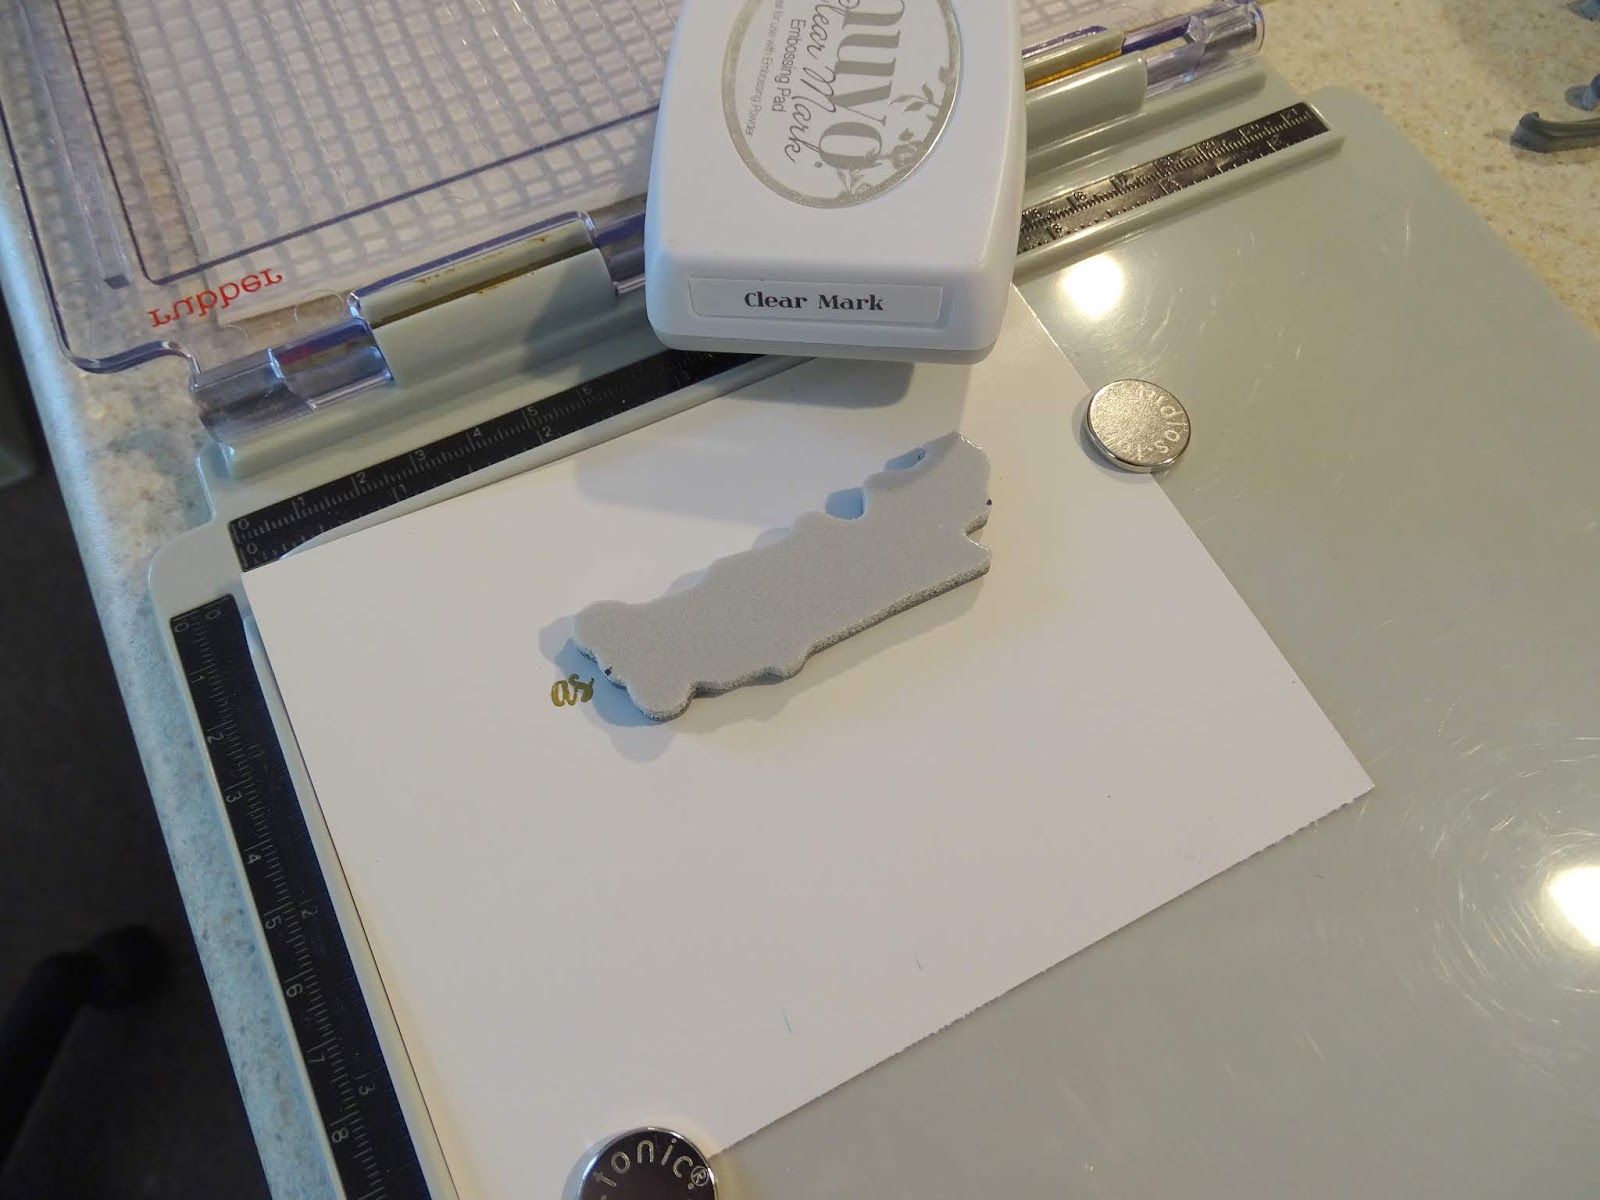
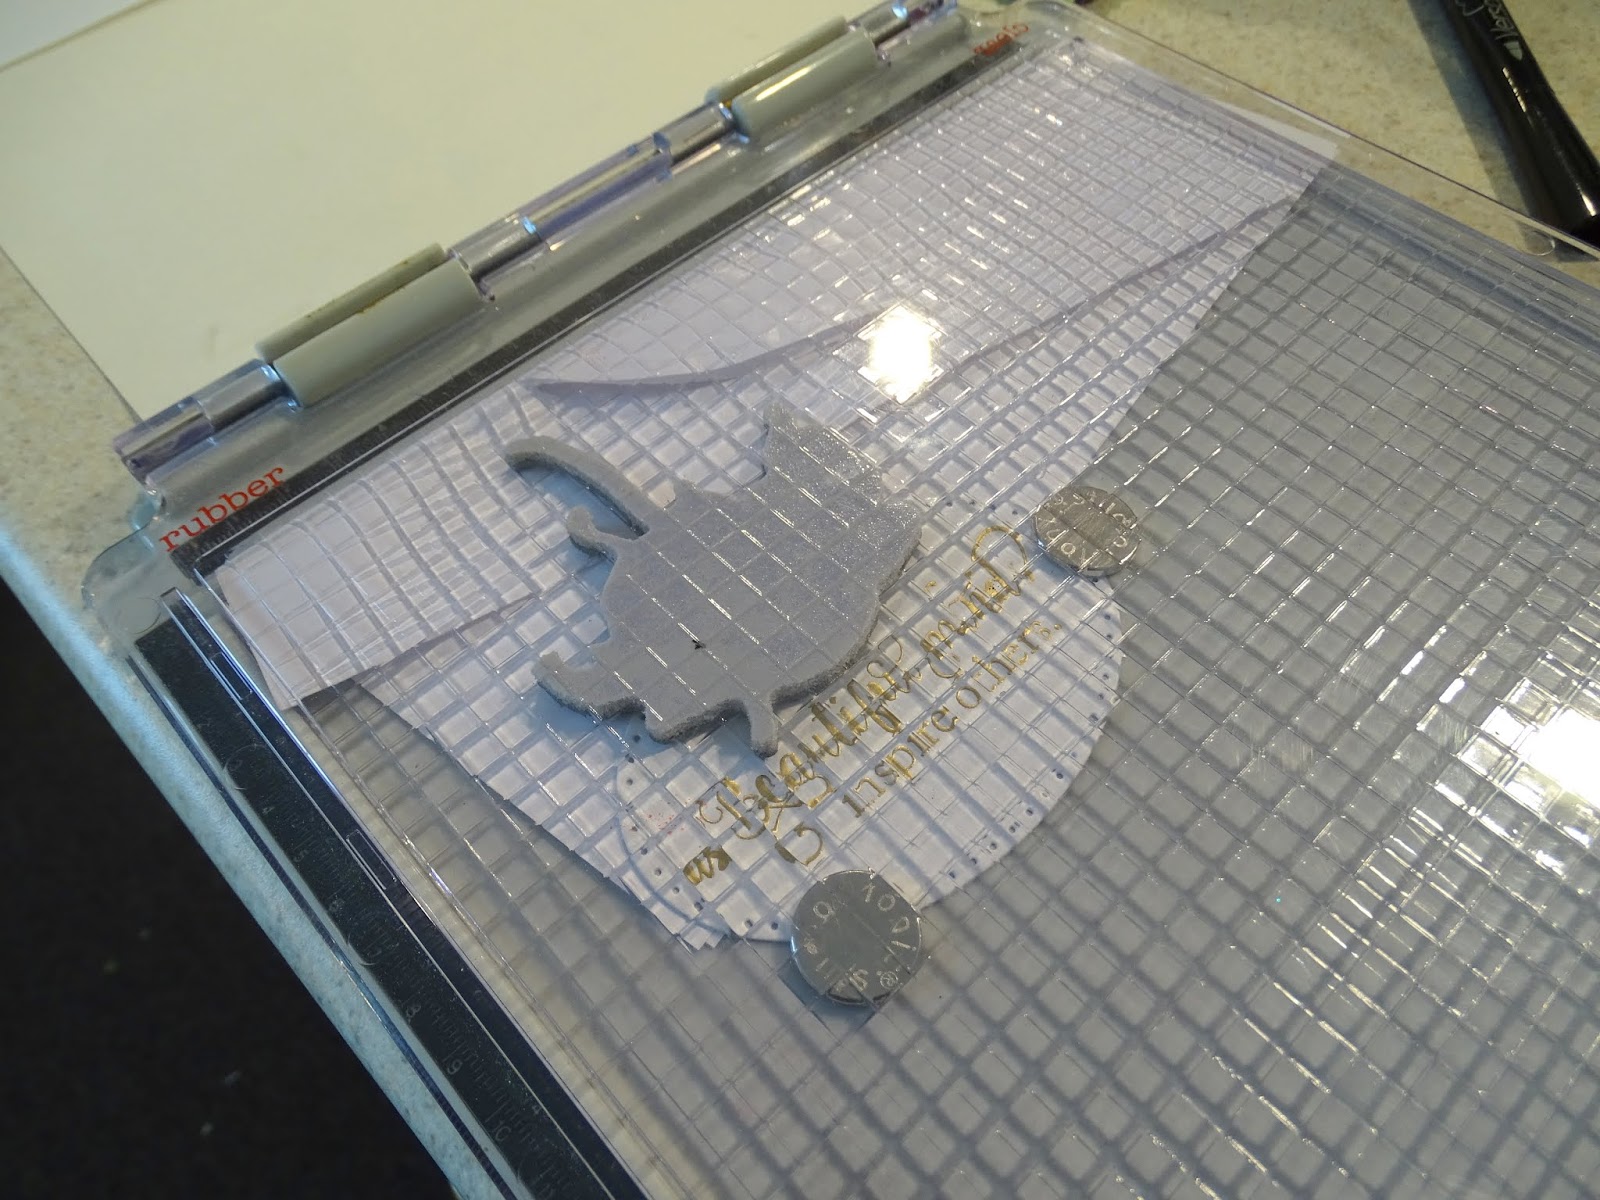
I used the left-over sprayed piece of the black cardstock for the sentiment, as I loved the mottled look. So the piece of scrap cardstock was put in the Stamp Platform and stamped with Nuvo Clear Mark and was then heat embossed with White Detail.


I then ran it through the Tangerine with the Spellbinders Lattice Rectangles die.


I then stamped the single rose from the set on to pink card with Nuvo Clear Mark ink and heat embossed with Black Detail. This was then fussy cut using the 5" Mini Scissors.


The card was assembled with the sprayed background being layered to the same pink cardstock that I stamped the rose on. Then the sentiment was added with Craft Perfect Foam Pads. Two little pink roses were then tucked in behind the sentiment and the stamped rose.


Nuvo Crystal Drops Party Pink were then added to the little flower ends.


... and that finished off my card for today.


Here is a list of the products that I used for my card, most of which can be found in the Sparkle N Sprinkle store:

My Wild Rose Set 898
White Detail (EP298)
TCW Stencil Mini Butterfly Meadow
Spellbinders Lattice Rectangles
2 roses

I'd like to join in the following challenges:
Craft Stamper June Challenge: Anything Goes
Classic Design Team Open June Challenge: Anything Goes

I hope you have enjoyed my share today? Please give these new Mica Mists a try - they really do have a lovely sheen to them and there are many pretty colors to choose from. Also, don't forget to check out the Facebook Creative Challenge! Fun contests and certificates to be won! All you have to do is submit a card where you used a Sparkle N Sprinkle stamp (and if you don't have a stamp you can use one of the free digis). Go check it out!

Thanks so much for stopping by today,

Shona


Thursday, May 31, 2018

Live as if .....!

Hi there,

I'm back today to share my last May Reveal card using the lovely Aster Garden Set 893 this time.


I began by stamping the main sentiment in the middle of white glossy cardstock in Nuvo Clear Mark using the Stamp Platform then I heat embossed with Gold Detail.


I then made two masks of the big flower from post-it notes, stamping in Memento black ink and fussy cutting with my 5" Mini Scissors.


I inked up the stamp using the Hybrid ink Diamonds Set Tropical Fruit and with the help of the masks I stamped around the sentiment, so that the images didn't overlap one another.


I stamped the smaller image with the butterfly on glossy card in Nuvo Clear Mark and heat embossed with Gold Detail.  This was then colored in with Aquaflow Watercolor markers - making a pallette from an acrylic block and applying the colors with the Nuvo Water Brush. Once dry this was fussy cut again with the 5" Mini Scissors.


Next I stamped on top of the flower circle with Nuvo Clear Mark and heat embossed with Gold Detail the same butterfly image.


Nuvo Deluxe Adhesive was applied to the back of the fussy cut piece and placed on top of the stamped image.


The larger flower was stamped twice in Nuvo Clear Mark and heat embossed with Gold Detail and then after being colored with the colors from the same pallette, they were fussy cut with the 5" Mini Scissors.


An embossed frame was made from cutting out an oval from the Craft Perfect Ivory Bouquet paper, using the Tangerine Machine along with the Sizzix Dotted Ovals and a Spellbinders Grand Ovals die.


Next I made my card base. Using the next biggest size oval die, I cut out the front of the easel card and then the base was made, using a scrap piece of cardstock at the fold of the card base, to "stop" the machine from cutting past the fold - the card front would then be placed on top. I did the same on the base edge - this way the base is also rounded.


For the smaller sentiment I applied Versamarker pen to the word "as" from the first sentiment and stamped it on to white glossy card with the Nuvo Clear Ink and then heat embossed with Gold Detail again. Then using the Stamp Platform I lined up the second sentiment and embossed with Gold Detail. This was then die cut in the Tangerine using one of the smaller Dotted Oval Dies.


The large flower was stamped again above this sentiment with a piece of scrap paper under the oval, so ink would not hit the platform. Again stamped with Nuvo Clear Mark and heat embossed with Gold Detail.


This was again colored with the Aquaflow Watercolors.


I layered up the card front and then ran the Versamarker Pen around the outer edge of the large oval front and heat embossed a little Gold Detail to distress the edge.


The two colored flowers were then attached to the card front, placing on top of the existing stamped flowers with some 1/4" Tear-ific Tape.


The Sakura Glue Pen was used to apply a little Autumn Frost Glitter to the center of all the attached  flowers and Butterscotch Glitter to the petals.


Two more images were stamped using the Hybrid Inks Tropical Fruits on the card base and then the smaller sentiment was positioned on the card base as my "stop" with mounting tape. A few Honey Gold Crystal Drops were added to the base of the easel. This finished off my card for today.


If you leave a comment here and then also go over and leave a comment on the Sparkle N Sprinkle Blog you will be eligible to win a $20 gift certificate for the Sparkle N Sprinkle store. Not many people are doing this, so your chances of winning are pretty high - just saying!

Below is a list of products that I used on my card, the majority of which can be found in the Sparkle N Sprinkle Store:

Gold Detail (EP168)
Sizzix Dotted Ovals
Spellbinders Grand Ovals
Mounting Tape

I'd like to play along in the following challenges:
Crafty Creations Challenge #367: Anything Goes
Crafty Gals Corner Challenge #166: Anything Goes
City Crafter Challenge Blog Week 414: Watercolor Flowers
World Wide Open Design Team Challenge #5: Anything Goes

Thanks so much for stopping by,

I'll see you back here in June!

Shona

Thursday, May 17, 2018

Denim Pocket Happy Birthday

Hi there,

Today I'd like to share with you, my first May Reveal card using the fun Pocket Full of Posies Set 896 along with my homemade denim cardstock!


As soon as I saw this stamp set, I had the idea of using the denim pocket in my card design. I had used the pocket idea many, many years ago when I had photocopied the back pocket of one of my toddler's jeans (the youngest of which is 18 today!!). I had taken several copies of it, and it was tucked at the bottom of my homemade background's drawer. I thought it would be fun to have denim on the background too, so I put a leg of a pair of jeans in my printer and took a copy. Here are the beginnings of the card:


I made my tag using the Memory Box Stitched Main Street Tags, but the tag that was wide enough was not sufficiently long, so I ran it through the Tangerine machine and put a doubled up piece of card at the bottom of the tag, which acted as a stop and then I pulled the tag die down, in order to elongate the die cut. I made two of these elongated tags, so that I would have a backing to the tag, as I wanted to stamp a sentiment on the back and make it sturdier.


On one of the tags, using the Stamp Platform, I stamped the sentiment from another of the May Reveal Sets - Cardinal and Holly Set 895 in Nuvo Clear Mark and then heat setting with Cerulean. A little ribbon of denim was added, when the tag was finished.


Now on to the front of the tag. Using the Stamp Platform again, I stamped the image with Nuvo Clear Mark and then heat embossed with Black Detail.


The background was colored in with Cornflower Blue Embossing Mousse applied with a waterbrush. Then the flowers were colored using an acrylic block and Aquaflow Markers: Spiced Ginger, Lemon Zest, Red Apple and Fresh Green, also being applied with the Nuvo Water Brush.


The stamp was positioned in the Stamp Platform to fit inside the lines of the pocket. This was then stamped in Nuvo Clear Mark and heat embossed with Sienna. This was then fussy cut with the 5" Mini Scissors


This pocket was layered over the stamped pocket with 1/4" Tear-ific Tape. I used the Black Micron Pen to add the little leafy squiggle. Then Tangerine and Butterscotch Microfine Glitters were added to the flowers using the Sakura Quickie Glue Pen.


Winter Cranberry Glitter Accents was added to the red centers of the flowers.


I cut out the printed jean pocket with the mini scissors for the front of the card. The back and front of the tags were glued together with Nuvo Deluxe Adhesive


The card base was cut and 1/4" Tear-ific Tape was added around the edges. The denim cardstock was then layered to the center of the card base and both Tangerine and Butterscotch Glitters were applied to the exposed adhesive. The little sentiment was stamped in Nuvo Clear Mark and heat embossed with Cerulean and was then cut out using a small die from the Stitched Main Street Tags. It was attached to the pocket with a little gold brad.The copied pocket was attached to the front panel with Mounting Tape, which would allow the tag to be pulled in and out.


Ripened Pumpkin Crystal Drops were added to the card for finishing touches.


Here is a list of the Products used in my card today:

Black Detail (EP171), Sienna (EP413),
Memory Box Stitched Main Street Tags
Copic YR16 Marker
Gold Brad
Denim (home copied paper)
Micron 08 Pen
Mounting Tape

Please leave a comment here on my personal blog and also over on the Sparkle N Sprinkle blog and that will put you in the running to win a $20 gift certificate to the Sparkle N Sprinkle store.  The winner of the certificate will be announced on the SNS blog and on the SNS Facebook page at the end of the month. You have to leave a comment in both places to be eligible. Good luck!

I'd like to play along in the following challenges:
Crafty Creations Challenge #366: Anything Goes
Crafty Gals Corner Challenge #165: Add a Flower
Scrapy Land Challenge #90: Anything Goes, using a die cut
Stinkin' Inkers Challenge Blog: Use flowers
World Wide Open Design Team Challenge #5: Anything Goes
Classic Design Team Challenge #25: Anything Goes
Craft Stamper Take it Make it May Challenge: Anything Goes

I hope you've enjoyed my share today. Thanks again for stopping by!

Shona

Tuesday, November 14, 2017

SPARKLE N SPRINKLE'S NOVEMBER REVEAL

Hi and Welcome to the November
Sparkle N Sprinkle New Reveal Blog Hop!

For my reveal card this month I chose to work with the Cat's Meow Set 870. I used some white and buff flocking with highlights from Copics and Memento ink to create my three little cats. We were asked to incorporate some new Specialty Papers from Tonic this month so for my card I used the Warm Dahlia paper to make three flowers, two rugs and a cloud!! I know - I'm a little crazy!


We are pleased to reveal the following new stamp sets this month.

The sets are:


Cat's Meow 870
(Digital Version: DIGI870B)


You are definitely going to want both the digi version as well as the rubber version because when you purchase the digital versions, there are lots of extras that aren't available otherwise.  These extras can include additional images, additional sentiments, digi papers (in some cases), and a cut file.

The new sets are 20% off until the 20th of the month.  Head on over to the SNS store once you've finished the Blog Hop and start shopping.

SNS is always adding new products and new product lines to the store.  So stop by often to see what's new!


One GRAND PRIZE WINNER will be announced on the 17th of the month.  One of the Designers is our Mystery Host and the winner will be selected from comments left on her blog.  You must leave a comment on each of the Designers' blogs in order to be selected as the winner, as you never know who the Mystery Host will be.  This is checked for compliance.

The GRAND PRIZE WINNER will be announced on the SNS Facebook page and on the SNS Blog and will receive all the rubber stamp sets revealed this month.

The Blog Hop order is:
(Tip: if you have difficulty with a particular link, try clicking on the Designer's blog title to be directed to their Home page.)

Chris
Diane
Shona
Belinda
Anne
Donna
Eret
Jess


We hope you enjoy the New Reveal Blog Hop as much as we enjoy creating new projects for it.  Be sure to visit the SNS Blog for even more inspiration.  Something new is posted most every day.


Did you know that SNS has a You-Tube Channel?  If not, then you are in for a real treat.  Subscribe today to get all the latest tips and techniques!


The Sparkle N Sprinkle Creative Challenge group is on Facebook.  
This is a closed group (just trying to keep out spammers), but we want anyone who to participate to join.  Click on the link and join in on the fun today!

The Creative Challenges run from the 1st - 25th of each month.  A SNS image (either rubber or digi) is required.  If you don't have any yet - no worries - there are some freebies located on the Home page of the SNS website.  Just scroll down the page a bit to see them.

The Creative Challenge Winner and Top Three will be posted on the last day of each month.  The winner will receive a $15 Gift Certificate to go shopping at the SNS store.

Please review all the Challenge Rules before submitting your photo 😀.  We can't wait to see what all you create using SNS images.


So now on to my card. I started by making my background, using three Nuvo Embellishment Mousses: Lemon Sorbet, Citrus Green and Aquamarine


These were sponged on to white cardstock using the jumbo daubers


Next up was the barn. I cut the barn from both beige and red cardstock. The roof of the silo was cut from grey. I stuck a piece of 2 1/2" Tear-ific Tape to a piece of white cardstock and removed the protective backing. The beige border was placed on top of the tape and the little red pieces were inlaid.


The silo was sponged with Indian Gold Embellishment Mousse.


The barn was cut out with my 5" Mini Scissors and the windows and doors were glued in place using the Nuvo Deluxe Adhesive.


This was set aside while I worked on the cats. A piece of 2 1/2" Tear-ific Tape was stuck down to a piece of beige cardstock. The protective backing was removed and Buff flocking was burnished in to the exposed tape.


In order to make sure that the cat would stamp well on top of the flocking, I decided to use the Stamp Platform, instead of the acrylic block. The image was stamped using the Hybrid ink Acorn Brown. I did restamp the image to get a nice crisp result.


Memento Cantaloupe was sponged on top of the flocking.


Highlights to the ears and nose were shaded with Copics. To color on top of the flocking with Copics, you just gently apply the side of the tip of the marker to the flocking.


I repeated the process for the other two cats using Snow White flocking on white cardstock and then stamping in the platform with Memento Tuxedo Black. Highlights were again added with Copics. The three cats were fussy cut using the 5" Mini Scissors and googly eyes were attached with the Nuvo Deluxe Adhesive.


Here is a close-up to show the fuzziness:


My mats, flowers and the cloud (this embossed paper is white on the back) were fussy cut from a piece of the Warm Dahlia paper.


The stems of the flowers were die cut using the Tonic Woodland Aster die. The sentiment was stamped in Nuvo Clear Mark and then heat embossed with Gold Detail. This was then die cut using the Tonic Layered Clouds die.


I cut out a frame from the Warm Dahlia paper and cut out all my shapes from the middle, so as not to waste any of the cardstock. The frame was layered to white cardstock. The card front was assembled with tape and mounting tape and was layered on to the Warm Dahlia frame. Here is my finished scene:


Here is a list of the products used in my card. Most of the products can be found over on the SNS website.

Cantaloupe
Buff Flocking (FL109)
Tonic Layered Clouds Die
Tonic Woodland Aster Die
Impression Obsession Barn Die
Copics R21, E04, E07, YR23
Googly Eyes

Remember to comment on all the Designers' blogs to be in the running to win all three sets. Next on the blog hop is Belinda, she has a cute snowman scene to share with you.

I would like to join in the following challenges with my card today:
Addicted to Stamps Challenge 157: Use more than one stamp
HeARTful Stamping Challenge, Nov 12 to 19th: Anything Goes + stamp
Classic Design Team Challenge Blog: Challenge #19: Anything Goes
Scrapyland Challenge #78: Any dies that Scrapyland sells

Thanks so much for stopping by today,

Hugs,

Shona