Hi there,
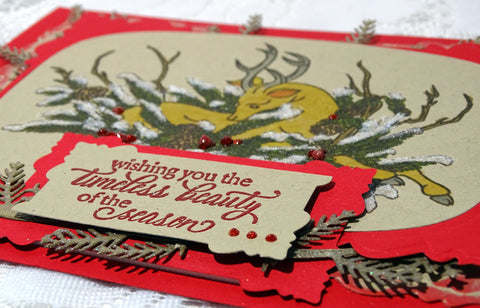
I'm delighted to be a newbie on the Design Team over at Christmas at Sweet Stampin'. Here is the card I made using the Sparkle N Sprinkle stamp set 935: Winter Deer.

With kraft cardstock in my stamp positioner, I began with stamping the image in Hybrid Acorn Brown ink, I then colored the image with Nuvo Alcohol Markers.

The image was then returned to the same position on the stamp platform and the stamp was inked up with Versamark and then heat embossed with Clear Detail. This made the image lines pop again.

Using the Nuvo Precision Glue I applied Twinkling Clouds Flocking to the snowy boughs.

I used the Spellbinders Superellipse die inside the Creative Expressions Seville die to frame the deer. I then ran kraft cardstock through the larger Seville frame die which was then distressed with Memento Ladybug ink using a dauber.

After stamping the sentiment on kraft cardstock in Versamark ink and heat embossing with Red Apple, I went to use the little Seville die, but it was too big for the sentiment, so I cut halfway through the die on my machine then moved the die over, so that it made the sentiment shorter and narrower.

I die cut a piece of the red cardstock from the same die as a backing for the sentiment. I die cut three of the Tutti Designs die Arched Fir Branch and then they were applied with Versamark and heat embossed with Sparkle. The kraft distressed frame was layered to a red card base and then I arranged the sparkly fir branches around the edges of the frame. The deer with the red frame was then positioned in the center with mounting tape.

The sentiment was then attached also with mounting tape. Ruby Slippers Glitter Drops were applied to some of the berries and left to dry. I then added some more berries with Glitter Accents Winter Cranberry. You have to wait until the drops dry between applications otherwise it will become one giant blob instead of individual berries.

I also applied three of the Ruby Slippers to the sentiment. Below you can see the dimension of the puffy snow and the berries.

So that finished off my card for today.
I hope you've enjoyed my share today. Below please find the list of products I used on my project today. The linked items can be found over on the Sparkle N Sprinkle website and if you use my ShonaDT10 code at the checkout and you will receive an extra 10% off your purchase.
Memento Lady Bug
Tutti Designs die Arched Fir Branch
Spellbinders Die Superellipse
Creative Expressions Die: Seville
We would love to see you join in the Challenge over at Christmas at Sweet Stampin'. You can show us anything Christmas! Hope to see you join in the fun! You n also join in the Sparkle N Sprinkle Challenge, where all you need to do is use embossing powder or loose glitter!
I'd like to enter my card in the following challenges:
Classic Design Team Open Challenge #2: Anything Goes
Scrapy Land Challenge #107: Use a die that Scrapy Land carries
The Holly and Ivy Christmas Challenge #44: Anything Goes
I'd like to enter my card in the following challenges:
Classic Design Team Open Challenge #2: Anything Goes
Scrapy Land Challenge #107: Use a die that Scrapy Land carries
The Holly and Ivy Christmas Challenge #44: Anything Goes
Thanks so much for stopping by today,
Shona


