Showing posts with label Flocked Backgrounds. Show all posts

Thursday, September 22, 2016

BE THE PERSON YOUR DOG THINKS YOU ARE!

Hi there,

Today I'd like to share a card with you using the new reveal set 793: Puppy Girl.

Be the Person

To begin with I stamped the image with Memento Tuxedo Black and then colored with Copics, YR00, RV42, RV95, R21, R22, E04, E13, E33, E35. For the background I took a piece of pink cardstock and covered it with a piece of Super Adhesive Sheet. I removed the protective backing and burnished Pink Spirit Sparkle N Soft onto the sticky surface.

Be the Person

I then took Rich Cocoa and inked the raised side of the Darice Paw Print Background embossing folder, The pink, flocked piece was inserted so that the ink would transfer on to the fuzzy surface.

Be the Person

This is the result - a sparkly, fuzzy background.

Be the person

I didn't want to cover up the majority of my background so I decided to make a frame around the image instead. I cut the background in half, then used the Spellbinders Mega Ovals Large to make an "opening" for my image. Place the die on the cutting plate, then position the background halves, so that the top and bottom corners are where the die will start cutting. I taped them to the plate, so they wouldn't move, then I ran it through the Big Shot.

Be the Person

The pieces were then taped down on top of the image.

Be the Person

I decided to curve the sentiment along the edge of the image. Place it on the acrylic block and bend it slightly before you ink up. I used Memento Rich Cocoa to stamp with.

Be the Person

Next step was to "give a dog a bone!" In fact he got three! I had little white bone brads, so I dipped them on my Versamark pad and then with tweezers dipped them into Vintage embossing powder and heat set them. They were then added to the image.

Be the Person

Be the Person

I attached the card front to a piece of 6" x 6" cardstock edged with 1/4" Tear-ific TapeSparkling Sands was then applied to the remaining sticky edge to finish off my card today. Not sure what that little speck is on the leash. Didn't notice it until now, but it's not on the card!

Be the Person

I'd like to join in the following challenges:

Hope you've enjoyed my share today,

Hugs,

Shona

Thursday, July 28, 2016

DANCING MILDRED

Hi there, 

Today I'm here to share a card using the July reveal set: Milton Catching Snowflakes. I chose to repurpose the stamp:

Dancing Milton

I matched my dancing giraffe with a saying from the Spring Time Spunky set, added a fuzzy giraffe background and some purple tulle for a totally different look. I began with the background. Taking a piece of yellow cardstock, I applied a 4 1/2" x 6 1/2" piece of Super Adhesive Sheet. After removing the protective backing I applied Mimosa Sparkle N Soft. 


Then I applied Memento Rich Cocoa ink to the raised patches on the inside of the Darice Giraffe embossing folder and ran the top half of the fuzzy cardstock through the embossing machine, then reinked the patches and ran the bottom half through.


Here is the finished background:

Dancing Milton

Milton was stamped on white cardstock in Versamark and heat embossed with Teddy BrownCopics were used to color. Sparkling Coffee Sparkle N Soft was applied to the patches with Brushable glue.

Dancing Milton

Dimensional Glue was then applied to the hooves. This was then set aside to dry.

Dancing Milton

I stamped the sentiment in Versamark on white glossy cardstock and heat embossed with Sienna. The Tuscany EP's are my go to detail embossing powders, which I use a lot on sentiments. The saying was cut up as shown to be attached to the card with foam squares. When the glues were dry, I added the velvet glittersHyacinthOrchid Rose and Ballerina, to the scarf, using the glue pen - Milton becomes Mildred!!

Dancing Milton

Spellbinders Mega Ovals Large was used to cut out the giraffe and before removing the die I sponged some Memento Cantaloupe ink around the image.

Dancing Milton

The background was layered to a piece of mustard cardstock, edged with Memento Rich Cocoa ink, before being layered to a white card base. I then attached a piece of purple tulle to the back of the image before attaching both the cut up sentiment and image with foam squares as shown.

Dancing Milton

That finishes my project for today. Hope I've inspired you to try out some of the Sparkle N Softs.

I'd like to enter my card in the following challenges:
Crafty Sentiments Designs - Animals Challenge
Simon Says Stamp - Monday Challenge: Add some texture


Hugs,

Shona

Thursday, June 4, 2015

BRUSHO'S BLOOM!

Hi there,

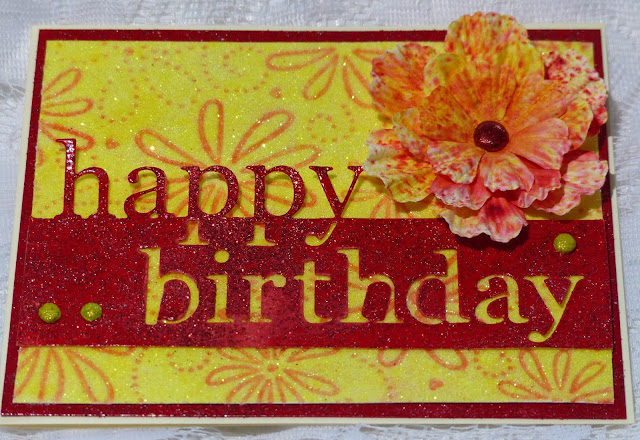
Things have been a little hectic around here for the last month, so I've barely been able to keep up with my stamping "duties". The end of the school year always does that to me and this year although I've not got proms or graduations for any of my kids, there is plenty volunteering activities to take care of. Today's card was put together for my Sister-in-Law using the Memory Box Grand Happy Birthday die, a couple of  Brushos, two embossing powders and a Sparkle N Soft from Sparkle N Sprinkle.


I cut a 4" x 5 1/4" piece of Super Adhesive Sheet. I removed the protective backing and covered the entire piece with Sun Dazzle Sparkle N Soft. Next I ran it through the Darice Daisy and Swirl embossing folder, which had been inked on the inside with Memento Lady Bug ink. There is a detailed tutorial on how to make these flocked backgrounds here.


Next I cut out the Happy Birthday die from white cardstock, covered it in Versamark ink and heat embossed the entire piece with Firecracker Red.

Dandy Dandelion and Firecracker Red embossing powders were used to bling up the silver brads. 


The flower was three Prima flowers layered on top of each other, after I had spritzed them with water and shaken the Brusho Crystals on them. Another spray of water and then they were dried with the heat tool, to compliment the colors of the card.


The card front was put together using the brads to hold everything in place. It was then layered to a piece of white cardstock edged with Versamark and heat embossed with the Firecracker Red. It was this was then layered to a cream card base. 


I'd like to enter this card in the Scrapy Land: Challenge 19 - Use a die cut that Scrapy Land carries.

Hope you've enjoyed my quick share with you today. 

Till next time,

Shona

Sunday, May 31, 2015

SPARKLE N SPRINKLE'S JUNE 1ST REVEAL

Hi there and welcome to the June 1st Reveal.


We have THREE new stamp sets to share with you today.  These new sets are 20% off until June 3.  So once you finish the blog hop, head on over to the store and start shopping.  All of the new sets are available on cling mounted rubber or as a digital image.  Ballet 709 is the stamp set featured with this month's Technique Video Kit.

The sets are:

Ballet 709   (digi version DIGI709)
Hearts Like Dogs 711   (digi version DIGI711)
Life Is Better 712   (digi version DIGI712)

On June 3, one GRAND PRIZE WINNER will be selected from the comments left on the Designers' blogs.  Please leave a comment with each Designer in order to be eligible for the Grand Prize.  You never know who the Mystery Designer will be that has the winning comment.

The Grand Prize Winner will receive all of the new stamp sets released this month (or the digi version, if preferred) and will be announced on June 3 on the SNS Facebook page, the Designer's blogs, and here on the SNS Blog.

In addition to our regular Designers, two of our 2015 Guest Designers, Diane and Ashley, are with us again this month.

The Blog Hop order this month is:


(*Tip: if you have difficulty with a particular link, try clicking on the Designer's blog title to send you to their Home page.)

We love reading your comments and hope that we have inspired you as well.  If you can not leave a comment for some reason, please email icinganne@yahoo.com with your comment and the name of the blog or the Designer you are commenting about.


The Sparkle N Sprinkle Creative Challenge also begins today.  There are lots of prizes and recognition badges.  Come check out how you can become a SNS Featured Artist as well.  The theme is always Anything Goes using Loose Glitter, Embossing Powder, and/or Flock.


We hope you enjoy the New Reveal Blog Hop as much as we do.  Thanks for joining us and remember to comment on each of the Designers' blogs to be eligible for the Grand Prize.  
Last month Belinda was the Mystery Designer with the winning comment.  Wonder who it will be this month????

I especially love the two new doggie sets this month, and couldn't resist using some flocking not only on the fluffy pup but went fuzzy with the background too!


I stuck a piece of Super Adhesive Sheet to white cardstock then peeled off the protective backing and applied Snow White Flocking, burnishing it in with my finger. The fluffy pup from the Hearts Like Dogs Set 711 was then stamped in Memento Tuxedo Black ink and fussy cut. I highlighted the white flocking using Copics W7, W5, W1 and R21. Here is the tutorial on how to accomplish this look. I find just using the side of the Copic on top of the flocking gives the best results.  Do not try to color like you would normally blend your Copics - this will result in "rubbing" a hole in the flocking. You can find a complete tutorial here for this technique.


So then, on to the background! I loved the saying in this set - and it just barked out that it needed to have hearts somewhere. Keeping in the warm and fuzzy mood I thought about a flocked embossed background.


I flocked up 3 3/4" x 5" piece of  Super Adhesive Sheet, attached to a piece of white cardstock, with Snow White flocking and then ran it through the embossing machine with the Cuttlebug Heart Blocks embossing folder, which had been inked on the inside with Memento Rose Red Ink. See here for a complete tutorial. The fuzziness of the dog and the background show up quite well in the photo below:


The sentiment was stamped in Versamark and heat embossed with Belgian Cream. I also heat embossed the two little bone brads with Vintage embossing powder before attaching them to the embossed Spellbinders Mega Oval die cut. 

The ribbon with paw prints was pulled gently through a Memento Angel Pink Ink Pad to give it a little pink hue and was attached to the back of the card front. The sentiment and pup were attached with Dimensional Dots and the little paw brad was attached before layering to a brown cardstock and then to a white card base.


Thanks for stopping by today, hope you've picked up some inspiration from the designers this month. Still two more to come - next up is the very talented Eret!

Till next time - sending warm and fuzzy hugs,

Shona

Wednesday, July 16, 2014

MY FIRST PUBLISHED ARTICLE!

I apologize for being MIA over here for a while. This last month has been so hectic. Knowing it was going to be crazy, good old Donna suggested I take a couple of months off from my designer duties over at Sparkle N Sprinkle. It was definitely a wise decision. I have been doing very little stamping, except for the graduation cards, as they were needed - two minutes before they left the house - not even time to take a photo!! 

Anyway, yesterday the mailman brought me a lovely surprise. A complimentary copy of the August/September issue of Scrap and Stamp Arts.  


My article  "Fun with Flocking" appears on page 31. Here it is - I hope you can read it? 


The Tulip Trio card is the one that I sent to Edith!

Till next time,

Big hugs,

Shona


Thursday, April 17, 2014

WHEN SKIES ARE GRAY!

OK, so we had 70 degrees at the weekend and then snow yesterday, three days later! Really? The poor daffodils have been whipped by the wind, and are looking a little droopy as a result, but hopefully they'll perk back up, as our temperatures are supposed to gently increase over the next week. 

Last week I left you with a sneak peak of another card that used the April Shower's Set from Sparkle N Sprinkle:


I used Dimensional Glue to get the "wet look" for my orange brolly and wellies and added some Waterscape and Cloud Nine Glitter with the Sakura Glue pen for the sparkle on the yellow umbrella and the puddle.

I had made a flocked background using the Darice Heart Embossing Folder with Sun Dazzle Sparkle N Soft and Lady Bug Memento ink. If you missed the tutorial on the flocked backgrounds - it can be found here

Doesn't the top photo look as though the heart center is raised? Funny how the camera can play tricks! Here is what it really looks like:


The Spellbinder's Scalloped heart was cut from the center of the flocked background and then I put the smaller red heart behind it. The image was stamped in Memento Tuxedo Black and colored with Copics. The sky and puddle were sponged with Memento inks.

The image was attached to a yellow card base and then the flocked piece was layered over the top with dimensionals. Sentiment was stamped on yellow card stock in Versamark and heat embossed with Detail Black. I cut out the saying using the same scalloped heart die and then cut along the top and bottom of the sentiment and edged it with the Lady Bug ink.


I love this little SNS set - so appropriate for this time of year. Just think of all the May flowers these April showers will bring! Full directions for the card, if needed, can be found in the Sparkle N Sprinkle Gallery.

I think I may have found the perfect challenge for this little card - it's with Stampotique Designers Challenge, April Showers!

Hope you have a great week and that if you do get caught in an April shower that you've got an umbrella handy!

Hugs,

Shona

Thursday, March 27, 2014

CARDINAL JOY!

Hi there,

I'm back today to share with you another sample of my flocked backgrounds. For this one I ran a piece of Sticker Paper applied with Palm Leaf Flocking, through the Sizzix Plaid embossing folder inked with Rhubarb Stalk Memento ink. The full tutorial for this technique can be found in the Tips and Techniques section.


I used another of the March Reveal Sets, A Winter Cardinal, Set 518. I stamped the image in Black StazOn and used watercolor crayons with a Dove Blender Pen to color. I fussy cut the image and applied Dimensional Glue to the beak and when it was dry I went over it with an orange Copic.

The Gypsy Red Velvet Glitter and the Green Iris Glitter was added to the image using the Sakura Glue Pen.


"Joy", a chipboard word, was heat embossed first with Firecracker Red and then I went over it and heat embossed with Green Marbled Christmas, love the mottled effect these marbled embossing powders give!


I tied up my bow and wrapped it around the flocked background and layered the background to red card base edged with 1/4" Tear-ific Tape. Sparkle N Soft Cherry Sparkle was then applied to the exposed sticky edge.

I stuck some Tear-ific Tape to red cardstock and then punched out a circle, removed the protective layer from the tape and stuck "Joy" to the center. Cherry Sparkle was again added to the exposed tape. I layered that with dimensionals to another punched red circle, which had been attached to the center of the bow with a brad. You can see this in the photo below. The image was then also added to the cardfront with dimensionals to finish off the card..


If you need further instructions, you'll find them in the gallery, right here. Hope you've enjoyed my share for today. Come back and visit me soon.

I'd like to enter this card in the Crimbo Crackers' Challenge, where it is Anything Goes Christmas.

Hugs,

Shona

Thursday, February 13, 2014

PANDAS IN THE SNOW!!


Hi all, and welcome to ANOTHER snow day in Martinsville, New Jersey!


This is what I woke up to this morning!  That's my stamping room over THERE! So after shoveling enough room for my neighbor's little 20 year old dog to go potty, I ice-picked my way back up our drive-way! I made a skinny little path to the garage door so that I could go up and put the heat on (there was no way I was getting to it from the side door!) I let it heat up and then ....

after an hour I went back out the side door of the house to this:


Wait a minute, I thought I said I'd already shoveled a path an hour ago?  Oh yes, I did - it's still coming down!! 

So up to the stamping room I went, where I have been experimenting over the last couple of days with some flocked backgrounds. I played for four hours!

I'm not going to share all the samples with you today.  There will be a full tutorial done over at Sparkle N Sprinkle at some point, but I was so excited,  I just had to make one card so that I could show off at least one of these backgrounds for now!

I was in snow mode - OBVIOUSLY! Who wouldn't be after the "fun" winter we've been having? So Panda's came to mind!!!! ... so what better background than bamboo?


What do you think? So easy, with lots of texture. A Super Adhesive Sheet, an embossing folder, some flocking and a dye ink pad and that's all there is to it!

Here is what you do. Take the Super Adhesive Sheet and cut it to 5 1/4" x 4", remove the protective backing and add it to cream cardstock. Cut off the edges of the cardstock, that's easier than trying to fit the SAS onto the specific cut piece of cardstock. 

Remove the protective backing and add Palm Leaf flocking to the entire piece. Ink the inside of the Darice embossing folder with Memento Rich Cocoa Ink pad:


Close the inked side over the flocked side and run it through an embossing machine:


So much texture! OK, then I got totally carried away and made seven other backgrounds, before I ran out of Super Adhesive Sheets!  But THERE'S MORE - you can do the same thing with Sparkle N Sprinkle's Sticker Paper! However, Sticker Paper is not double-sided, so one thing that you cannot do is stick it down to a colored card base, before flocking. I mean, you can do it, but the color won't show under the flocking. 

Confused? (I know I am!) Here are a couple of examples:

The one on the left is done with Super Adhesive Sheet on yellow cardstock, with Sun Dazzle Flocking and Memento Lady Bug ink. The one on the left is done with Sticker Paper, taped down to white cardstock, but with the same flocking and ink:


The left hand side is much more vivid, but actually in this instance - I happened to like the right hand side (the Sticker Paper) version, because of the side of the embossing folder inked!  Did you notice that they are positive and negative? Yep, by changing the side of the folder you ink on - changes the outcome!! See the endless possibilities with this technique?

OK? .... and now back to pandas! 

I used Sparkle N Sprinkle Sets 465: Panda's Birthday to compliment my bamboo background.


I wanted to let the background really be the focus of this card, so tried to keep everything else minimal. Just stamped the pandas with Memento black ink and colored the bamboo with Copics, adding a little Green Iris glitter to the bamboo. The handmade ribbon tag was stamped with Versamark and heat embossed with Black Detail embossing powder. A little Memento Bamboo Leaves ink was added to the edges of the tag. The image and tag were both attached to the background with dimensionals and then layered to a black card base. 

So where are the pandas in the snow? Funny you should ask! 


Till next time, keep warm,

Hugs,

Shona